Plenty of tech YouTube channels have taken a plunge into daily-driving Linux. And I’d actually been wanting to do so for the longest time. The holdup hasn’t been any specific requirements. I need Windows for some things, so dual-booting was part of the intent.
Which, up front, I’ll say that if you want to dual-boot Windows and Linux, get one drive for each, install Windows first and get it completely updated, set this setting in the registry, then install Linux.
Anyway… The holdup has actually been the distro.
I’ve been using Linux in virtual machines for… years using VirtualBox on Windows – and briefly when using VMware and ProxMox on a server. And that’s a great way to try out new distros and compartmentalize projects. For example, I created a Linux Mint virtual machine with VS Code for working on the theme I mentioned in this article. Everything was self-contained, separate from my Windows environment. And with bridged networking, I could still test the theme in my Windows browser and on my phone.
So before going further, let’s address the elephant in the room: Windows 11.
Why do I still need Windows 11?
Two things: games and photography.
On the first, while there have been significant leaps in Linux gaming, courtesy of Valve’s work with Proton, Steam isn’t the only service where I have games. I also have games through Epic, Ubisoft Connect, EA Origin, Bethesda, Battle.net, GOG, and the Rockstar Social Club. And getting games from those clients working on Linux can be… interesting, to say the least.
But with the light years leap Valve made for Linux gaming with Proton and Steam, I would not be surprised if Epic is actively developing a Linux client if, for no other reason, to get their client on the Steam Deck and other SteamOS compatible devices. Windows-based handhelds can already run… most any game you throw at it – just watch the many reviews Craft Computing has made. But it is definitely in Epic’s interests to get their client on SteamOS. Same with Blizzard with Battle.net. It’s also in Microsoft’s interest to write a Linux driver for the XBox controllers so we don’t have to rely on reverse-engineered drivers from Github. (The PS5 controller apparently works out of the box.)
However (comma)… until the issues with anti-cheat in online multiplayer games are handled in a viable fashion, gaming on Linux won’t be able to completely catch up to Windows.
Overall gaming is just easier on Windows. Period.
I also use WeMod, which absolutely does not work on Linux and likely never will simply due to what it is and how it works.
Yes I use cheats and trainers in offline games. If that bothers you, and you feel you the need to say anything negative about it, kindly fuck off. I’m approaching my mid-40s. I don’t have enough time on my calendar to spend 100 hours trying to finish a game when I’ve got a backlog a mile long and a trainer or cheat will allow me to see it all and do it all in a fraction of that time.
As an example, even with a trainer, it still took me over 30 hours to 100+% Hollow Knight. And I’m considering going achievement hunting on that, which will probably take another 20+ hours with a trainer. And yes, I’m very much looking forward to Silksong.
On photography…
I use the Adobe suite. Photoshop (Ps) and Lightroom (Lr) specifically. Plain and simple, there is currently no viable alternative to either in the open source space. Not at least without making significant sacrifices to my workflows.
“But GIMP!!!”
Shut the fuck up!
GIMP absolutely is very functional, very capable for photo editing and “manipulation”. I do use it on occasion, though not nearly as much since adding Ps to my Adobe subscription in mid-2023.
But Photoshop is just better. Plain. And. Simple. Far superior where it counts. And one place where it absolutely counts is… context-aware heal. Why GIMP’s devs have not integrated this feature is beyond me? Why “integrate” and not “implement”? Because a plugin has been available for over a decade that provides a context-aware fill. Yet that code has never been adapted to provide a context-aware heal that works very similar to Photoshop’s implementation.
In all seriousness, if they were to implement just. that. feature. they’d bring themselves far closer to Photoshop in needed functionality. That feature alone could give them the leg-up they need, especially among photographers who want to walk away from Photoshop and would be willing to walk to something available for free, like GIMP, if only the functionality was there.
“Why don’t you implement it then? After all GIMP is open source!” Because I value my time and will readily use something that already works, even if I have to pay for it, over spending who knows how much time figuring out GIMP’s source code, the plugin’s source code, and how to integrate them.
“Photoshop works in Wine!”
Shut the fuck up! No it doesn’t!
If it can’t be installed and run through Wine in Linux without issues, it. doesn’t. work. Period. So stop claiming it does. And almost no one using Ps or Lr cares about the ancient versions that you claim work. Only Linux fanboys care about that, and only so they can claim Ps and Lr work in Wine.
And darktable is not a viable alternative to Lr. Plus it’s a lot more difficult to use. Yes, I’ve tried it. Lr’s UI and UX is just far superior.
Moving on…
My primary camera is the Nikon Z5 (buy it on Amazon, Adorama, or direct from Nikon). My previous camera was a Nikon D7200. I’ve been relying on Nikon NX Studio for initial image review before importing photos into Lr for editing as it’s pretty snappy. I’ve used RawTherapee, but Nikon’s NX Studio is just… better. It’s from Nikon, so I would expect it to be. Plus it’s also available for free.
But one hard requirement is… functional 10 bit-per-channel color.
I’ve been relying on that for a couple years, since acquiring two 4K televisions that support it. My camera is configured to write 14-bit RAW files. And the aforementioned software I use on Windows can display 10-bit color without question.
The situation is a bit different on Linux.
It appears to be working on Linux from what I can find. Kind of, at least. But it’s seemingly impossible to determine whether it’s enabled, let alone being used. In all seriousness, it should be as easy to find in Linux as it is in Windows. Put it on the same panel for changing the display resolution and refresh rate.
And, lastly, to a lesser extent is Microsoft Office. But most of the functionality I need with the Office suite is available in the browser, so it’s not a major loss. I have a 365 subscription mostly for OneDrive. I know I lose OneDrive syncing, but I still have access to that through the browser. Plus, as mentioned, I’m going to be dual-booting with Windows.
So moving on…
A few things I didn’t need to worry about
Before getting into the requirements for my setup, day-to-day, workflows, etc., let’s first talk about what I need that’s also pretty ubiquitous with Linux.
Browser. Most everything that doesn’t require significant compute performance or an involved UI has moved to the browser. And even some things you wouldn’t expect to be browser-enabled have become so. For example, you can do light photo and video editing in a browser. Google Docs and Office Online have been available for years – though there are plenty of features Office Online does NOT have compared to Microsoft Office that just aren’t really possible in the browser.
And virtually every browser is also available on Linux. Firefox, Chrome, Brave, and even Microsoft Edge. So there’s no worries with using my preferred browser – Brave – on Linux.
Media players. VLC and Plex in particular. (I do have a Plex Pass.) Plex has been available on Linux since the beginning – both the server and client. And I’ve written a few articles about it here. Same with VLC since it relies on other open source projects.
SSH. This is pretty ubiquitous on Linux. I use PuTTY on the regular on Windows to, for example, remote access the server behind this blog for software updates and the like. PuTTY is also available readily on Linux, so no changes needed here.
Virtualization. VirtualBox is readily available. QEMU is there as well with virt-manager, but isn’t just a single-command install, but I might use this as a chance to play around with it since it has some features that VirtualBox does not.
Requirements
So now let’s talk about functionality I need. While that doesn’t necessarily govern what distro to use, it does determine whether this is viable in the first place.
Lean installation. One thing I don’t like is a distro that doesn’t give me the choice of what to install. So if that choice is going to be taken away from me, I want what is installed to be a lean set of packages so I’m not spending time removing a ton of stuff I know I won’t ever use. Needing to remove some things is fine, but needing to remove half of what’s installed… No.
This means… Mint is pretty much out, as are a lot of distros that don’t have a “slim” or “minimalist” option.
I understand wanting to be more welcoming of people new to Linux by giving them an install base with a bunch of software that meets most anyone’s requirements for a desktop. But… please… please also always give a lean install. Seriously Arch should not be the default choice for lean Linux setups. This was one of my gripes finding a Linux distro for Cordelia.
Rolling release. I’ve played around with Arch, and I like the idea of the operating system not having a set version number. Since that means not having to worry about doing an in-place upgrade – though Ubuntu and Fedora make that mostly trivial – or a reformat and reinstall like when I upgraded from Windows 10 to 11. (I did the in-place upgrade first to register my machine against the Microsoft license servers, then reformatted and reinstalled.)
Now this is a risk in part because rolling releases may include experimental, beta, or even alpha packages. But it also means you don’t have to worry about being horribly out of date on some things like… the kernel.
KDE or Cinnamon. Linux Mint is one of my go-to distros for running in a VM, even with all the packages I need to remove, largely because of Cinnamon. Being somewhat lightweight, it works well in a virtual machine. I’ve fooled around with Arch a little as well, using Cinnamon there. But Cordelia runs Manjaro with KDE. And KDE is the window manager I’ve leaned toward ever since first using Linux… over 25 years ago. And in playing around with the latest versions of it recently, I prefer KDE to Cinnamon.
Never liked GNOME. And I avoid distros and install options where that’s the default – meaning Ubuntu is out just on that alone.
I’ve played around with COSMIC in virtual machines, but it’s only in Alpha right now. And as this is for my personal desktop – i.e., mission critical – I need something that’ll just work. This is a workstation, not a bug testing setup.
Password management. I’ve been relying on KeePass for… years. Before I even contributed code for it all the way back in… 2006. And while I’m evaluating switching to Proton Pass, since I use Proton for email, right now I need something compatible with KeePass. And KeePassXC fits the bill, so it needs to be readily available in the package manager as well. I’ve played around with it on Windows, and I definitely prefer its password generator to the one in KeePass, which has some… issues.
What distro?
OpenMandriva ROME. As of this writing, the latest released version is 24.12, though an update will upgrade you to 25.02. And specifically I’m using the Plasma6 on Wayland ISO. I tried to use the “ROME Plasma Slim” from this page but was not able to get the image to boot on my desktop. Worked fine in VirtualBox, though.
But that also meant I couldn’t get the “slim” release I wanted since the “slim” build seems to be new for the 2025 builds. There isn’t a “slim” option for download on their SourceForge. Meaning I’d be removing packages after installing. But while it isn’t “slim”, I’ve definitely seen worse – e.g., Linux Mint.
So why OpenMandriva? I learned about it through Lunduke’s YouTube channel and checked it out.
Mandriva is a spiritual successor to Mandrake Linux. Mandrake was a RedHat derivative, and version 6.0 (Venus) is where I got started with Linux back in 1999. At the time, it was billed as one of the easier Linux distros to get into. And a boxed set of CDs for it was on the shelf at CompUSA, saving me from having to download it later. (Alongside boxed sets for Caldera, RedHat, Debian, and Slackware.)
The last release of Mandriva Linux was in 2011, and OpenMandriva followed a couple years later. There’s also Mageia, another fork of Mandriva, but its last major update was in 2023.
I’ve bounced between various distros over the years, and I’d considered daily driving Linux for a while. So upon learning about OpenMandriva, I tried it out. And it was what finally gave me the push to daily drive Linux for the first time in… well, a long time. I only wish I could get the 25.01 “slim” release working.
What didn’t work out of the box?
I’ve only tried the Plasma6 release, so I can’t speak for anything else. Out of the box, it gives you Chromium plus quite a few other packages I just… removed. There are third party repos for Brave, VS Code, and a few other things.
And one point to the OpenMandriva team as well if they see this: take out the “We strongly recommend…” text from the third-party repository descriptions. If a user enables one of the non-free repos, it’s likely out of necessity – e.g., the Microsoft Teams repo – so your “We strongly recommend” is largely meaningless.
And with VS Code, a LOT of developers are very used to VS Code – like me! – and so will NOT transfer to something else because… why?
Anyway… There isn’t much I have a gripe with here so far, so I’ll just mention the specific packages that gave me issues.
Printing. I have an HP LaserJet P1505 printer that I bought brand new back in 2009. Still on the original toner cartridge, too, which goes to show how ubiquitous printing no longer is. And while the system did detect and appear to install the printer, that didn’t happen.
I needed to install another package called hplip and then run hp-setup after first removing the printer through the System Settings so it could be re-added using HP’s official Linux driver.
Printing still isn’t working properly directly from an application, though. Brave can see the printer but print jobs sent to it get blackholed, and GIMP doesn’t see it at all. I hardly every print anything so I’m not hugely concerned with getting this working. Most of what I print is PDFs, though, which can be printed using HPLIP directly.
Clipboard. Imagine copying something to the clipboard, but it doesn’t actually get copied. So when you try to paste something into a form, for example, it instead pastes something you had previously copied, if anything.
Yeah for some reason I have to clear the clipboard history periodically to keep this from happening. This became especially apparent when trying to use KeePassXC. Where I think I copied the username or password to the clipboard only for… something else to be pasted into the login form. I’m leaning toward that being a problem with Plasma6, since I don’t recall having this issue on Cinnamon. Perhaps I need to downgrade to Plasma 5. I don’t know…
Anyway…
But it’s little things like these which can keep people from adopting Linux for daily use. Since I definitely should NOT have to keep clearing the clipboard to keep using it. Sure with Windows I still needed to download and install a driver for my printer, but then it just… works after that.
And then there’s…
NVIDIA
So this took more than a few tries to get right. And I definitely spent way more time on this than was reasonable.
I’ve used the NVIDIA proprietary Linux driver in the past, too. A LOT. So that I had this much difficulty getting it working on OpenMandriva is either a problem with NVIDIA or OpenMandriva. And I’m leaning toward the latter simply due to a couple quirks I discovered while trying to get this working.
Out of the box, the Nouveau driver does at least provide something to get NVIDIA owners going. But with more advanced setups, the driver’s lackluster performance becomes very apparent. Especially on a system with two 4K monitors like mine.
The OpenMandriva non-free repo does have an RPM for the NVIDIA proprietary driver, but… I was not able to get it to work. So going with the download available straight from NVIDIA, I’ll outline the steps I followed.
Note: make sure to fully update your install before following these steps.
I also highly recommend backing up your boot and data partitions since this… could get messy. Even if you’re operating on a fresh install since restoring a backup might be quicker than reinstalling everything. In my instance, I just imaged the entire drive using dd from the OpenMandriva live USB, copying the image off to Nasira, making restoration as simple as reversing the process while I was figuring out these steps.
First, you’ll need to download the NVIDIA driver package. If you’re on on the OpenMandriva Rock 5.0 distro, go with the “New Feature Branch” version, which is 565.77 as of this writing since Rock is still on the 6.6 kernel as of this writing. But if you’re using Rome, which is the rolling release distro which was recently upgraded to kernel v6.13, the v565 driver will not build so you’ll need the v570 beta driver.
Next up is package installations. You can do this from within the graphical desktop from a command line – e.g., Konsole for KDE Plasma – or reboot to the console.
sudo dnf install clang libglvnd-devel pahole kernel-desktop-devel kernel-source
Notice I did NOT add “-y” to auto-confirm. You need to pay attention to what’s going to be pulled in here, specifically the kernel-desktop-devel package. The version MUST match your kernel. If you’re fully up-to-date, this should be the case. Make sure it is NOT grabbing something newer. If it is, you need to update your packages first.
After this, disable kernel package updates. This is due to a couple additional steps we must take in order to build the kernel modules that absolutely will brick your installation if you allow the kernel packages to be updated. Make this change by running this command:
echo "exclude=kernel*" | sudo tee --append /etc/dnf/dnf.conf
I’ve filed two bugs with OpenMandriva’s GitHub (here and here), so hopefully those will be addressed. Not sure how easy or difficult those will end up being.
So now to overcome the issues I reported in the above bugs:
# Build resolve_btfids and link to it

cd /usr/src/linux-`uname -r | sed -E 's/(.+?)-.+?-(.+)/\1-\2/g'`/tools/bpf/resolve_btfids
sudo make
sudo ln -rs resolve_btfids /usr/src/linux-`uname -r`/tools/bpf/resolve_btfids/resolve_btfids

# Create a symlink for vmlinux

cd /usr/lib/modules/`uname -r`/build/
sudo ln -s /sys/kernel/btf/vmlinux vmlinux
That first line will strip “desktop” from the middle of the kernel version string returned by uname -r, so it should take you right to the kernel source folder for the resolve_btfids tool, which the NVIDIA installer will use as part of building the kernel modules. As of this writing, on my updated installation, uname -r will return 6.13.4-desktop-2omv2590, so that first line should resolve to /usr/src/linux-6.13.4-2omv2590/tools/bpf/resolve_btfids
So after all of this, you’ll want to run the installer. If you have not yet rebooted your system to the console, do so now, then run this when you get settled:
sudo /path/to/NVIDIA_install.run --no-rebuild-initramfs --no-nouveau-check --skip-module-load
Let’s go over the options here.
--no-rebuild-initramfs: the in-built step to rebuild the initramfs will fail on OpenMandriva, so disabling it here to avoid the error message and early abort.--no-nouveau-check: pretty self-explanatory. This won’t check for nouveau, but it also won’t attempt to disable it. We’ll handle that later.--skip-module-load: This will prevent the installer loading the module, which will error out if Nouveau is still loaded, causing the installer to abort early.
During the install, you’ll get prompted for a few things:
- NVIDIA Proprietary or MIT/GPL: Proprietary
- Install 32-bit libraries: Yes. Not sure what uses it, but better to have it and not need it over needing it and not having it
- Register the kernel module with DKMS?: No! Unless you previously installed DKMS for something else, you likely won’t even get prompted for this.
- Configure X automatically: Yes if you’re on X11, No if you’re using Wayland
The installer will dump out some progress messages as it goes and eventually confirm at the end that the kernel module was installed. But you will also get a message about needing to reboot due to Nouveau being enabled.
Don’t reboot just yet! We’ve got one more step: disabling Nouveau. First, create a new file at /etc/modprobe.d/nvidia-proprietary.conf:
blacklist nouveau
options nouveau modeset=0

options nvidia_drm modeset=1
options nvidia_drm fbdev=1
Now, edit the /etc/defaults/grub file. The line you’re looking for begins with GRUB_CMDLINE_LINUX_DEFAULT. Add modprobe.blacklist=nouveau to the end of that string.
Now, a few more commands:
sudo dracut --force
sudo cp /boot/grub2/grug.cfg /boot/grub2/grub.cfg.bak
sudo grub2-mkconfig -o /boot/grub2/grub.cfg
That copy command ensures that your grub config is backed up before it’s overwritten so you can easily recover it using a boot USB if necessary.
And now… Reboot.
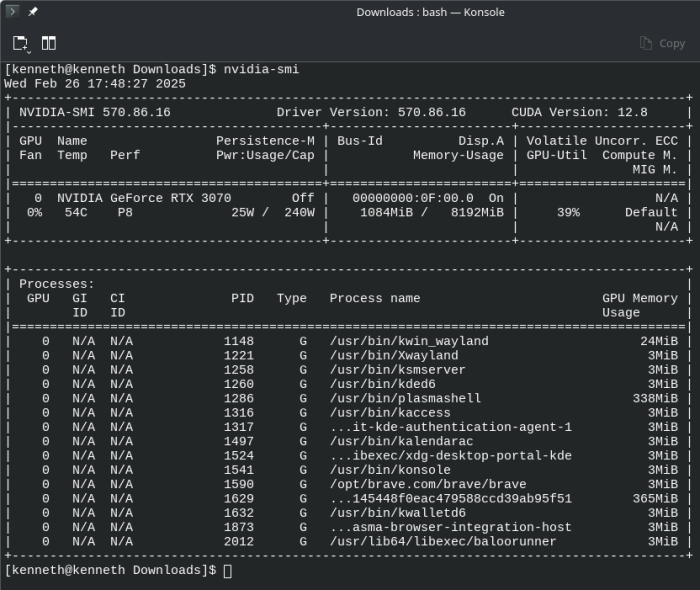
If you did everything successfully, you should be coming back up into your desktop of choice with everything working as expected. Meaning if you have your system configured for auto-login, that should work as before. And you can verify from a terminal that your system is using the NVIDIA driver instead of Nouveau by running this:
lsmod | grep nouveau
If the NVIDIA driver is properly configured and working, you should get a blank result. You should also be able to run nvidia-smi from the command line and have it return details about your card and what applications are trying to use it:
And – holy shit! – that was far more difficult to figure out than it realistically should have been. So be glad you’re reading this so you don’t have to go through the pain – or at least for much longer. These instructions may also work with other distros with some tweaks for distro-specific commands and package names.
Conclusions
So that’s it for now. I’ll probably revisit this some months down the line – especially as package and kernel updates get rolled out along with a new NVIDIA driver release.
I’ve been daily driving Linux for about two weeks as of this writing, so it’ll be interesting going forward. I’ve been back in Windows a few times, but that was mostly as I was figuring out the NVIDIA driver issues and just wanted to break from it. I have VMs under VirtualBox in Windows I need to migrate to QEMU – which that, along with virt-manager – works a LOT better than VirtualBox under Linux. But things for the most part have been… just working.
Once I figured out the NVIDIA driver and realized what was going on with the clipboard.
And again the only reasons I really have for going back into Windows are gaming and photo work along with the very infrequent print job. I can use the HPLIP GUI to print some document types, though, so that’s a workaround for the occasional need to print a shipping label.
So I’ll report back sometime down the line as to how this goes. But so far I’ll likely be sticking with Linux and popping over to Windows only when necessary – e.g., the above-mentioned reasons why I’m keeping it around.

You must be logged in to post a comment.