For the longest time I wanted a KVM connection to my OPNsense router.
I have a KVM-over-IP appliance on my rack. An Avocent MPU2032 I bought back in 2018. (Vertiv, the company that now owns the Avocent brand, discontinued support for it only last year.) And it works very well.
And given where I have my router, hooking all of that in would require running Cat5e to it for the interface module. Up through and across the attic, down into the networking closet, then down through floor to get to the router.
Yeah… no.
There really aren’t many other options for KVM-over-IP for controlling just one machine. Virtually every other KVM-over-IP solution is built with a rack or bank of servers in mind. Since the whole idea of KVM is controlling several computers from one keyboard, mouse, and screen. Making the Pi-KVM project somewhat unique in that. And thankfully in the years since that project started (2019 from what I can find), better options for that have come available so you’re not doing everything DIY.
And you don’t need to rely on the external box, either. Geekworm and blicube have introduced internal options, though designed for a rear I/O slot. Such as the option I chose: the KVM-A8 by Geekworm. (Buy on Amazon, AliExpress, or direct from Geekworm)
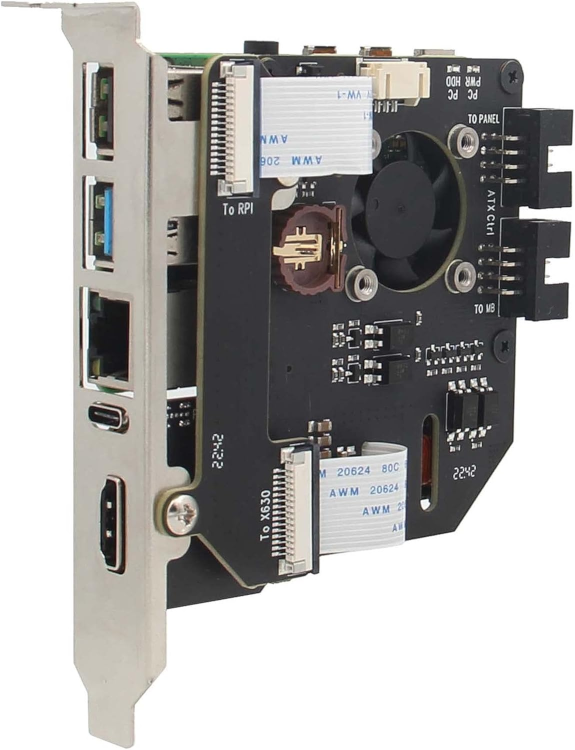
Very convenient
The package includes everything you need, including a 30cm (12″) HDMI cable. Just add the Raspberry Pi 4 Model B, and an HDMI adapter if needed. It’s fairly easy to assemble, though not entirely intuitive.
Geekworm recommends powering this via Power-over-Ethernet (PoE), and I second that recommendation. It’s just a lot more convenient if you have the option since it eliminates the need for an external power supply. It does not require PoE+. An injector (such as this one by TP-Link) is a useful alternative if you don’t have a PoE switch.
I also recommend using Cat6 or better for the Power-over-Ethernet if you have the option, simply to get full Gigabit bandwidth to the Raspberry Pi.
Quick note on the RTC battery
If you can’t find a CR-1220 battery, a CR-1216 will work just fine. So don’t fret if your local battery retailer has CR-1216s but not CR-1220s in stock – e.g. Micro Center. Just pick up a CR-1216.
The only difference between the two is thickness. A CR-1220 is 2mm thick, while a CR-1216 is 1.6mm thick. So 0.4mm. The underside contact for the coin cell has more-than-enough tension to make contact and power the RTC.
Set it up first
Given the target audience for this device, and the Pi-KVM project in general, I really should not have to say this, but I will anyway. And this goes for any Pi-KVM appliance you select: set it up for Pi-KVM before attaching it to or installing it in the system you intend to control. This just ensures you don’t have a one-off dead component on your hands, and that it’ll work with your Power-over-Ethernet setup.
You don’t need to have it connected to the target system to set it up. So take advantage of that. You only need have it powered and connected to your network to finish the setup. Just look for “pikvm” in your DHCP leases list on your router to find the IP or connect to “pikvm.local”.
And make sure to get the base OS completely updated as well. It uses Arch Linux, which uses pacman as the package manager. So to update everything, use these commands:
rw
pacman -Syu
reboot
Then connect it to the system you intend to control with it.
Replacing the SSL certificate
This is only relevant to you if, like me, you have your own SSL CA for your home servers. If you don’t and want to create one, I just followed the instructions on here to create the root signing certificate using OpenSSL.
The Pi-KVM system software uses nginx for the web UI, but the service configuration isn’t at /etc/nginx/.
As of this writing, the server certificate is stored in /etc/kvmd/nginx/ssl. You could just overwrite the public and private keys already there. I dropped in new files, leaving the originals in place, and updated the configuration: /etc/kvmd/nginx/ssl.conf.
When you’re done, restart the kvmd-nginx service.
One small complaint…
It doesn’t fit entirely within one slot width. So whether this will work with your server depends on a few details. In short, you’d want to avoid having any cards in the slot immediately below it.
And I feel this could’ve been avoided with a simple change to its design. The black screws in the above image mark the outline, more or less, of the Raspberry Pi. So if the “hat” board was just an inch longer, they could’ve better accommodated the FPIO without overstepping into the next slot by having the connectors on the Raspberry Pi’s side of the board.
Alternatively, instead of using the 8-pin pin connectors they did integrate, they could’ve used a USB 3.0 type-A female plug, which has 9 pins, or USB type-C. Not having the shroud around the 8-pin connectors might even be enough to give the needed clearance. So next time I open up the router – which will come soon since I do need to change out the front fans – I might just see if I can pull the shroud off the pins.
Alternatively if you can source a Raspberry Pi CM4, Geekworm also makes makes the X652 (buy it on Amazon, AliExpress, or direct from Geekworm), which looks to actually fit within the width of a single slot. It’s also low profile, so can fit in a 2U server with the included low-profile bracket.
Conclusions
Well… not too much to say here other than that it works. And I’ll reiterate that you should use PoE to power this if possible just to make your life a little easier depending on the proximity this will have to any power and the switch.
If you need a KVM-over-IP for just one system, then this will work great and is much more cost effective compared to trying to use a KVM-over-IP solution for multiple systems. It’s only about $100 for everything you need. Just add the Raspberry Pi 4 Model B and microSD card – I used a Samsung PRO Endurance 32GB for mine.
If you need a KVM to handle multiple systems, though, this will NOT be cost-effective in the slightest. Since you’re talking one KVM-A8 and one Raspberry Pi 4 Model B per system you need to control remotely. Plus needing to provide power to all of them – whether through USB-C power adapters or Power-over-Ethernet. Plus unique hostnames for each one. (IPs as well, but most-everyone uses DHCP, so that’s not an issue.)
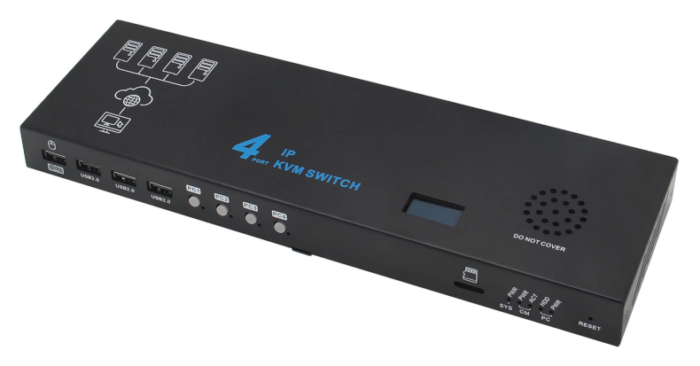
But Geekworm does have a KVM-over-IP solution for up to 4 systems. And I do have one that I ordered in at the same time as the KVM-A8 to replace my Avocent MPU2032 in my rack – which has 32 ports but I’m using only… 3 of them. I’m just trying to source a Raspberry PI CM4 to put it into service. So stay tuned for that review.
You must be logged in to post a comment.