Okay… I decided to give in. I’ve seen Blackout Coffee advertised by a couple YouTube creators I follow. And I’d been… wishy-washy about trying them out given my less-than-stellar experience with Black Rifle Coffee.
But I decided to give in. After looking at their site and seeing they have an espresso blend, I decided to try it.
My… equipment
Espresso machine: ECM Technika IV Profi with VST 18g basket Grinder: Compak K-3 Touch
Blackout’s Pitch Black Espresso is… well… pitch black. “Dark” is a bit… light of a word to describe this.
This is a very dark, very oily roast. Easily the darkest roast I’ve had. Darker still than The Roasterie’s Gotham and Nitro espresso roasts.
It took a few tries to get this dialed in. Largely because it initially would not grind through. This was my fault, though, as the very oily bean seemed to bind onto latent grinds in my grinder. I should’ve run Grindz through before this, but had just run out with my last bag of coffee and neglected to pick up more. (For those in Kansas City, The Roasterie plant off 27th Street typically carries it for less than Amazon.) To get around that, I needed to open the grinder up wide after also dumping out what I attempted to grind.
Anyway… the final dial-in was about 16g with the grind being only slightly coarser than with Messenger’s Relay at 17g. Pulling shots, even while dialing in, I noted a very rich crema.
First latte
16g in, about 35g out on the shot. Milk is A&E Whole Milk. Steamed enough to make about a 16oz latte.
And… smoke… Wow, there’s a heavy taste of smoke and charcoal that penetrates the milk. I’m used to the flavor of the coffee being sweetened by the milk, tempered by it. The coffee flavor blending into the milk. But this charcoal flavor just punches right through.
And lingers on the tongue as well.
Experience through to the end
The smoke and charcoal flavor died off quite a bit during the run through the bag and was not nearly as pronounced toward the end. So it’s definitely most intense at the start of a bag. I typically extract the shot directly into a mug, and I noticed the crema creates a very pronounced concave meniscus. Something I’ve never seen before. (And somehow I remembered that term from my high school chemistry classes before verifying I had it right.)
I also had to back off the dose. I’m not sure what about my initial dial-in landed me on a 16g dose, but I had to back off to about 15.5g on the dose the next day. That proved to be the sweet spot, going for about 32g to 35g out. I did not need to adjust the grind or dose any further beyond that.
The resealable bag Blackout Coffee uses does not have a one-way valve for degassing, so I transferred the beans into an Airscape for storage. And during the time I worked through the beans, I did not notice the beans going stale. They stayed as fresh at the end as I’d normally expect, and was in line with my typical experience with Messenger’s Relay Espresso. Again the only “aging” I noticed was the smoke and charcoal flavors not being nearly as pronounced.
Overall
Overall, it was a pleasant experience with Blackout’s Pitch Black Espresso. The strong smoke and charcoal flavors are not for me. I definitely prefer medium roasts. But thankfully that wasn’t so overpowering it completely turned me off. Though it had no difficulty overpowering the flavor of the milk. I don’t think adding flavor syrups would’ve done much to temper that.
And when you have that strong of a charcoal or smoke flavor, you definitely need to be careful what flavors you pick to avoid creating something… unappetizing. But then if you’re buying this kind of a dark roast, you’re likely not doing any kind of adulteration to it anyway. Instead you’re buying it because you want that smoke and charcoal flavor.
How the coffee performed during the time I had it was most important. It took me about a week to get through the beans, and during that time they stayed as fresh as I’d expect being stored in an Airscape.
So overall if how I’ve described the flavor is something you typically go for, then give it a try. If you’re new to dark roasts, this will probably feel a bit extreme on the flavor spectrum, meaning you’ll either really like or it’ll send you straight back to the medium roasts.
Just make sure that you clean your grinder first before trying to put this through to avoid the issue I described above.
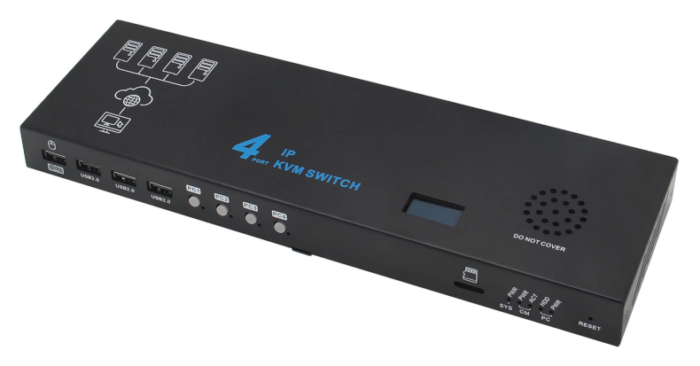
As said in my review of the KVM-A8, I picked this up at the same time, though I had to wait longer to put it into service. At the time I bought the KVM-A8, I already had a Pi 4B in hand, but needed to wait when it came to getting a CM4.
So now that I was able to put it into service, time to talk about it…
You have the option to buy the X680 on its own or in several kits depending on how many systems you need to control via ATX. In my instance, I needed support for 3 systems: Nasira, Cordelia, and my mail server. That was “Kit C” (on Geekworm’s site, “X680-X630-A5-3” on AliExpress), which comes with three X630-A5 boards and requisite cable harnesses, along with three 1m Cat5e cables.
If you buy the X680 on its own, you get 4 USB 2.0 cables plus the power brick, which will still allow you to control up to 4 systems, but you won’t be able to remotely control the power and reset function.
It does NOT come with any HDMI cables.
Note: buying the kit with the X630-A5s is less expensive than buying the X630-A5s later. So depending on where you’ll be deploying this, it may be worthwhile grabbing the full kit with four (4) X630-A5s now so you won’t have to buy them later if you anticipate needing to control four systems eventually.
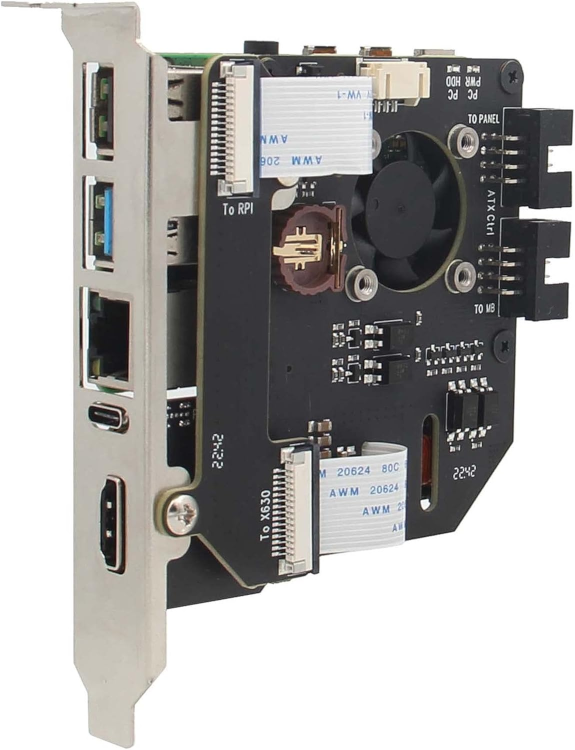
You have three boot options: NVMe SSD, microSD, or onboard eMMC. I think most everyone who uses this will be using either microSD or eMMC, though, so it’s rather… strange they included an NVMe slot. Sure, NVMe is more versatile compared to microSD, and probably more so compared to the onboard eMMC. But getting it set up is a little bit of a chore.
And it’s not like you need the write endurance of an NVMe since the Pi-KVM OS operates with the file system on read-only.
Initial impressions
I paired mine with the CM400200, which is the 2GB “Lite” version of the Raspberry Pi CM4, meaning no onboard eMMC and no WiFi.
Again, the X680 gives you the option to boot from NVMe or microSD along with the onboard eMMC (if your CM4 has that). I went with the same microSD card I used with the KVM-A8: Samsung PRO Endurance 32GB. It was just… far easier doing that. If your CM4 has eMMC, it must be 16GB to use it as the boot device.
Like the KVM-A8, this does also have an onboard real-time clock which needs a CR-1220 or CR-1216 battery. It’s the same socket used in the KVM-A8, which I already said will accept a CR-1216 without issue.
The main unit is also 30cm x 9cm (12″ x 3.5″) and about 2.75cm tall (a hair over 1″). This isn’t large enough to fill a 1U space and does not come with rack ears – nor does it have any screw holes for attaching them. So you will need a shelf if you’re putting this in a 19″ rack.
Unfortunately this does NOT support Power over Ethernet. But even if it did, I’m not sure I would want to use it via PoE anyway. The KVM-A8 being powered via PoE is perfectly sensible since it’s inside my OPNsense router. This is a purely external appliance.
Like with the KVM-A8, I set this up before connecting anything. This also gave me a chance to replace the SSL certificate and make sure it had all needed updates.
Given the commands to set this up, I actually wish Pi-KVM included a Bash script that could be run instead. Perhaps I’ll look into writing that later. It would just make it a lot easier on everyone for the setup instructions to include “run setup_pivkm.sh and follow the prompts” for the most common setup and customization steps.
X630-A5 and low-profile servers
Why is there no low-profile bracket available for the X630-A5?
That’s a bit of a pain since my mail server is in a 2U chassis. So to get this to “work”, I just removed the card from the full-height bracket and… attached it to the side of the chassis using VHB with the Ethernet cable just… dangling through the back.
In all seriousness, how could they NOT anticipate needing a low-profile bracket? PiKVM has a low-profile bracket for their ATX control board – though it’s odd they sell that separately. So Geekworm should get on that.
And I wonder if the Pi-KVM ATX control board works with the Geekworm appliance, if the pinouts match.
Display troubles
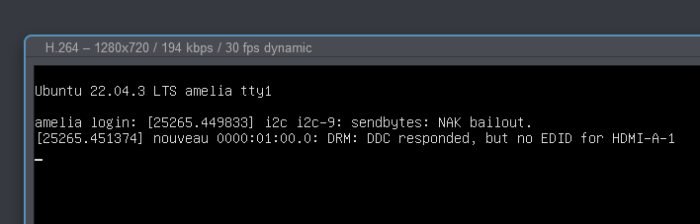
Getting this to work was… interesting. The mail server worked fine pretty much out of the gate. It did have this interesting error, though:
Nasira and Cordelia? Not so much.
Powering off the KVM and powering it back on with everything connected brought Nasira around. So there must’ve been some kind of hiccup with whatever video driver TrueNAS is using. (Which I’d expect it to be a generic graphics driver, not anything specific to any chipset.)
Cordelia was a bit more involved. And it’s safe to say the NVIDIA driver was the issue.
I have a Docker container for Frigate, and a GTX 1060 for video transcoding. And that video transcoding requires the NVIDIA proprietary driver. But I had installed the driver via packages from Ubuntu’s repository. This had… kinda worked with the Frigate container. And removing the NVIDIA proprietary driver packages brought Cordelia around to cooperating with the KVM – though also presenting the same EDID error as the mail server.
Now to figure out how to get the NVIDIA proprietary driver working here. Provided that’s possible. Obviously I can’t speak to the AMD drivers since the systems I’m controlling don’t have AMD cards, and I don’t have any spare AMD cards to test.
Update (2024-08-01): I think I have this figured out. When you’re powering on a system connected to the KVM, the KVM switch needs to be set to the input you’re turning on. For example, I have Cordelia on Input 2. If I don’t have the KVM set to Input 2 when I turn on Cordelia, I’ll never get a picture until I power off Cordelia and then power it back on with Input 2 selected. A reset doesn’t appear to change this. Geekworm has since released a new version of the X680, so hopefully that little issue has been resolved.
Conclusions
So first point of order: if the servers you will be controlling have an NVIDIA card running Linux, don’t use the proprietary drivers. And if you must, you’ll likely be better served using one of the other single-machine Pi-KVM options available. I can’t speak to Windows servers for this, so your mileage may vary.
(Note: I’ll update this article if I manage to get the proprietary NVIDIA driver working, but for the time being I’m leaving things as-is.)
Though if you need to control a mix of Windows, Linux, and Mac servers, you may be better served doing this:
And I considered doing this as well when I ran into the above-mentioned frustrations.
But the cost of the standalone Pi-KVM v3 HAT and the ezCoo KVM he used surpasses the cost of the the Geekworm X680 kit. Though if you use Geekworm’s KVM-A3 (buy from Amazon, AliExpress, or Geekworm), you’re about breaking even. But having an all-in-one solution I feel is better.
And once I got past the hiccups… it works.
Now does it work better than what it’s replacing? Yes and no.
There’s much higher fidelity in the video feed going to the browser with the Pi-KVM for… obvious reasons. Keyboard and mouse input latency is much better than the Avocent MPU. The Avocent MPU also had this weird… offset issue with the mouse cursor that is definitely non-existent with the Pi-KVM. Never did get that fully troubleshooted.
But I’m not going to be controlling these servers through the KVM the vast majority of the time. I use the TrueNAS web interface for Nasira and SSH for the mail server and Cordelia the vast majority of the time.
While a KVM-over-IP solution can be used for remote server management, it isn’t the most efficient means. Windows servers can be remote-administered using Remote Desktop (RDS), VNC, or one of the several remote admin products available. Most Linux servers are remotely administered via SSH.
So why have a KVM-over-IP solution? So you can see that a server comes back up when you reboot it – e.g. after doing package updates – and troubleshoot it remotely if it doesn’t. The ability to control the power and reset remotely on all connected servers is a nice bonus with the Geekworm X680.
Driver issues aside, my only real gripe with this is cable bulk. Since you have three cables per system you’re administering: USB, ATX (Cat5E), and HDMI. Cable sleeving can help tame the madness. I just wish it was as easy making custom-length USB and HDMI cables as it is Cat5E.
Which is the advantage of the Avocent MergePoint Utility KVM-over-IP solutions. The individual control modules contain both USB and video, and talk to the main appliance over Cat5E. One module – one cable – per system you’re administering.
While there are other KVM solutions with combined cables, the Cat5E means you can build your cables to whatever length you need. The modules that went to the mail server and Cordelia ran off short patch cables typically used to connect a patch panel to a front-facing switch. Plus they have modules for serial consoles for switches and uninterruptible power supplies.
Adding something like that to a Pi-KVM would take a LOT of effort. (Provided Vertiv doesn’t own any patents on that.) But that’s largely not worth it since the Pi-KVM is built to control just one system, the Pi-KVM OS written for controlling just one input. A substitute for IPMI, not a replacement for existing KVM-over-IP solutions designed from the outset for handling multiple servers.
That Geekworm was able to make the X680 is remarkable taking this into account. And it works… reasonably well.
Would using the ezCoo KVM with the PiKVM v3 HAT, or similar, or the v4 Plus work better? Likely. But simply due to the external KVM being what’s switching between systems.
Having an integrated solution, I feel, is easier to deploy and manage. And with the Geekworm X680, you also have remote power and reset control. The ezCoo KVM doesn’t have that function. So if you require that, you’ll have to figure something out for it. And the Avocent MPU also doesn’t have that.
So, in the end, I would still recommend this. If your use case is like mine, and you’re controlling a bunch of Linux servers without the need to work with a graphical desktop, this should work fine for you.
For the longest time I wanted a KVM connection to my OPNsense router.
I have a KVM-over-IP appliance on my rack. An Avocent MPU2032 I bought back in 2018. (Vertiv, the company that now owns the Avocent brand, discontinued support for it only last year.) And it works very well.
And given where I have my router, hooking all of that in would require running Cat5e to it for the interface module. Up through and across the attic, down into the networking closet, then down through floor to get to the router.
Yeah… no.
There really aren’t many other options for KVM-over-IP for controlling just one machine. Virtually every other KVM-over-IP solution is built with a rack or bank of servers in mind. Since the whole idea of KVM is controlling several computers from one keyboard, mouse, and screen. Making the Pi-KVM project somewhat unique in that. And thankfully in the years since that project started (2019 from what I can find), better options for that have come available so you’re not doing everything DIY.
And you don’t need to rely on the external box, either. Geekworm and blicube have introduced internal options, though designed for a rear I/O slot. Such as the option I chose: the KVM-A8 by Geekworm. (Buy on Amazon, AliExpress, or direct from Geekworm)
Very convenient
The package includes everything you need, including a 30cm (12″) HDMI cable. Just add the Raspberry Pi 4 Model B, and an HDMI adapter if needed. It’s fairly easy to assemble, though not entirely intuitive.
Geekworm recommends powering this via Power-over-Ethernet (PoE), and I second that recommendation. It’s just a lot more convenient if you have the option since it eliminates the need for an external power supply. It does not require PoE+. An injector (such as this one by TP-Link) is a useful alternative if you don’t have a PoE switch.
I also recommend using Cat6 or better for the Power-over-Ethernet if you have the option, simply to get full Gigabit bandwidth to the Raspberry Pi.
Quick note on the RTC battery
If you can’t find a CR-1220 battery, a CR-1216 will work just fine. So don’t fret if your local battery retailer has CR-1216s but not CR-1220s in stock – e.g. Micro Center. Just pick up a CR-1216.
The only difference between the two is thickness. A CR-1220 is 2mm thick, while a CR-1216 is 1.6mm thick. So 0.4mm. The underside contact for the coin cell has more-than-enough tension to make contact and power the RTC.
Set it up first
Given the target audience for this device, and the Pi-KVM project in general, I really should not have to say this, but I will anyway. And this goes for any Pi-KVM appliance you select: set it up for Pi-KVM before attaching it to or installing it in the system you intend to control. This just ensures you don’t have a one-off dead component on your hands, and that it’ll work with your Power-over-Ethernet setup.
You don’t need to have it connected to the target system to set it up. So take advantage of that. You only need have it powered and connected to your network to finish the setup. Just look for “pikvm” in your DHCP leases list on your router to find the IP or connect to “pikvm.local”.
And make sure to get the base OS completely updated as well. It uses Arch Linux, which uses pacman as the package manager. So to update everything, use these commands:
rw
pacman -Syu
reboot
Then connect it to the system you intend to control with it.
Replacing the SSL certificate
This is only relevant to you if, like me, you have your own SSL CA for your home servers. If you don’t and want to create one, I just followed the instructions on here to create the root signing certificate using OpenSSL.
The Pi-KVM system software uses nginx for the web UI, but the service configuration isn’t at /etc/nginx/.
As of this writing, the server certificate is stored in /etc/kvmd/nginx/ssl. You could just overwrite the public and private keys already there. I dropped in new files, leaving the originals in place, and updated the configuration: /etc/kvmd/nginx/ssl.conf.
When you’re done, restart the kvmd-nginx service.
One small complaint…
It doesn’t fit entirely within one slot width. So whether this will work with your server depends on a few details. In short, you’d want to avoid having any cards in the slot immediately below it.
And I feel this could’ve been avoided with a simple change to its design. The black screws in the above image mark the outline, more or less, of the Raspberry Pi. So if the “hat” board was just an inch longer, they could’ve better accommodated the FPIO without overstepping into the next slot by having the connectors on the Raspberry Pi’s side of the board.
Alternatively, instead of using the 8-pin pin connectors they did integrate, they could’ve used a USB 3.0 type-A female plug, which has 9 pins, or USB type-C. Not having the shroud around the 8-pin connectors might even be enough to give the needed clearance. So next time I open up the router – which will come soon since I do need to change out the front fans – I might just see if I can pull the shroud off the pins.
Alternatively if you can source a Raspberry Pi CM4, Geekworm also makes makes the X652 (buy it on Amazon, AliExpress, or direct from Geekworm), which looks to actually fit within the width of a single slot. It’s also low profile, so can fit in a 2U server with the included low-profile bracket.
Conclusions
Well… not too much to say here other than that it works. And I’ll reiterate that you should use PoE to power this if possible just to make your life a little easier depending on the proximity this will have to any power and the switch.
If you need a KVM-over-IP for just one system, then this will work great and is much more cost effective compared to trying to use a KVM-over-IP solution for multiple systems. It’s only about $100 for everything you need. Just add the Raspberry Pi 4 Model B and microSD card – I used a Samsung PRO Endurance 32GB for mine.
If you need a KVM to handle multiple systems, though, this will NOT be cost-effective in the slightest. Since you’re talking one KVM-A8 and one Raspberry Pi 4 Model B per system you need to control remotely. Plus needing to provide power to all of them – whether through USB-C power adapters or Power-over-Ethernet. Plus unique hostnames for each one. (IPs as well, but most-everyone uses DHCP, so that’s not an issue.)
But Geekworm does have a KVM-over-IP solution for up to 4 systems. And I do have one that I ordered in at the same time as the KVM-A8 to replace my Avocent MPU2032 in my rack – which has 32 ports but I’m using only… 3 of them. I’m just trying to source a Raspberry PI CM4 to put it into service. So stay tuned for that review.
Double-entry accounting doesn’t have much in the way of rules. But one is paramount: all debits in a transaction must equal all credits. But there is no limit to the number of debits or credits you can have. No limit to how many accounts you’re referencing.
Income and revenue transactions are many source to one destination. Transfers are one source to one destination. (Splits are allowed, but they must all have the same source and destination.) Expense transactions are one source to many destination.
The thing is…. anyone’s paycheck breaks this.
Your paycheck is your gross pay (income), deductions (expenses), and your net pay (asset). You can’t have all of that in a single revenue transaction in Firefly III. Firefly’s documentation says the source accounts for the splits in a revenue transaction must be revenue accounts, and the destination is an asset or liability account.
One income (possibly more) to many expenses and at least one asset, the latter of which could include splitting deposits between multiple accounts (e.g. direct deposit to savings as well as checking) and/or retirement account contributions.
The only way around this is several transactions involving an intermediate asset account, which we’ll call simply “Paycheck” for this example.
Deductions. Expense transaction – source: “Paycheck”, destinations: accounts for your deductions (e.g., taxes, insurance, etc., but NOT including retirement account contributions)
Net pay. Transfer transaction – source: “Paycheck”, destination: bank account
Split deposit. Expense transactions – source: “Paycheck”, destination: other bank accounts
And whatever other transactions you’d need to account for everything. If you have employer-paid benefits or an employer 401(k) match, you could include that as separate splits on the main “gross pay” transaction.
In my case, my paycheck has three incomes: salary, employer 401(k) match, and employer-paid benefits.
Anything that breaks the one-to-many or many-to-one rule in Firefly III requires using intermediate accounts. And, as already mentioned, anyone’s paycheck is a ready item showing this. And on the expense front, if you’ve ever split payment on an expense, such as using a gift card or gift certificate to cover part of it, you’re breaking the one-source, many-destination rule for expense transactions.
This goes against double-entry accounting.
There is no rule in double-entry accounting that expense transactions must be only from a single source. There is no rule that revenue or income transactions must be only single destination. So Firefly III shouldn’t have this limitation if they’re going to say it “features a double-entry bookkeeping system”.
But I can… somewhat live with that. Cloning transactions means you really only need to enter those transactions once. But… why does cloning not open the transaction editor with everything pre-populated rather than creating a new transaction that you then have to edit, generating unnecessary audit entries?
The user interface, though, definitely leaves something to be desired.
I’ll admit I’ve been spoiled by GnuCash’s simple, straightforward, spreadsheet-like interface that makes it stupid-easy to enter transactions. It’s really easy to navigate through the transaction editor using the keyboard, much like Microsoft Money, which I used before GnuCash. And getting something like that in a mobile or web-based application is going to be hard to come by.
Firefly III’s transaction editor is far from “stupid-easy”.
One tenet of user interface design and crafting the user experience is to make your software easy to use and intuitive as best you can. Keyboard shortcuts are the easiest way to do this. The less someone has to use the mouse to perform an operation, the better. And with GnuCash, I can tab or arrow-key around the transaction editor. No mouse clicking required.
Sure learning keyboard shortcuts can be a pain in the ass. But once you learn them, you’ll never not use them again since not using them slows you down.
So why does Firefly III not have any keyboard shortcuts? If anything, that should be priority. Usability is of paramount importance in any system. Doubly-so with financial management. Consulting with a UI/UX professional for ways to improve the user interface, hopefully without having to gut it and start over, would be beneficial.
On the plus side, it is easy to set up. Especially if you use the script I provided in a previous article to set it up in a Docker container.
Firefly III is an open source financial management system. I’m trying it out in renewing my search for an accounting system I can use from a browser. Am I ultimately going to keep using it? I’m still kind of playing around with it, but it’s likely I’ll look for something else. I guess when it comes to ease of use, nothing really compares to GnuCash’s simplicity. And that’s largely what I’m looking for.
Firefly III, sorry to say, doesn’t even come close. I might write a review for it later, contrasting it with GnuCash and comparing it against the rules (or, largely, lack thereof) with double-entry accounting.
Anyway, copy the installation script to a .sh file on your Docker machine and give it the requisite permissions, then run it. Make sure to copy off everything from output at the end and store it off somewhere, preferably in a password manager like KeePass, since you’ll need it for running the update script.
Like with the install script for Guacamole, pay attention to the subnet and IPs this will be using and change those if necessary. If you don’t select a port number at the first prompt, it’ll randomly select a port between 40,000 and 60,000. And unless you have a need for this to be on a specific port, I suggest just letting the script pick one at random.
Having a separate script that is run periodically – e.g. as a cron job – to back up the volumes for the MySQL and Firefly containers would also be a good idea.
Installation script
#!/bin/bash

read -p "Port number for Firefly web interface [Enter to pick random port]: " firefly_port_number
echo

if [ -z $firefly_port_number ]; then
    firefly_port_number=$(curl -s "https://www.random.org/integers/?num=1&min=40000&max=60000&col=1&base=10&format=plain&rnd=new")
fi

# Random passwords and app key generated using Random.org so you don't have to supply them

root_secure_password=$(curl -s "https://www.random.org/strings/?num=1&len=16&digits=on&upperalpha=on&loweralpha=on&unique=on&format=plain&rnd=new")
firefly_mysql_password=$(curl -s "https://www.random.org/strings/?num=1&len=16&digits=on&upperalpha=on&loweralpha=on&unique=on&format=plain&rnd=new")
firefly_app_key=$(curl -s "https://www.random.org/strings/?num=1&len=32&digits=on&upperalpha=on&loweralpha=on&unique=on&format=plain&rnd=new")

sudo docker pull mysql
sudo docker pull fireflyiii/core

# Creating the volumes for persistent storage

sudo docker volume create firefly_iii_upload
sudo docker volume create firefly_mysql_data

# Creating the network. This allows the containers to "see" each other
# without having to do some odd port forwarding.
#
# Change the subnet and gateway if you need to.

firefly_network_subnet=192.168.11.0/24
firefly_network_gateway=192.168.11.1
mysql_host_ip=192.168.11.2
firefly_host_ip=192.168.11.3

# Remove the ".local" if necessary. Override entirely if needed.

full_hostname=$(hostname).local

sudo docker network create \
--subnet=$firefly_network_subnet \
--gateway=$firefly_network_gateway \
firefly-net

# Setting up the MySQL container

sql_create="\
CREATE DATABASE firefly; \
\
CREATE USER 'firefly_user'@'%' \
IDENTIFIED BY '$firefly_mysql_password'; \
\
GRANT ALL PRIVILEGES \
ON firefly.* \
TO 'firefly_user'@'%'; \
\
FLUSH PRIVILEGES;"

echo Creating MySQL container

sudo docker run -d \
--name firefly-mysql \
-e MYSQL_ROOT_PASSWORD=$root_secure_password \
-v firefly_mysql_data:/var/lib/mysql \
--network firefly-net \
--ip $mysql_host_ip \
--restart unless-stopped \
mysql

# Sleep for 30 seconds to allow the new MySQL container to fully start up before continuing.

echo Let\'s wait about 30 seconds for MySQL to completely start up before continuing.
sleep 30

echo Setting up MySQL database

sudo docker exec firefly-mysql \
mysql --user=root --password=$root_secure_password -e "$sql_create"

echo Creating Firefly-III container

sudo docker run -d \
--name firefly \
-v firefly_iii_upload:/var/www/html/storage/upload \
-e DB_HOST=$mysql_host_ip \
-e DB_DATABASE=firefly \
-e DB_USERNAME=firefly_user \
-e DB_PORT=3306 \
-e DB_CONNECTION=mysql \
-e DB_PASSWORD=$firefly_mysql_password \
-e APP_KEY=$firefly_app_key \
-e APP_URL=http://$full_hostname:$firefly_port_number \
-e TRUSTED_PROXIES=** \
--network firefly-net \
--ip $firefly_host_ip \
--restart unless-stopped \
-p $firefly_port_number:8080 \
fireflyiii/core

echo Done.
echo
echo MySQL root password: $root_secure_password
echo MySQL firefly password: $firefly_mysql_password
echo Firefly App Key: $firefly_app_key
echo Firefly web interface port: $firefly_port_number
echo
echo Store off these passwords as they will be needed for later container updates.
echo To access the Firefly III web interface, go to http://$full_hostname:$firefly_port_number
Update script
#!/bin/bash

read -s -p "MySQL Firefly user password: " firefly_mysql_password
echo
read -s -p "Firefly app key: " firefly_app_key
echo
read -p "Port number for Firefly web interface: " firefly_port_number
echo

# Make sure these match the IPs in the installation script

mysql_host_ip=192.168.11.2
firefly_host_ip=192.168.11.3

# Remove the ".local" if necessary

full_hostname=$(hostname).local

echo Stopping the containers.

sudo docker stop firefly-mysql
sudo docker stop firefly

echo Deleting the containers.

sudo docker rm firefly-mysql
sudo docker rm firefly

sudo docker pull mysql
sudo docker pull fireflyiii/core

echo Creating MySQL container

sudo docker run -d \
--name firefly-mysql \
-v firefly_mysql_data:/var/lib/mysql \
--network firefly-net \
--ip $mysql_host_ip \
--restart unless-stopped \
mysql

echo Creating Firefly-III container

sudo docker run -d \
--name firefly \
-v firefly_iii_upload:/var/www/html/storage/upload \
-e DB_HOST=$mysql_host_ip \
-e DB_DATABASE=firefly \
-e DB_USERNAME=firefly_user \
-e DB_PORT=3306 \
-e DB_CONNECTION=mysql \
-e DB_PASSWORD=$firefly_mysql_password \
-e APP_KEY=$firefly_app_key \
-e APP_URL=http://$(hostname).local:$firefly_port_number \
-e TRUSTED_PROXIES=** \
--network firefly-net \
--ip $firefly_host_ip \
--restart unless-stopped \
-p $firefly_port_number:8080 \
fireflyiii/core

echo Done.
With the last update, I mentioned upgrading from 990FX to X99 with the intent of eventually adding an NVMe carrier card and additional NVMe drives so I could have metadata vdevs. And I’m kind of torn on the additional NVMe drives.
No more NVMe?
While the idea of a metadata vdev is enticing, since it – along with a rebalance script – aims to improve response times when loading folders, there are three substantial flaws with this idea:
it adds a very clear point of failure to your pool, and
the code that allows that functionality hasn’t existed for nearly as long, and
the metadata is still cached in RAM unless you disable read caching entirely
Point 1 is obvious. You lose the metadata vdev, you lose your pool. So you really need to be using a mirrored pair of NVMe drives for that. This will enhance performance even more, since reads should be split between devices, but it also means additional expense. Since you need to use a special carrier card if your mainboard doesn’t support bifurcation, at nearly 2.5x the expense of carrier cards that require bifurcation.
But even if it does, the carrier cards still aren’t inexpensive. There are alternatives, but they aren’t that much more affordable and only add complication to the build.
Point 2 is more critical. To say the special vdev code hasn’t been “battle tested” is… an understatement. Special vdevs are a feature first introduced to ZFS only in the last couple years. And it probably hasn’t seen a lot of use in that time. So the code alone is a significant risk.
Point 3 is also inescapable. Unless you turn off read caching entirely, the metadata is still cached in RAM or the L2ARC, substantially diminishing the benefit of having the special vdev.
On datasets with substantially more cache misses than hits – e.g., movies, music, television episodes – disabling read caching and relying on a metadata vdev kinda-sorta makes sense. Just make sure to run a rebalance script after adding it so all the metadata is migrated.
But rather than relying on a special vdev, add a fast and large L2ARC (2TB NVMe drives are 100 USD currently), turn primary caching to metadata only and secondary caching to all. Or if you’re only concerned with ensuring just metadata is cached, set both to metadata only.
You should also look at the hardware supporting your NAS first to see what upgrades could be made to help with performance. Such as the platform upgrade I made from 990FX to X99. If you’re sitting on a platform that is severely limited in terms of memory capacity compared to your pool size – e.g. the aforementioned 990FX platform, which maxed out at 32GB dual-channel DDR3 – a platform upgrade will serve you better.
And then there’s tuning the cache. Or even disabling it entirely for certain datasets.
Do you really need to have more than metadata caching for your music and movies? Likely not. Music isn’t so bandwidth intense that it’ll see any substantial benefit from caching, even if you’re playing the same song over and over and over again. And movies and television episodes are often way too large to benefit from any kind of caching.
Photo folders will benefit from the cache being set to all, since you’re likely to scroll back and forth through a folder. But if your NAS is, like mine, pretty much a backup location and jumping point for offsite backups, again you’re likely not going to gain much here.
You can improve your caching with an L2ARC. But even that is still a double-edged sword in terms of performance. Like the SLOG, you need a fast NVMe drive. And the faster on random reads, the better. But like with the primary ARC, datasets where you’re far more likely to have cache misses than hits won’t benefit much from it.
So then with the performance penalty that comes with cache misses, is it worth the expense trying to alleviate it based on how often you encounter that problem?
For me, it’s a No.
And for most home NAS instances, the answer will be No. Home business NAS is a different story, but whether it’ll benefit from special devices or an L2ARC is still going to come down to use case. Rather than trying to alleviate any performance penalty reading from and writing to the NAS, your money is probably better spent adding an NVMe scratch disk to your workstation and just using your NAS for a backup.
One thing I think we all need to accept is simply that not every problem needs to be solved. And in many cases, the money it would take to solve a problem far overtakes what you would be saving – in terms of time and/or money – solving the problem. Breaking even on your investment would likely take a long time, if that point ever comes.
Sure pursuing adding more NVMe to Nasira would be cool as hell. I even had an idea in mind of building a custom U.2 drive shelf with one or more IcyDock MB699VP-B 4-drive NVMe to U.2 enclosures – or just one to start with – along with whatever adapters I’d need to integrate that into Nasira. Or just build a second NAS with all NVMe or SSD storage to take some of the strain off Nasira.
Except it’d be a ton of time and money acquiring and building that for very little gain.
And sure, having a second NAS with all solid-state storage for my photo editing that could easily saturate a 10GbE trunk sounds great. But why do that when a 4TB PCI-E 4.0×4 NVMe drive is less than 300 USD, as of the time of this writing, with several times the bandwidth of 10GbE? Along with the fact I already have that in my personal workstation. Even PCIE-3.0×4 NVMe outpaces 10GbE.
A PXE boot server is the only use case I see with having a second NAS with just solid-state storage. And I can’t even really justify that expense since I can easily just create a VM on Cordelia to provide that function, adding another NVMe drive to Cordelia for that storage.
Adding an L2ARC might help with at least my pictures folder. But the more I think about how I use my NAS, the more I realize how little I’m likely to gain adding it.
First I upgraded the SAS card from the 9201-16i to the 9400-16i. The former is a PCI-E 2.0 card, while the latter is PCI-E 3.0 and low-profile – which isn’t exactly important in a 4U chassis.
After replacing the drive cable harness I mentioned in the previous article, I still had drive issues that arose on a scrub. Thinking the issue was the SAS card, I decided to replace it with an upgrade. Turns out the issue was the… hot swap bay. Oh well… The system is better off, anyway.
Now given what I said above, that doesn’t completely preclude adding a second NVMe drive as an L2ARC – just using a U.2 to NVMe enclosure – since I’m using only 3 of the 4 connectors. The connectors are tri-mode, meaning they support SAS, SATA, and U.2 NVMe. And that would be the easier and less expensive way of doing it.
This also opens things up for better performance. Specifically during scrubs, given the growing pool. I also upgraded the Mellanox ConnectX-2 to a ConnectX-3 around the same time as the X99 upgrade to also get a PCI-E 3.0 card there. And swap it from a 2-port card down to a single port.
The other change is swapping out the remaining 4TB pair for a 16TB pair. I don’t exactly need the additional storage now. Nasira wasn’t putting up any warnings about storage space running out. But it’s better to say ahead of it, especially since I just added another about 1.5TB to the TV folder with the complete Frasier series and a couple other movies. And more 4K upgrades and acquisitions are coming soon.
One of the two 4TB drives is also original to Nasira, so over 7 years of near-continuous 24/7 service. The 6TB pairs were acquired in 2017 and 2018, so they’ll likely get replaced sooner than later as well merely for age. Just need to keep an eye on HDD prices.
To add the new 16TB pair, I didn’t do a replace and resilver on each drive. Instead I removed the 4TB pair – yes, you can remove mirror vdevs from a pool if you’re using TrueNAS SCALE – and added the 16TB pair as if I was expanding the pool. This cut the time to add the new pair to however long was needed to remove the 4TB pair. If I did a replace/resilver on each drive, it would’ve taken… quite a bit more than that.
Do the math and it’s about 111 MiB/sec
Obviously you can only do this if you have more free space than the vdev you’re removing – I’d say have at least 50% more. And 4TB for me was… trivial. But that obvious requirement is likely why ZFS doesn’t allow you to remove parity vdevs – i.e. RAID-Zx. It would not surprise me if the underlying code actually allows it, with a simple if statement cutting it off for parity vdevs. But how likely is anyone to have enough free space in the pool to account for what you’re removing? Unless the pool is brand new or nearly so… it’s very unlikely.
It’s possible they’ll enable that for RAID-Zx at some point. But how likely is someone to take advantage of it? Whereas someone like me who built up a pool one mirrored pair at a time is a lot more likely to use that feature for upgrading drives since it’s a massive time saver, meaning an overall lesser risk compared to replace/resilver.
But all was not well after that.
More hardware failures…
After installing the new 16TB pair, I also updated TrueNAS to the latest version only to get… all kinds of instability on restart – kernel panics, in particular. At first I thought the issue was TrueNAS. And that the update had corrupted my installation. Since none of the options in Grub wanted to boot.
So I set about trying to reinstall the latest. Except the install failed to start up.
Then it would freeze in the UEFI BIOS screen.
These are signs of a dying power supply. But they’re actually also signs of a dying storage device failing to initialize.
So I first replaced the power supply. I had more reason to believe it was the culprit. The unit is 10 years old, for starters, and had been in near-continuous 24/7 use for over 7 years. And it’s a Corsair CX750M green-label, which is known for being made from lower-quality parts, even though it had been connected to a UPS for much of its near-continuous 24/7 life.
But, alas, it was not the culprit. Replacing it didn’t alleviate the issues. Even the BIOS screen still froze up once. That left the primary storage as the only other culprit. An ADATA 32GB SSD I bought a little over 5 years ago. And replacing that with an Inland 128GB SSD from Micro Center and reinstalling TrueNAS left me with a stable system.
That said, I’m leaving the new RM750e in place. It’d be stupid to remove a brand. new. power supply and replace it with a 10 year-old known lesser-quality unit. Plus the new one is gold rated (not that it’ll cut my power bill much) with a new 7-year warranty, whereas the old one was well out of warranty.
I also took this as a chance to replace the rear 80mm fans that came with the Rosewill chassis with beQuiet 80mm Pure Wings 2 PWM fans, since those had standard 4-pin PWM power instead of needing powered direct from the power supply. Which simplified wiring just a little bit more.
Next step is replacing the LP4 power harnesses with custom cables from, likely, CableMod, after I figure out measurements.
Add this code to the default.hbs file in your theme at the bottom before the {{ghost_foot}} helper. Don’t forget as well to include the fslightbox.js file. And to ensure the code is used only when needed, enclose both the line pulling in fslightbox.js and the below code block in the {{post}} helper.
// Lightbox: https://fslightbox.com/
// Adapted from: https://brightthemes.com/blog/ghost-image-lightbox
// Improved to make it so each gallery has its own lightbox
// unless the galleries are immediately adjacent to each other.

// Also removed using a lightbox for individual images since my
// current Ghost theme ("Edge") doesn't use a lightbox for
// individual images.

let galleries = document.querySelectorAll('.kg-gallery-card')
let galleryIdx = 0
let hasImages = false

let lastGallery = document
galleries.forEach(function (gallery)
{
    // Ghost has a limit of 9 images per gallery. So if two or more
    // galleries are placed one immediately after the other - no
    // other blocks between them - then treat the galleries as if
    // they are together.

    if(lastGallery.nextElementSibling != gallery)
        galleryIdx++

    lastGallery = gallery

    let images = gallery.querySelectorAll('img')
    images.forEach(function (image)
    {
        hasImages = true
        var wrapper = document.createElement('a')

        wrapper.setAttribute('data-no-swup', '')
        wrapper.setAttribute('data-fslightbox',
            'gallery_' + galleryIdx.toString())
        wrapper.setAttribute('href', image.src)
        wrapper.setAttribute('aria-label', 'Click for Lightbox')

        image.parentNode.insertBefore(wrapper,
            image.parentNode.firstChild)

        wrapper.appendChild(image)
    });
});

if(hasImages)
    refreshFsLightbox()
In a previous article, I described migrating Plex from one VM to another. In recently rebuilding my virtualization server, now called Cordelia, I decided against creating a VM for Plex. I have a few Docker containers running on it and decided to let Plex be another rather than constricting it to a set amount of memory and core count through a VM.
Migrating from a Plex VM to the Docker container is pretty straightforward. Just a few things to keep in mind. Along with creating a script you can run whenever there are server updates, since you can’t just… install a new version over the existing one like you could before.
Note: If you’re considering migrating Plex to Docker or running anything through Docker, make sure to install Docker CE from Docker’s repository. Don’t install the version of Docker from your distribution’s repositories. This will ensure you have the latest version – meaning also the latest security updates – and greatest compatibility.
I’ll also presume in this article that you know your way around a Linux setup, particularly the bash command line. You don’t need to be great with Docker containers, but some knowledge there will be helpful as well.
Backing up the server
First step is to back up the library on the original server. As root or an administrator, after stopping Plex Media Server:
cd /var/lib
sudo tar cvf plexmediaserver.tar plexmediaserver/
gzip plexmediaserver.tar
This should give you a .tar.gz backup of your Plex instance. I have a pretty large library – over 400 movies and specials, over 300 music albums, and 37 TV shows, most of which are complete series (and yes, I own physical copies or licenses to everything on it) – so my backup ended up being over 4GB. Compressed. Your mileage will vary.
My Plex server pulled from NFS shares on my NAS, so I made sure to also copy off the relevant fstab entries so I could restore them. Make note of however you have your media mounted to your Plex VM or physical server, the actual paths to the media. For example, on my Plex VM, I had the media mounted to these paths, meaning these paths are also what the Plex Docker container would be looking for:
/mnt/tv
/mnt/movies
/mnt/music
Transfer the backup file off the server somehow and shut it down.
Mount points
Here is where things get a little tricky. I think it best I just illustrate this using my directory mounts. To recap, these were the paths to the media I had with my Plex VM, meaning these are the paths the container will want:
/mnt/tv
/mnt/movies
/mnt/music
Paths work far different in containers compared to a virtual machine. When you install the Plex service on a virtual machine, it can see all paths it has permission to access.
Containers are a bit more isolated. This means you don’t have to worry about a container having access to more than you want it to, but it does mean you have to explicitly mount into the container whatever you want it to access.
There isn’t anything wrong, per se, with maintaining these mount points on the Docker host. It’s not like I’m going to have any other Docker containers using them. But I instead chose to consolidate those mount points under a subdirectory under /mnt on Cordelia:
/mnt/media/tv
/mnt/media/movies
/mnt/media/music
Why do this? It’s cleaner and means a simpler set of commands for creating the container.
Had I kept the same mount points as before – e.g., /mnt/tv, etc. – I would need a separate volume switch for each. Having everything under one subdirectory, though, means having just one volume switch that catches everything, as you’ll see in a little bit.
However you create the mount points, don’t forget to add them to your /etc/fstab file for your Docker host.
Your library
Now you’ll need another directory for your library files – i.e. the compressed archive you created above. Just find a suitable spot. You can even put it back at /var/lib/plexmediaserver if you want, following the restore commands in my previous Plex article. I have it on Cordelia’s NVMe drive.
Just remember that the archive you created above will create a directory called plexmediaserver when you extract it. And, obviously (hopefully), do NOT delete the archive until you confirm everything is working.
Copy and paste the above script into a shell file on your server – e.g. “update-plex.sh” – and give it proper permissions. Whenever Plex tells you there’s a new version available, just run the above script. Obviously (hopefully) the first time you run this, the commands to stop and remove the Plex container will print out errors because… the container doesn’t exist yet.
/path/to/plexmediaserver is the path where you extracted your backup archive
/path/to/media is, in my instance, the /mnt/media directory I mentioned above
If I had kept the separate mount points, I’d need individual -v switches for each path – e.g. -v /mnt/movies:/mnt/movies. Having all of them consolidated under /mnt/media, though, means I need just the one -v switch in the above script.
The latter volume mount is what ensures the Plex container has the same path for the library files. So when the library says the episodes for Game of Thrones, for example, are at /mnt/tv/Game of Thrones, it can still find them even though the Docker host has that path mounted as /mnt/media/tv/Game of Thrones.
After you create the container for the first time, you’ll want to interact with the container to make sure your mount points are set up properly:
sudo docker exec -it plex bash
Under /config you should see just one directory: Library. Under Library should be… everything else Plex will be looking for. And check your media mount point to make sure the directories there look as they did on your previous VM.
If any of the mount points don’t look right, you will need to massage the script above and re-run it to create a new container. Then just rinse and repeat with interacting with the container to validate the mount points.
Don’t forget to add the needed ports to your firewall: you must open 32400/TCP, and if you intend to use DLNA, you need to open 1900/UDP and 32469/TCP.
Making sure it all works
And lastly, of course, open one of your Plex clients and try playing something to verify everything works and that it doesn’t show the media item as “unavailable”. If anything is “unavailable”, you need to double-check your -v paths in your script. Use “Get Info” on the media item to see what path it’s trying to use to find it so you can double-check everything.
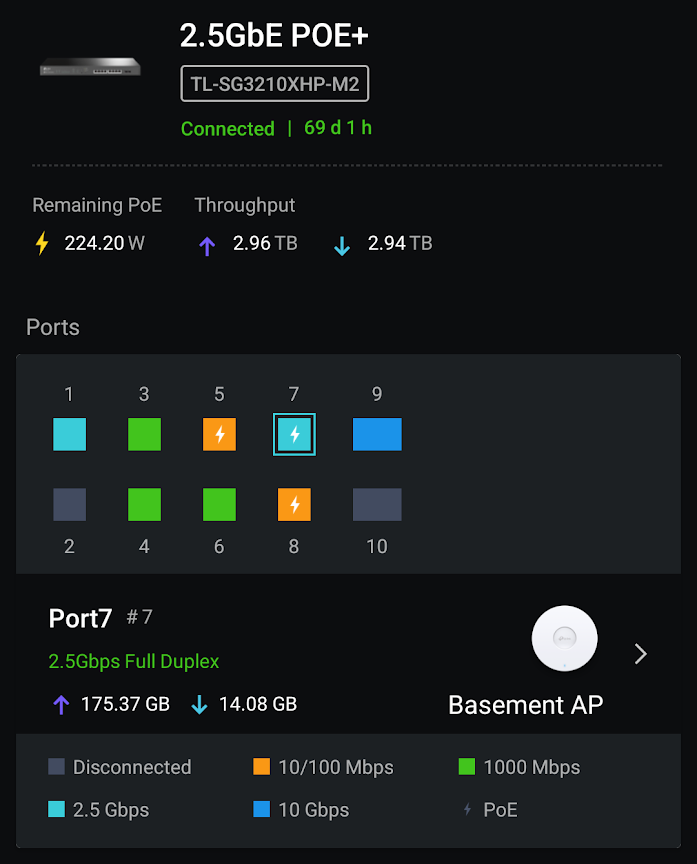
This quick post is for those with a 2.5Gb PoE device, such as a WiFi 6 access point, that either won’t run at 2.5GbE speeds at all or falls back to 1Gb or 100Mpbs after a short time.
On my home network I have several TP-Link devices. Relevant to this article is my EAP670 WiFi access point and TL-SG3210XHP-M2 2.5GbE PoE+ switch. And for some reason the EAP670 wouldn’t run faster than 100Mpbs.
Sound familiar?
Well there’s a simple solution I’m surprised I never thought of sooner: DON’T. USE. CAT5E! Don’t use Cat6 or Cat6A either.
To be sure your 2.5Gb PoE device will talk at 2.5GbE speed, use Cat7. When I switched out the Cat5E cable for Cat7, the access point had no problem staying at 2.5Gb. You might get away with Cat6A, but you’re better off using Cat7.
Cat5E will work fine for non-PoE 2.5GbE devices. But it won’t work for 2.5GbE POE. Again, use Cat7.
First, it is generally NOT true that workers at a business create value. Most workers, instead, transform existing materials with their labor into new products, or leverage existing products and materials to provide a service.
It’s only in the creative industries that employees actually create value, create something that didn’t previously exist in any form. I’m talking graphic design, web site and software development, photography, videography, architecture, etc. And in all those cases, the work product is also considered a “work made for hire” under copyright law, meaning it’s the intellectual property of the employer. And like in most every other line of work, the employees in creative industries aren’t using their own equipment.
As an example, I’m a professional software engineer. My employer provides everything I need to work: the computer (laptop, specifically), access to needed cloud services at their expense, software licenses, etc. The only thing I’m bringing to the table is my skill and expertise.
I am permanently work from home, so I do provide additional equipment for my own benefit: two 4K televisions I use as monitors (with needed adapters to connect to the laptop), mechanical keyboard, mouse, and work space. But those additions are divorced from the laptop my employer provided, so won’t change if I change employers.
In very, very few lines of work is an employee bringing anything more to the table than their skills, experience, and, where required, strength. The employer is providing everything else at their expense, not the employee’s expense: machinery and equipment, tools, materials, the space to do the work, additional personnel so the employee doesn’t need to do everything, etc. Before the employee even shows up to add their part to the equation, the employer has already sunk a lot of cost into production.
Yet the image above pretends the employer – the “capitalist” – isn’t putting anything into the production. Only taking. Whereas the reality is the “capitalist” is providing everything except what the employee is adding.
The easiest illustration of this is food service. Specifically those who are preparing the food.
The line cooks don’t provide the ingredients, and they didn’t purchase the equipment needed to cook and serve the food. The owners of the establishment provided that. Along with paying to have it all installed properly, paying for maintenance when required, replacements where necessary, cleaning equipment and supplies, the utility service (e.g. electricity, natural gas or liquid propane, water, etc.), insurance on the entire establishment and employees, and… pretty much everything else.
The employee just… shows up and does their job as agreed. Receiving for their time a paycheck.


You must be logged in to post a comment.