- 10 gigabit (10Gb) home network – Part I
- 10 gigabit (10Gb) home network – Part II
- Again, Amazon?
- 10 gigabit (10Gb) home network – Zone 1 switch
- 10 gigabit (10Gb) home network – Zone 2 switch – Part 1
- 10 gigabit (10Gb) home network – Zone 2 switch – Part 2
- 10Gb home network – Retrospective
- Quanta LB6M
- 10 gigabit home network – Summary
- Revisiting the Quanta LB6M
- MikroTik CRS317 10GbE switch
- MikroTik CSS610
- Quieting the MikroTik CRS317
- Goodbye, MikroTik
- Troubleshooting 2.5Gb power over Ethernet
Before continuing, first a few notes on the previous iteration.
Firmware. FreeNAS’s driver for the Chelsio card complained about the firmware version. The card I received had the 7.07 firmware installed while the latest is 7.11, and the driver wanted the latest. It was in a security output e-mail. Upgrading the firmware was pretty straightforward, though. The instructions are the same as on Linux, and the tools come with FreeNAS/FreeBSD.
But something to keep in mind if you decide to buy 10Gb cards to create a 10Gb network: you may need to upgrade firmwares. The Mellanox cards all had the latest firmwares.
Active cooling. On the Mellanox MNPA19-XTR, the mounting holes for the single-port ConnectX-2 are 34mm apart, and the heatsink is 45mm by 35mm. I don’t know of a heatsink that will fit this, but if you can attach a 30 or 35mm fan, you’ll likely be fine. The 34mm distance may be enough to attach a 25mm fan diagonally.
On the dual-port Mellanox card I received (PN: 81Y1541), the heatsink is 40mm square and the mounting holes about 47mm apart.
Not for two systems. This is something that should be very obvious from the outset: this project is not for just connecting two systems together. This project is for connecting multiple systems together onto a 10GbE network.
This is also for small setups — four to six 10GbE connections. If you need more than that, you should really be looking at off-the-shelf 10GbE switches, such as the Netgear ProSAFE XS708Ev2 (10GbE Cat6a RJ45) or Dell X4012 (10GbE SFP+).
System requirements and costs
Since the network cards can be had for pretty cheap — under 20 USD for the single-port, under 40 for the dual-port SFP+ cards — you might be tempted to find other ways of keeping costs low. And on this, the used and refurbished hardware market can be your friend. Mostly. You just need to know what to find.
PCI-Express. This is where you need to pay attention. At minimum you’ll need a mainboard that supports PCI-E 2.0. Slot configuration requires your attention here.
Every dual-port 10GbE card will require a x8 slot. Any single-port cards in the mix may be able to get away with a 2.0×4 slot depending on the card. So look for a mainboard that can provide the PCI-E slot configuration you’ll require.
On the Intel platform, you’ll need to pay attention to the processor you select to ensure you get an adequate lane count. Most Intel processors support at most 16 lanes. A PEX chip won’t help much in this. To get more lanes, you’ll need either an “extreme” processor, such as the i7-3930k (40 lanes), or a Xeon, possibly even a dual-Xeon depending on generation.
Core count. You will need at least a quad-core processor for this. Beyond that you’ll want at least 1 core per SFP+ port.
The reason for this IRQ Affinity. In brief, every hardware event that occurs on your system is processed via a hardware “interrupt”. Affinity determines what core processes that interrupt via the Advanced Programmable Interrupt Controller (APIC). More physical cores = more interrupts that can be processed in parallel = better throughput on your switch.
AMD or Intel? Whether you go AMD or Intel is entirely up to you. While Intel processors do tend to out-perform AMD processors, it won’t provide you much benefit here. As noted above, PCI-E lane count will matter more.
And this is where AMD wins out, in my opinion, since the lane count isn’t tied to the processor. On that, however, I can really only recommend the 990FX chipset.
The 990FX chipset provides 42 lanes, typically as 2×16, 1×4 or 2×4, and 2×1, allowing two dual-port cards and maybe one or two single-port depending on model. Some 990FX mainboards have a better lane spread, providing 1×16 and 2×8, allowing up to three dual-port cards while still retaining the 2×4 slots as well. Only one 990FX mainboard I’m aware of provided for 4×8 slots: Gigabyte GA-990FXA-UD7.
Which four or six 10GbE ports should be more than enough for most setups. Again, if you need more than that, you should really be looking at an off-the-shelf 10GbE switch.
Operating system
I considered two operating systems for this: VyOS and Fedora 24 Server.
Note on VyOS and installing from USB: you need to make sure to write the ISO image to disk using DD mode or it won’t boot. And when booting off the USB stick, make sure it is plugged into a USB 2.0 connection. It will fail to boot if you try to boot from a USB 3.0.
It’s pretty easy to create a switch with VyOS as well. Their configuration options are relatively straightforward. And using the video I embedded in the earlier section as a guide had a switch working relatively quickly.
But you may want to consider going with an off-the-shelf Linux distribution instead. Why? Driver support.
For Chelsio cards this isn’t nearly as huge a deal. The latest Chelsio drivers for the T3 chipset (which includes the S320 in my NAS) were released in 2010. But for the Mellanox ConnectX-2, I recommend you consider against using VyOS.
VyOS 1.1.7 is built from Debian 6 “Squeeze”, which was initially released in 2011, the latest version released in 2014, and went out of long-term support in February 2016. The latest Debian is 8.6, which is what VyOS 1.2 will be based on.
The oldest Debian version supported by the Mellanox EN driver, as of the time I write this, is Debian 7.6. The Mellanox driver supports the latest or nearly latest available version for
- SuSE Linux Enterprise Server (SLES)
- Oracle Linux (OL)
- Fedora
- CentOS
- RedHat Enterprise (RHEL)
- Ubuntu
So if you are using Mellanox cards, which seems to be the brand most widely available, consider using an off-the-shelf Linux distribution to build your switch. Just make sure to install it using a minimal install since you don’t need really much of anything for this.
For this setup, I’ll be using Fedora 24. Fedora 25 is the latest version as of when I write this, but Mellanox has not yet released a driver installer that supports it as of the time this article went live. When installing the driver on a kernel the installer doesn’t readily support, you will be walked through rebuilding the driver for your kernel version — what packages to install, what command line options to include, etc.
First test
Before building the switch I intend to use, I wanted a proof of concept. At the same time this was going on, I was also buying parts to build two systems for a lesbian couple I know, so I had a system set up on a test bench near the NAS and virtualization server with these specifications:
- AMD Athlon X4 860k (stock speed)
- Gigabyte GA-F2A88X-D3HP
- 4GB Corsair Vengeance DDR3
- 64GB ADATA SSD
Since this was already on a test bed, I just used it to drop in the 10GbE card and work out any gotchas. As mentioned above, the OS I used is Fedora 24 Server.
Creating the switch is relatively straightforward. One line to create the bridge, and two additional lines per interface you’ll include into it, as this script demonstrates:
ifconfig enp3s0 0.0.0.0
ifconfig enp1s0 0.0.0.0
ifconfig enp1s0d1 0.0.0.0

nmcli connection add ifname zone1bridge type bridge con-name zone1bridge
nmcli connection add type bridge-slave ifname enp1s0 master zone1bridge
nmcli connection add type bridge-slave ifname enp1s0d1 master zone1bridge
nmcli connection add type bridge-slave ifname enp3s0 master zone1bridge
Setting the IPs on the interfaces to 0.0.0.0 throws them into promiscuous mode. This is needed for the bridged interfaces to act as a switch. Additionally I also disabled the firewall. Then I turned my attention to the NAS.
In FreeNAS, I disabled DHCP on the onboard Gigabit connection and assigned it a temporary static IP. Then I added the 10Gb connection and enabled DHCP for it. Once it had an IP address from the router, I removed the Gigabit NIC from FreeNAS’s list of interfaces, unplugged the NAS’s Ethernet cable, then rebooted the system to refresh all of its networking-related caches and settings.
DNS picked up the NAS across its 10Gb connection, and I was able to ping it successfully from my desktop and the switch. So with that, I ran iperf between the switch and NAS to get an initial bandwidth report:
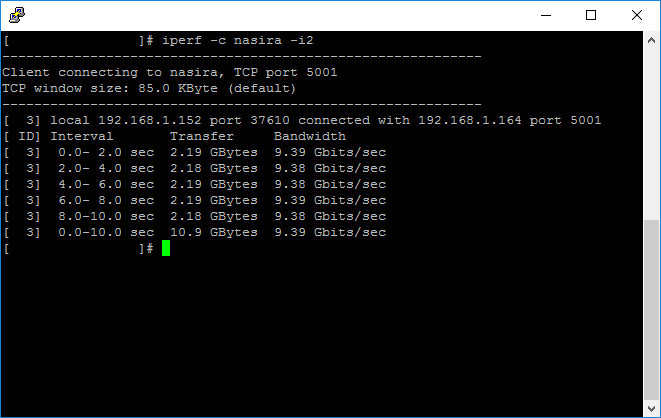
9.39 Gbits/sec = 1.17 Gigabytes/sec. That’s about as good as it’s going to get. The Linux ping utility gives about .065ms (about 65μs) for the round-trip time between the NAS and switch, which is an ultra-low latency and what I’d expect from optical fiber.
So this tells me that, at least between the switch and the NAS, everything is working clean. Time to move on to the actual hardware I’ll be using.
Second test
The second test was a similar bench test setup with what will likely be the final hardware for the switch:
- CPU: AMD FX-8320E
- Mainboard: ASRock 990FX Extreme6
- Memory: 4GB Corsair Vengeance DDR3
And this is with a clean install of Fedora 24 Server — Minimal Install with with the Mellanox drivers installed, using the instructions above to create the bridge. There isn’t anything more that you really need to do for this either, not unless you’re anal about getting the max throughput possible for this setup, squeezing every last Mbit/sec out of it.
In this setup I also had the virtualization server plugged into the switch along with the NAS. For VMWare ESXi, it will not automatically grab an IP address via DHCP for the new adapter unless you specifically tell it to do so through the console interface.
For performance testing I ran iperf from two machines separately, both talking to the switch. One connection from a Linux VM on the virtualization server, the other from the NAS.
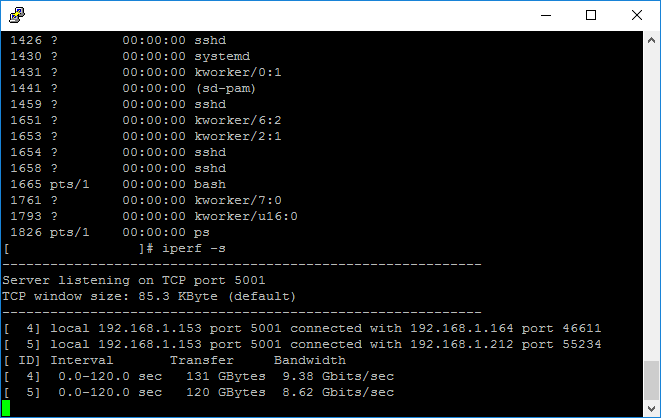
The VM was not able to saturate the connection as well as the NAS, but that was expected given the way VMWare ESXi tries to handle networking via a virtual switch. The NAS saturated its 10Gb connection — again, about 9.38Gbits/sec is likely as good as that’s going to get.
For another test, I installed the second 10Gb NIC. Both x16 slots on the mainboard had the 10Gb NICs and the x4 slot had the graphics card. I connected the NAS to the single-port card, added it into the bridge, then rebooted the switch so the network changes would take.
I was looking for any indication of a performance degradation sending data between the NICs across the PCI-Express bus.
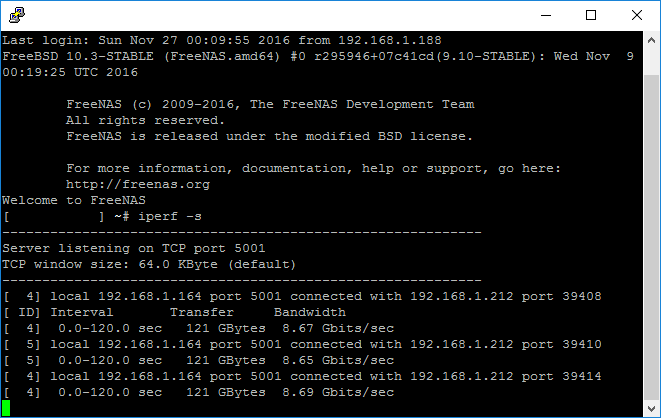
As you can see above, I ran three tests just to be sure. The PCI-Express bus on the 990FX chipset is not a bottleneck between the NICs.
Now I just need to finalize the setup. I’m not settled yet on whether this will go into a 2U or 4U chassis, though it’ll likely be the latter to allow for a full-size power supply and quiet 120mm fans for cooling while avoiding having to find low-profile brackets for the NICs.
So the next part will be finalizing the Zone 1 switch and figuring out what I need for the Zone 2 switch.
You must be logged in to post a comment.