- Beta Orionis
- Beta Orionis – Part II: New fans
- Beta Orionis – Part III
- Beta Orionis – Part IV
- Beta Orionis – Part V
- Beta Orionis – Part VI
- Beta Orionis – Part VII
- Beta Orionis – Part VIII: Delays
- Beta Orionis – Part IX
- Beta Orionis – Part X
- Beta Orionis – Part XI
- Beta Orionis – Part XII
- Beta Orionis – Part XIII
- Beta Orionis – Part XIV
- Beta Orionis – Part XV: Follow-up with Koolance blocks
- Beta Orionis – Part XVI: Overclocking the GPUs (or not)
- Beta Orionis – Part XVII: The AX860
- Beta Orionis – Part XVIII: New power supply and quieting things down
- Beta Orionis – Part XIX: Taking it outside
- Beta Orionis – Part XX: New loop
- Beta Orionis – Part XXI
- Beta Orionis – Part XXII
- Beta Orionis – Part XXIII
- Beta Orionis – Part XXIV
- Radiator box for PC water cooling
- Beta Orionis – Part XXV
- Corsair AX860: A retraction
- Mira
The new power supply is installed and so far has been running steady without any problems. The only minor concern about the EVGA power supply is its PCI-E power connectors in that they include only two 6+2pin PCI-E cables instead of four, and I would also prefer the single-connector cables be full 8-pin connectors as well instead the 6+2pin. Getting that, however, appears to require going completely custom, whether I do it myself or pay someone else to do them.
Given the direction graphics cards are going, however, and the reputation EVGA has among enthusiast builders, it’s something they should consider doing. Continue including the 2×6+2pin PCI-E cables, which I currently have connected to my graphics cards, but also include 8-pin PCI-E cables with a single connector and 6-pin PCI-E cables with a single connector.
At the least, make them a purchase option so I don’t have to buy complete cable kits to get what I want. Currently it appears I’d have to do just that or go completely custom — and currently Ensourced appears to be the only place through which I can order the custom cables I want, to the tune of about $36 per pair, provided the G2 cables work with the GS power supplies.
So now it’s a matter of figuring out what to do with the AX860.
* * * * *
In building out the HDD enclosure project, I used an NZXT Grid to control the fans. To make the fans virtually inaudible, I modified the 4-pin Molex to 3-pin female connector to be a 7V step-down, making the fans virtually silent.
Liking the result, I decided to try something like this for Beta Orionis.
It made the system virtually inaudible, but I wasn’t comfortable with the temperatures. The CPU temperature climbed over 70C running Prime95 on small FFT, and the copper tubing was becoming very noticeably warm to the touch, telling me the coolant temperature was easily in the upper 40s — note the pump has a maximum rated temperature of 60C. Interestingly the GPU temperatures didn’t go up all that much compared to running the fans at stock voltage while running a Bitcoin miner in benchmark mode.
So a higher voltage was needed. 7V would be great for the system at idle, but not under load, but 12V is loud when you’ve got a lot of fans — you know, like having 9 of them in my system (and I know of those who have still more). My thoughts settled on 9V, which should undervolt them enough to keep the system quiet but also cool enough under a decent load. An initial test on that was a 9V battery, or it would’ve been if a 9V battery could supply the proper current (~1.2A for all of the fans) — but even if it could supply the current, it would discharge so quickly that I wouldn’t be able to adequately test things.
So instead I would have to order a voltage regulator. I bought this one by DROK to test various voltages to find the ideal voltage that would give quiet fans but still good cooling before ordering a static voltage regulator for a 12V input and the proper voltage output.
Now I can already hear this question: why not just use a fan controller? I considered it. Fan controllers, though, come in two varieties: you either have to manually change the fan speed, or program it to automatically change it. I didn’t want to do either, so I went for some kind of middle ground. I still have the Phobya fan controller that was originally in my wife’s build. On the front of automatic controllers, I looked at the Aquacomputer poweradjust 3 Ultra, and I still might ultimately end up buying one since it can be used with a temperature sensor — such as a coolant temperature sensor.
I might look at creating something from an Arduino or equivalent if I decide to go that direction — I’ve considered it in the past. With fans that aren’t PWM, voltage regulation is still needed to control the speed.
But for now, I wanted something inexpensive that would allow for a silent running that would still keep temperatures reasonably under control. And an inline voltage regulator was the best way to do this, once I found the right voltage that would give me a good balance, and it’s something I don’t have to muck with after it’s installed.
Now testing things was pretty straightforward. I took a spare fan adapter (4-pin Molex to 3-pin) and modded it to cut off the 3-pin part, split the wires apart and stripped the ends. With the voltage regulator between the PSU and the fans, the voltage is tuned using a small flathead screwdriver. For the first test, I took the fans to my intended target voltage of 9V and opened up Prime95 with HWMonitor running alongside to watch the temperatures. I also backed off my overclock as for some reason Prime95 was giving errors trying to run initially.

During the testing the ambient temperature was about 25C.
As expected, 9V kept the system quiet — the hard drive was louder than the fans. And the temperatures while running Prime95 climbed up to the 50s relatively quickly, but once it hit 55C the climb slowed down, hovering at each one above that for at least a minute. When the temperature hit 56C, I decided to drop the voltage to 8V. Now the system was virtually inaudible. It reached 59C (138F) at about 8 minutes into the Prime95 test and held at that temperature for about 5 minutes more before poking to 60F and then going back and forth between the two.
To throw more heat into the coolant, at about 15 minutes into the Prime95 test, I pulled up a Bitcoin miner and ran it alongside Prime95. The GPU temperatures soared into the mid 40s fairly quickly while the CPU temperature stayed at 60C. The extra heat caused the CPU to start climbing toward the mid 60s while the GPUs held at around 50C. At about 18 minutes into Prime95, the CPU reached 65C while the GPUs sat at 52C. I turned the fans back up to 9V.
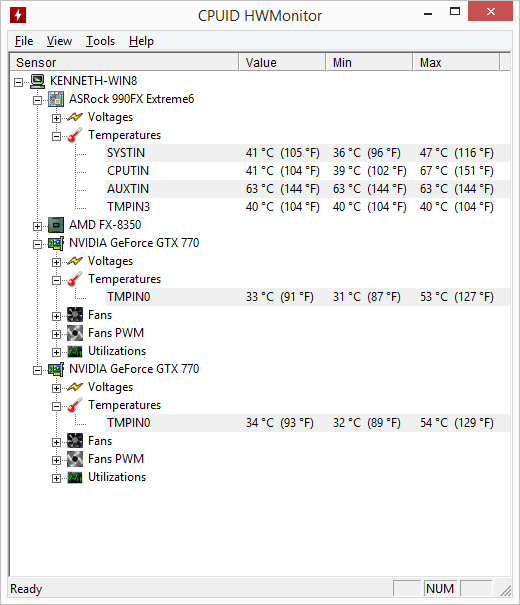
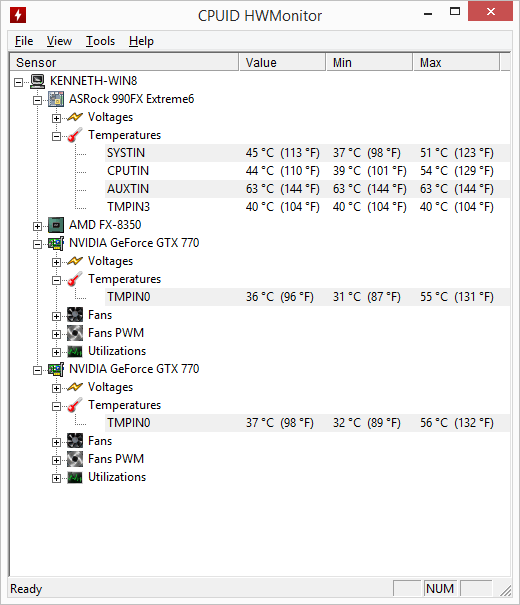
The temperature on the CPU topped out at 67F after 20 minutes of Prime95 combined with about 8 minutes of the Bitcoin miner before I stopped Prime95. The copper tubing had started to become noticeably warm to the touch. The CPU dropped down to 53C and held.

I stopped the Bitcoin miner after 10 minutes and let the system cool down, turning the fans all the way up to bring the temperatures down a little quicker — the regulator has a max output voltage of 11V. When the CPU bottomed out at around 40C, I dropped the voltage back down to 8V, reset the temperatures in HWMonitor, and fired up F.E.A.R. Online while waiting for Bioshock Infinite to download and install.
The CPU topped out at 45C during F.E.A.R. Online — the game isn’t SLI enabled, so only one of the graphics cards saw a temperature increase to 44C. In Bioshock Infinite, after about 30 minutes, the CPU temperature topped out around 54C. I turned the fans backup to 9V during the play as well.

So that’s pretty good given how quiet the system is now running, so I think I’ll lock the fan voltage at 9V. And I’ll be doing a similar experiment on my wife’s machine, Absinthe. But in the mean time, I’ll be doing some more temperature monitoring with the fans set at 9V, possibly 8V, to make sure this is how I want to leave things.
You must be logged in to post a comment.