- Water cooling build in my wife’s computer – Part IX
- Project Absinthe
- Project Absinthe – Part II
- Project Absinthe – Part III
- Project Absinthe – Part IV
- Project Absinthe – Part V
- Project Absinthe – Part VI
- Project Absinthe – Part VII
- Project Absinthe – Part VIII
- Project Absinthe – Part IX
- Project Absinthe – Part X
- Project Absinthe – Part XI
- Project Absinthe – Part XII
- Project Absinthe – Part XIII
- Project Absinthe – Part XIV
- Project Absinthe – Part XV: It’s alive!
- Project Absinthe – Intermission and future plans
- Project Absinthe – Part XVI
- Absinthe – Part XVII
- Absinthe – Part XVIII
- Absinthe – Part XIX: Valentine’s Day
- Absinthe – Part XX
- Distilling another batch of Absinthe
- Distilling Absinthe – Part II
- Distilling Absinthe — Part III
- Another glass of absinthe
- Another glass of absinthe — II
- Adjusting the recipe
- Absinthe to Amethyst
Well Absinthe is basically complete now. There’s not really anything left on it. Everything is installed that was planned to be, though there may be some adjustments in the future. I do plan to build out another water cooling loop in my own personal computer in the coming months, and I’ll probably be experimenting with a few things as well in building that out, but I don’t foresee many upgrade paths for Absinthe.
The only plan on the plate right now is just figuring out how to get those hard drives out of the picture. Sure, I could switch them over to SSDs, and she’d certainly love the speed those would bring, but I wouldn’t like the expense: 2 x 1TB SSDs would cost more combined than the components in the loop and the tools I needed to buy to make it all happen.
Instead, I’m going to move them to an external RAID enclosure. I’ve done this with my computer, and it works quite well – though I’m going to be swapping out the current enclosure for something else with better features.
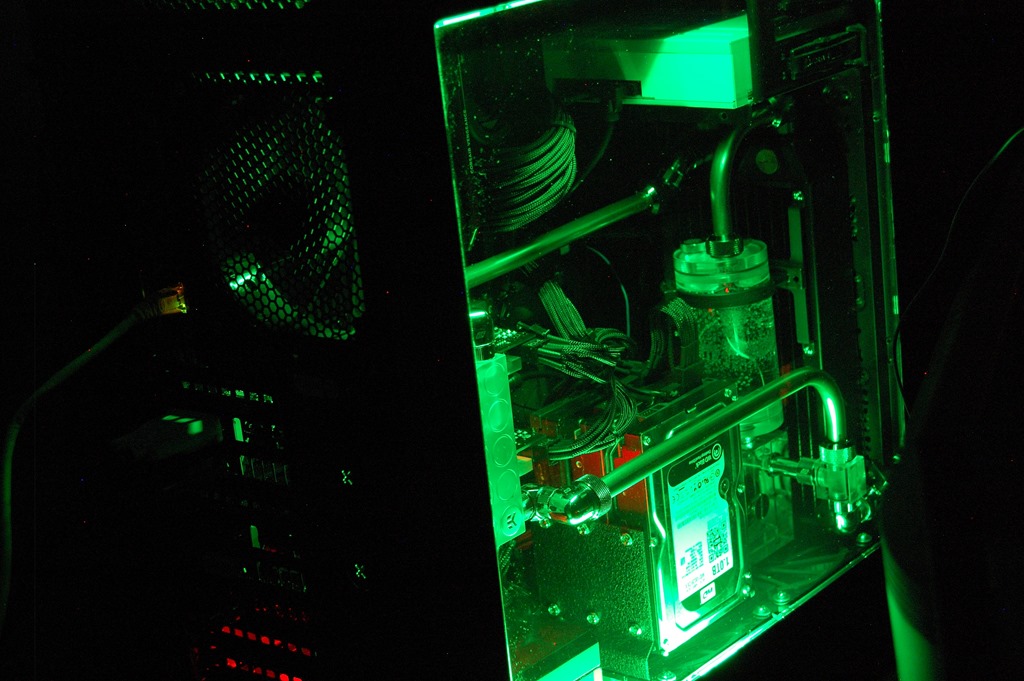
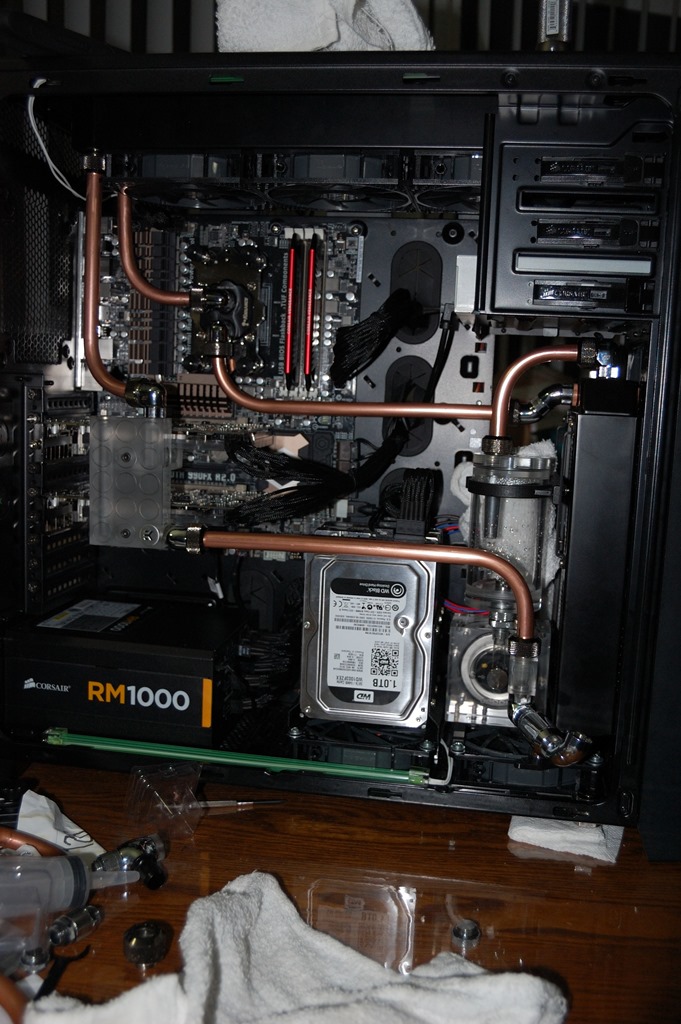
There are three hard drives in Absinthe: 2 x 1TB Western Digital Blacks and an older 250 GB Western Digital drive. The 1TB drives are in a RAID 1 setup, while the smaller drive is for backups. Moving the two 1 TB drives into a RAID enclosure that connects via eSATA, with the spare in another enclosure or removed altogether, will free up space and improve airflow and get rid of what is definitely an eyesore while removing some of the cable bulk. I may also move her Blu-Ray drive into an external enclosure as well, removing another eyesore.
But then with 256GB USB 3.0 sticks out for a reasonable price, and the amount of her hard drive usage being less than that, I could actually move her entire system over to a USB stick and have her run off that – and the read speeds I’m seeing for some of those, it could be better than her hard drive.
Now removing the hard drives exposes the inverter for the bottom CCFL, so I’d either need to move that behind the mainboard tray, if possible, or devise a way of covering it up. Or paint it. Probably cover it up, though.
* * * * *
Cleaner loop and look
JayzTwoCents is documenting on Instagram and YouTube an upgrade on a previous client machine in changing the loop over to acrylic tubing from soft tubing. The results are certainly quite phenomenal.
Now this could’ve been made cleaner by having the pump in a different location, such as finding a way to have it under the reservoir. It’s an AlphaCool VPP655 pump in this build, so he could’ve used a Z2 bracket or something similar to have it on top of the fans on the lower radiator.
In the update, he has it so the pump and reservoir are one unit. And with acrylic tubing, it looks so, so much cleaner.
I think this is a tad cleaner than before
A photo posted by JayzTwoCents (@jayztwocents) on
This is very similar to the previous loop and current loop I built out in my wife’s computer. The original loop wasn’t terrible, mainly because I had the pump and reservoir as one unit, but it certainly could’ve been better. Now the previous loop was my first attempt at a loop, and even with all the reading and videos I’d watched, my inexperience certainly showed. But then there’s no doubt that rigid tubing – whether acrylic, PETG or copper – allows you to build a cleaner loop overall. Even with a new radiator added to the loop over the previous, this build is still much cleaner.
And it’ll be much cleaner when I get those hard drives out of there. If I’m careful, I shouldn’t need to do anything with the loop to accomplish that.
* * * * *
Takeaways and lessons
So what lessons could be learned on this? What did I learn along the way of building Absinthe? Note: some of these might sound like common sense, but it’s often been my experience that things considered “common sense” are the things that need to be repeated the most to ensure you don’t forget them.
1. Don’t skimp on the tools
This doesn’t mean you should max out credit cards or drain bank accounts paying for them either. Annealed copper tubing is typically used for water systems, not water cooling systems. As such, those are the tools you need to consider if you’re going to go with copper tubing. The tubing bender I purchased was made for HVAC professionals. I just needed to shop around to find the best price for it.
There are more expensive options, but I didn’t need to go that route. If I was doing client builds, building out copper tubing water cooling systems for others, then I’d probably consider it to ensure I was building with the best tools for the application. But then I’d also have spent $200 on a tubing straightener or figured out how to build my own – come to think of it, I may consider trying to figure that out anyway before I build out a loop in my personal computer as I’m likely going to use copper tubing for that as well.
2. Practice before building
I went through an entire 10′ coil of copper tubing figuring out a few things before I built the loop. I wanted to know what I was getting into, what the tools were going to do, and figure out any “gotchas” before getting down and dirty. It’s amazing how many people just jump right in with acrylic or PETG tubing without spending a little time learning their tools and figuring out the techniques. That is a formula for waste.
Speaking of “gotchas”, there’s one major reason I went with copper tubing: the bender all but guarantees the angles at which I’m bending. I can trust the marks on the bender better than I can my own judgment of where 90-degrees is. A lot of people who’ve built loops with acrylic have built jigs to assist in getting the 90-degree and 45-degree bends they may need. You may need to do the same if you go with acrylic/PETG tubing as opposed to copper.
There’s a common tip I’ve seen with regard to building out water cooling loops: build your loop outside your case before you build it inside your case. That sentiment is not just about planning, but about practice. It’s why I wanted to get a proof of concept on the copper tubing before planning out the rest of the loop.
3. Don’t be afraid to change your plans
I will guarantee you that most of the build logs you read across the web or videos you see online involve a lot of changed plans that may or may not be documented. The individuals behind the builds likely didn’t show you their entire planning process, including having to change plans. And I highly, highly doubt that all plans they had going into the build were maintained through it.
As I documented across the build log, I’ve had to change plans. A lot. I had a number of ideas in mind going into this, and a lot of them didn’t work out. I originally planned to have the reservoir mounted externally on a 140mm UN Z3 bracket on the back of the case with the pump sitting on top of the power supply. Then I discovered there wouldn’t be nearly as much room as I originally thought due to the lower graphics card.
I wanted to have the 240mm radiator laying on the floor of the case. I had an inkling going into this that it wouldn’t fit with the new power supply, so I had to change it so the radiator was on the front. This meant my original idea for how to mount the pump and reservoir would also have to change after seeing they would need to be mounted internally.
I even had to change the drainage system. Twice! With the second time being while I was doing the first leak test on the full loop.
So many plans, ideas and decisions needed to be changed through the course of this build – I know I didn’t document all of them. Changing plans does mean spending more money, which means…
4. Don’t purchase everything up front
If you’re going to be switching out fans, I’d say get those ordered first and get as many installed as you can. Work on the system little by little if possible. Then decide on your water blocks and radiators first and get those ordered. Decide on where your radiators will go. Everything else needs to be planned around those, including the pump and reservoir. Plus the blocks and radiators can easily be over half the cost of your loop, so getting those out of the way is going to be a good thing. Be sure to read reviews and watch review videos as well.
What you should not purchase up front are the fittings. Even in the original loop I built out back in March, the fittings were actually the last things I bought, and in my next loop that’ll hold true as well. The loop needed to be planned first, then the fittings acquired. Fittings can easily send your budget into the red, even if you’re just going with soft tubing and flush compression fittings. Because chances are you’ll discover something in building out your loop that you did not consider going into it.
One thing you’ll notice with the build log is actually how slowly things progressed until nearly the very end. I decided to change the fans after doing some research, so I bought those and got them installed.
5. Budget for contingencies
Back when I was in late elementary school into middle school, there was a cartoon series on television called “Darkwing Duck“. In one episode, DW’s adopted daughter Gosalyn is sleepwalking around town (video here), having a very imaginative dream about historical events because, as the character Astroduck notes, she was “lazy and wanted a shortcut to avoid studying history”.
Anyway, Gosalyn notes toward the end of the episode while still in her dream: “You should never let a minor setback stop you and nobody ever lands right where they plan to.”
It is only with experience that you can plan out things well enough in advance that few of your plans will need to change during the course of building out a loop. Chances are you will never become that experienced. Chances are, neither will I. Regardless of how much you read online, or how many videos you watch, you will not be able to overcome your inexperience and the ignorance that comes with it. It’s just something you’re going to have to live with, meaning you need to insure yourself against it.
And the only way you can insure yourself against it is to keep some room in your budget to account for it. This is something that should be common sense, but then, to borrow the oft quoted phrase, common sense tends to not be that common. Given that in building out two loops I’ve had to in both instances overnight something seemingly at the last minute, and overnight shipping prices are likely going to be significantly more than what you’re overnighting, again you need to account for the possibility.
* * * * *
Inventory
You can see the current parts inventory, minus the water cooling equipment, on PCPartPicker. Here are the components of the water cooling loop:
| Radiators: | AlphaCool XT45 240mm and 360mm |
| Pump: | AlphaCool VPP655 w/ AlphaCool HF D5 top |
| Reservoir: | Assembled from these parts: Bitspower Water Tank Z-Tube 100mm (BP-WTZACT100-CL) Bitspower Z-CAP I (BP-WTZACC1-CL) Bitspower Z-CAP II (BP-WTZACC2-CL) |
| CPU: | Koolance CPU-380A |
| Graphics cards: | 2 x EK FC-660 EK FC Bridge, dual serial 3-slot CSQ Plexi |
| Tubing: | Type L Copper annealed tubing |
| Fittings | PrimoChill Rigid Revolver, Nickel plated, Silver/Black Swiftech 90-degree swivel elbow adapter, chrome Swiftech 45-degree swivel elbow adapter, chrome Bitspower valve, shining silver Bitspower mini-D plug, shining silver |