Looking online there are plenty of options for a wall-mount 19″ rack. Open frame. Enclosed cabinet with doors and accessible sides. And there are plenty of options on eBay as well that go for much less than what you’ll find most anywhere else.
But they all suffer from the same flaw: they stand out. Hang one on your wall or use it free-standing and it’s quite obvious that it’s a network cabinet.
My wife and I recently bought a house. And after a lot of planning and research for how to wire up the network in my home, I had a couple ideas in mind. The central network hardware in my home is a MikroTik CRS317 10GbE switch (buy it at Amazon or EuroDK) and my ISP’s router, both connected to an uninterruptible power supply. I have a separate wireless access point (Tenda AC1900), but it is located elsewhere in the house at the moment, and I’ll probably buy a second one to have full coverage in my home.
I also have a few sets of rack rails left over from some previous projects I’ve since taken down, so I initially planned on just building an open rack. But given that where I put that rack is likely to be in plain sight, that would’ve been… unsightly. And most any prefab option – whether it’s open frame or enclosed – again would’ve stood out wherever I hung it in the house.
But I didn’t go full DIY either. Kind of… in between.
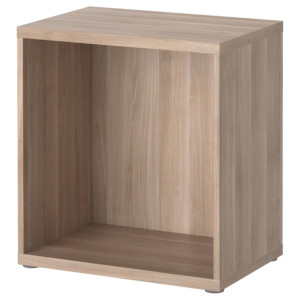
IKEA’s BESTÅ system includes several cabinet frame options, two of which have measurements almost perfect for making a 19″ rack. They’re 600mm (23-5/8″) wide by 640mm (25-1/4″) tall, and 200mm (7-7/8″) or 400mm (15-3/4″) deep. Perfect for light-weight equipment, such as switches, routers, and patch panels. And they can either be used free-standing or mounted on the wall with the corresponding suspension rail.
The shallower cabinet works for patch panels and PDUs and other very shallow equipment – e.g the Bitscope BR04A. But the deeper option is great for lightweight switches that are 12″ or shorter, such as the aforementioned MikroTik switch.
Adhering to standards
The cabinet has an internal width of 22-3/16″ (~563mm to 564mm). The proper spacing for the mounting holes is governed by the EIA-310 standard. Since the rails I’m using are similar to what I used in a previous attempt to build an open frame rack cabinet from 2x4s, I already know to space the rails to about 19-3/16″ or 19-1/4″ (~488mm).
Meaning 1-1/2″ on each side for mounting the rails. Can you get any more perfect?
Bill of materials
- IKEA BESTÅ 400mm deep cabinet – Item No. 702.473.81 (brown), 202.459.64 (black), or 302.458.50 (white)
- Reliable Hardware Company RH-12-SRR-A 12U rails
- 2×2 (1.5″x1.5″ nominal) boards, cut to 21″, one for each side
- 1/4″-20 (or M6) lag bolts, 1″ (25mm) long, at least 2 per rail
- #4×1.5″ wood screws – such as Everbilt #808631 – or M3x50mm wood screws, at least 2 per rail
- #10-32 (3/8″ or 1/2″ long) machine screws for mounting equipment or shelves
Building the cabinet
Assemble the cabinet frame as normal, including the back. If you’re going to be hanging this on the wall, add the suspension rail hardware to the cabinet as well.
Then it’s just a matter of attaching the rail to the 2x2s and attaching that to the inside of the cabinet using the #4 screws (or M3 if you went with those). And it’s on that which I have suggestions from my experience.
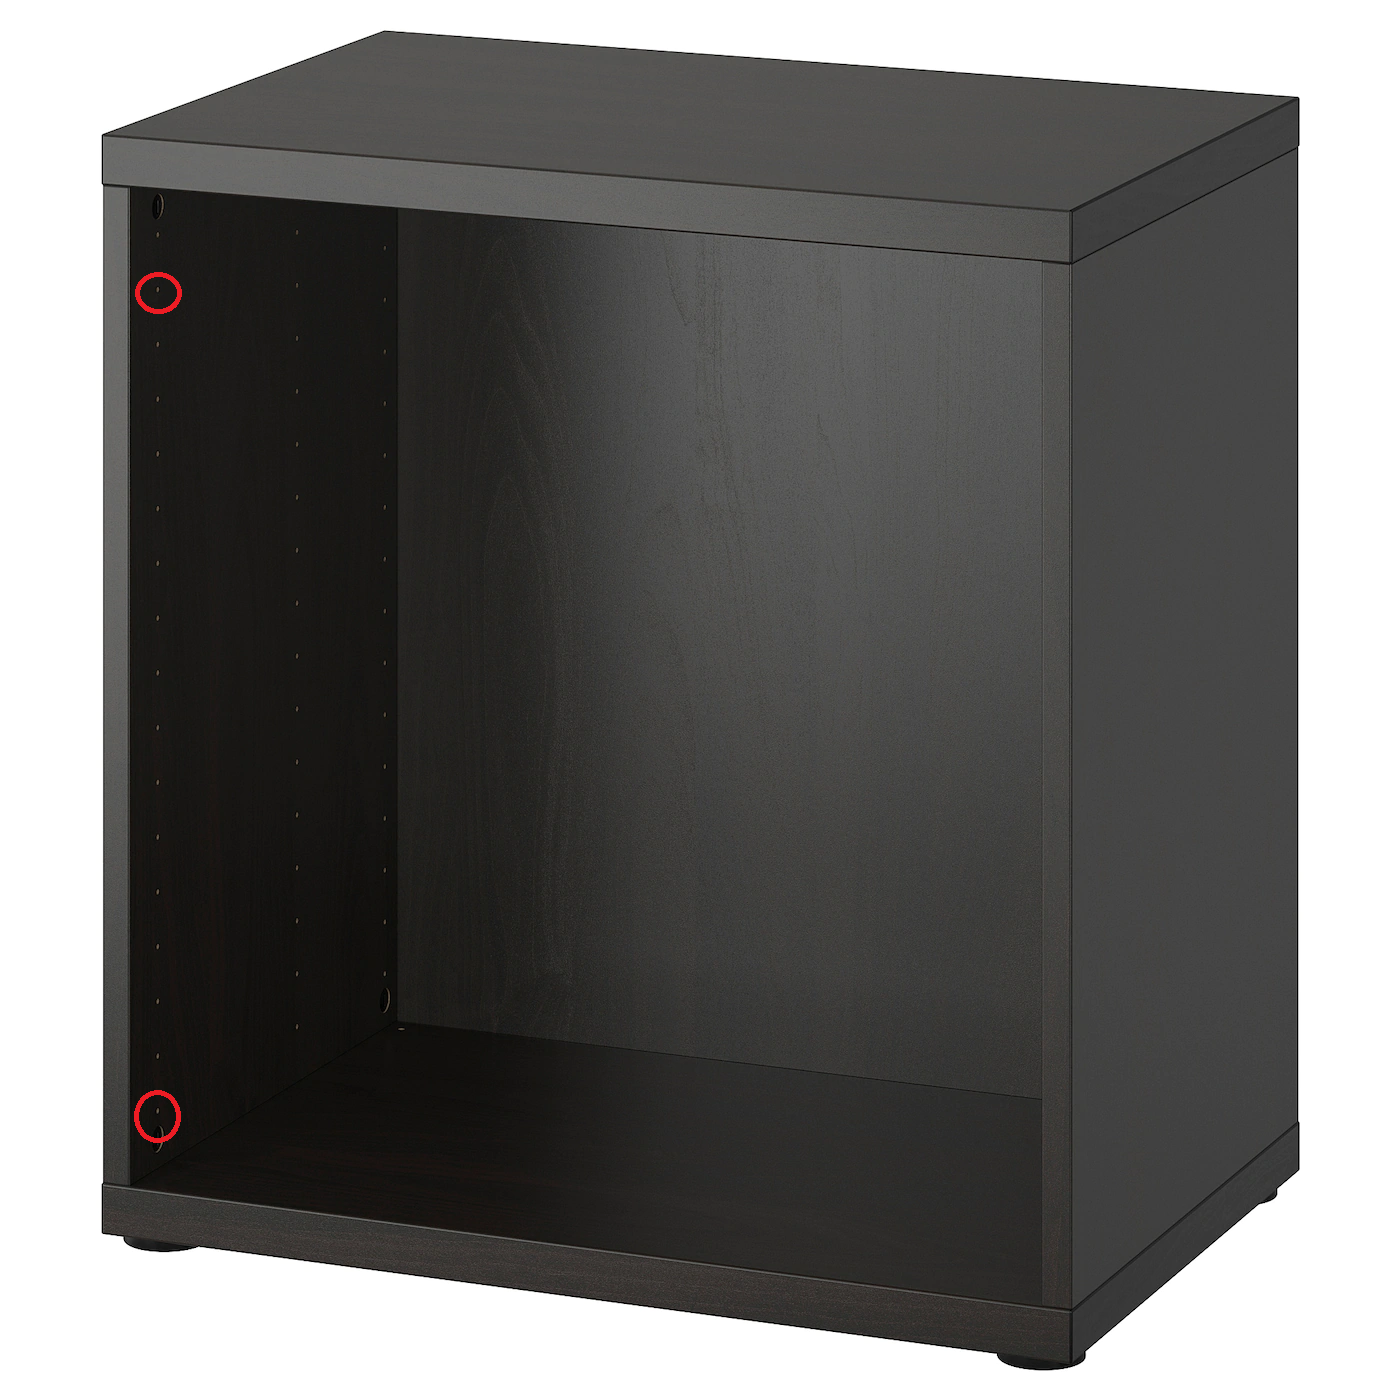
The cabinet frame comes with two (2) screws, about 50mm long, for joining two of these together, and they go through the shelf peg holes on the inside of the frame. That they go straight through means they are perfect for holding a 2×2 to the inside of the frame. But to know where, you need to put the screws through two of those holes going out, that way you have a full pass-through for pushing back in.
The holes I selected were these two (click on the image to view it full-size):
If I were having more equipment in this than just two switches and a patch panel or two, I’d have probably 4 screws each securing the 2x2s to the sides just to be safe.
I mounted the rails to the 2x2s using 1/4″ lag bolts through the #2 and #11 rack units. This all went together for me in less than an hour.
Conclusions
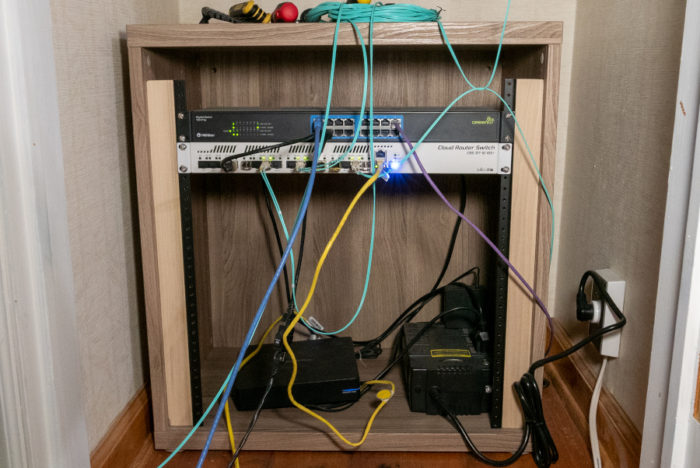
Yes, the cabling is a mess, currently, as I haven’t consolidated all connections here yet. The blue cables are OM4 optical fiber, and there is also Cat6 cable in there, too. That is a GbE switch as well, giving me the option of using various devices off RJ45 instead of wireless – e.g. my work laptop.
This looks better than most pre-fab options, in my opinion, and was less expensive than most pre-fab options. I could’ve used wood that blended in better to the outside, such as oak 2x2s instead of the poplar, or lined them with veneer that matches the cabinet. But since this was going to be out of the way and mostly out of sight, I wasn’t concerned.
So this became the central networking cabinet for my home, where I moved my 10GbE switch and ISP router. With how far out the front the cables stick, unfortunately I wasn’t able to take advantage of one of the doors available for the cabinet. The switch, router, and uninterruptible power supply all fit into this without issue. Now I just need to finish consolidating connections.
You must be logged in to post a comment.