Wow… it’s been… months since the last part of this. So what in the hell has been happening? Well, in short, a lot. I’d been doing some thinking on how to build the internal frame to the cabinet. I also needed to acquire a few things that I’ll detail later, plus there were a lot of other things coming up in the mean time.
The biggest hurdle was my inexperience with woodworking. The previous attempt at a cabinet frame was far from ideal. It wasn’t completely square. There were numerous defects to its construction largely because I cut a lot of corners, mostly due to lack of setup — e.g. I didn’t yet have a table saw when I built that. About the only saving grace was being made from 2x4s with dowel joints, so it could stand up to literally anything I did to it, including setting a lot of weight on top of it.
But this cabinet I want to do as properly as I can.
For tools I already had a drill press, table saw, circular saw, and cordless drill. I acquired a palm sander, electric planer (which I’m considering selling), and a jointer for this project as well.
A lot of mistakes were made along the way. I’ll discuss those mistakes herein for the sake of transparency and for helping out any amateur woodworkers as well who might come across this. It’ll basically be the sole focus of this article. And I’m doing this really to just outline my intentions and thought processes. So if you’re not interested in these details, feel free to click away from this.
Mistakes are how we ultimately learn. And I feel a person working on a project should outline the mistakes they’ve made and how they were overcome.
My first mistake, or so I thought, was the choice of lumber for this. Home Depot sells “pre-milled” 1×4 boards in minimum 72″ lengths. Initially I was making 2x4s by face-gluing them together. To try to get them as flat as possible out of the gate, I clamped them to the side of a laminated particle board bookcase. And it kind of worked…
The major concern here was making sure the result was square and flat. And to account for the uneven edges, I had already planned to slim them down to 3″ wide from their nominal 3.5″, starting with jointing the edges. Which didn’t work out as well as I’d initially hoped.
So on to round 2. New set of 1x4s. But not face gluing them. Instead I decided to take a simpler approach: full lap joints. This would require square cuts and flat edges to get everything square when assembled together using glue, screws, and pilot holes. And that went pretty well until I needed to drill the holes to mount the rack rail. And that’s where I screwed up on that one.
I didn’t move on to a “round 3” right away, though. Before spending any more on wood, I wanted to assess what I was doing wrong. So I took to the Internet to do more research. And there were some rather key things I was doing wrong. Key things I was overlooking without realizing it.
Apartment woodworking
Living in an apartment means my options aren’t all that great. I have limited room and neighbors to account for when it comes to noisy power tools. On which the circular saw and table saw are easily the worst, as I can’t use either without hearing protection. The jointer, on the other hand, sounds like a really loud vacuum cleaner. Hearing protection likely advised, but it doesn’t hurt my ears running it so I tend to just not worry about it.
Now there is a woodworker’s guild in my area that I’m seriously considering joining, along with taking some woodworking classes. But I wanted to see whether I could complete this project before doing that. And how well it’d turn out. More study was definitely needed in the mean time.
And that started with my jointer.
Benchtop jointers
I watched a few videos online about using a jointer, but easily the most valuable is this one by Craftsman.
https://www.youtube.com/watch?v=jNw3v9vsEfg
I had presumed that, after assembly, it’d just be fine out of the box after guaranteeing the rip fence was square. Except it wasn’t square as I first thought. And getting it square was mildly frustrating as the rip fence kept wanting to creep slightly whenever I tried to tighten it down.
The more significant change though was technique. Most videos and tutorials on jointers work from the presumption that you’re using a large jointer — the ones commonly found in woodworking shops and guilds. Few talk about the smaller benchtop jointers like mine. In fact, the Craftsman video above is the only actual video on YouTube I could find specifically addressing using a benchtop jointer effectively.
Do all the woodworking experts on YouTube expect everyone watching their videos to have the larger jointers at their disposal?
So what needs to be kept in mind with the benchtop jointers?
Well for one, a very shallow cut depth. This might seem like a no brainer, but unless you’ve worked with the larger counterparts, you don’t have a reference for comparison to these smaller units. Meaning you don’t know the power difference between them. For all I knew, the motor in mine is just as powerful as in larger models, but just without the tables and rip fences needed to work with larger stock.
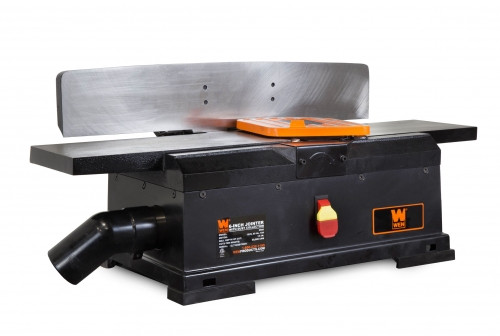
So it was very helpful to learn that you need to keep to a very shallow cut depth. 1/32″ is what I saw recommended. My jointer — pictured above — doesn’t have a depth gauge, so I had to use a square to measure the cut depth. You might be able to get away with 1/16″, but it’s best going shallower.
This also keeps “snipe” to a minimum, but that’s something that is otherwise common with these smaller jointers. Something that can be accounted for by keeping the piece long when planing it, then ripping it down to final length later.
Lumber
And then there’s the lumber itself.
For the third round, I considered going back to face-gluing the 1x4s, this time as a triple layer instead of a double layer. Only I didn’t go that route. Each six-foot 1×4 was shy of 5 USD, so that would get expensive in a hurry.
Instead, I’m leaning toward using 4x4s. Why? To answer that, I need to get into some math. Which means I need to first talk about the outer cabinet frame, the SEKTION cabinet.
Math on the cabinet frames
The SEKTION cabinet frame is 3/4″ particle board. For the 30″ tall, 24″ wide SEKTION cabinet, the internal width is 22-1/2″ and the internal height is 28-3/8″ — top and bottom aren’t flush with the edge of the panel.
The rails are 1-1/2″ total width and the mounting holes are give-or-take along the mid-line, so about 3/4″ from the mounting hole center to the face of the rail. And the 12U rails are 21″ tall, which will leave a little over 3-1/2″ clearance on the top and bottom. So time for some more math.
I’m aiming for a rail depth of 22″. The internal frame, then, will be 20.5″ deep between the mounting holes. Add the width of 1 board, and the entire frame would need to be about 23.5″ deep. Round up to 24″ to keep things simple.
Again, the frame’s internal width is 22.5″. To get the rails to the proper width for the EIA-310 specification, I would need to close that width down to about 19.25″, a difference of about 3.25″. Splitting that evenly means 1-5/8″ on each side.
I originally planned this to use 2x4s — as doubled-up 1x4s — and a 1/8″ thick washer on each side. So why 4x4s instead? They’re 3.5″ square, and an 8-foot 4×4 is only about 2 to 3 USD more than the 6-foot 1x4s I’d been buying. So a decent 4×4 could net me the equivalent of two 2x4s even after jointing and ripping. Provided I get decent stock to start with.
So what next?
I’m not yet anywhere close to having a completed cabinet. This just hasn’t been a major priority for me on my project list. But I have been continuing some experiments lately.
I mentioned earlier about need to re-adjust the rip fence on the jointer. Along with that, I acquired a 4×4 from my local Menard’s — thanks to the guys there for helping me with it and lopping the 8′ timber in half. It’s currently acclimating to my apartment as I write this. They also carry engineered 4x4s made of oak, I presume for indoor staircases. But those were…. expensive. I might consider them for the next cabinet, though. But not for this one.
So really right now I’m just trying to figure out how best to do the inner frame for the cabinet. I have a few ideas in mind and some power tools to help me out. It’s just a matter now of learning how to use the tools since I’m now well beyond just cutting wood and drilling holes.
In the mean time, though, that’s at least an intermediate update to what is going on with this. The next update, which hopefully won’t be several more months out, should be with progress on the cabinet itself.
You must be logged in to post a comment.