- Amethyst
- Revisiting Amethyst – A different look
- Revisiting Amethyst – More color testing
- Slight detour
- Amethyst finally gets an upgrade
The simplest solutions will often present themselves, provided you’re willing to open your mind to them.
If anything would be the theme to the transition of Absinthe to Amethyst, that would have to be it. Building the loop for Amethyst was initially challenging, simply because I kept thinking, anticipating the overall layout would be much more complicated. But the less I thought about it, the simpler the solution became.
Let’s start with Absinthe and the system specifications:
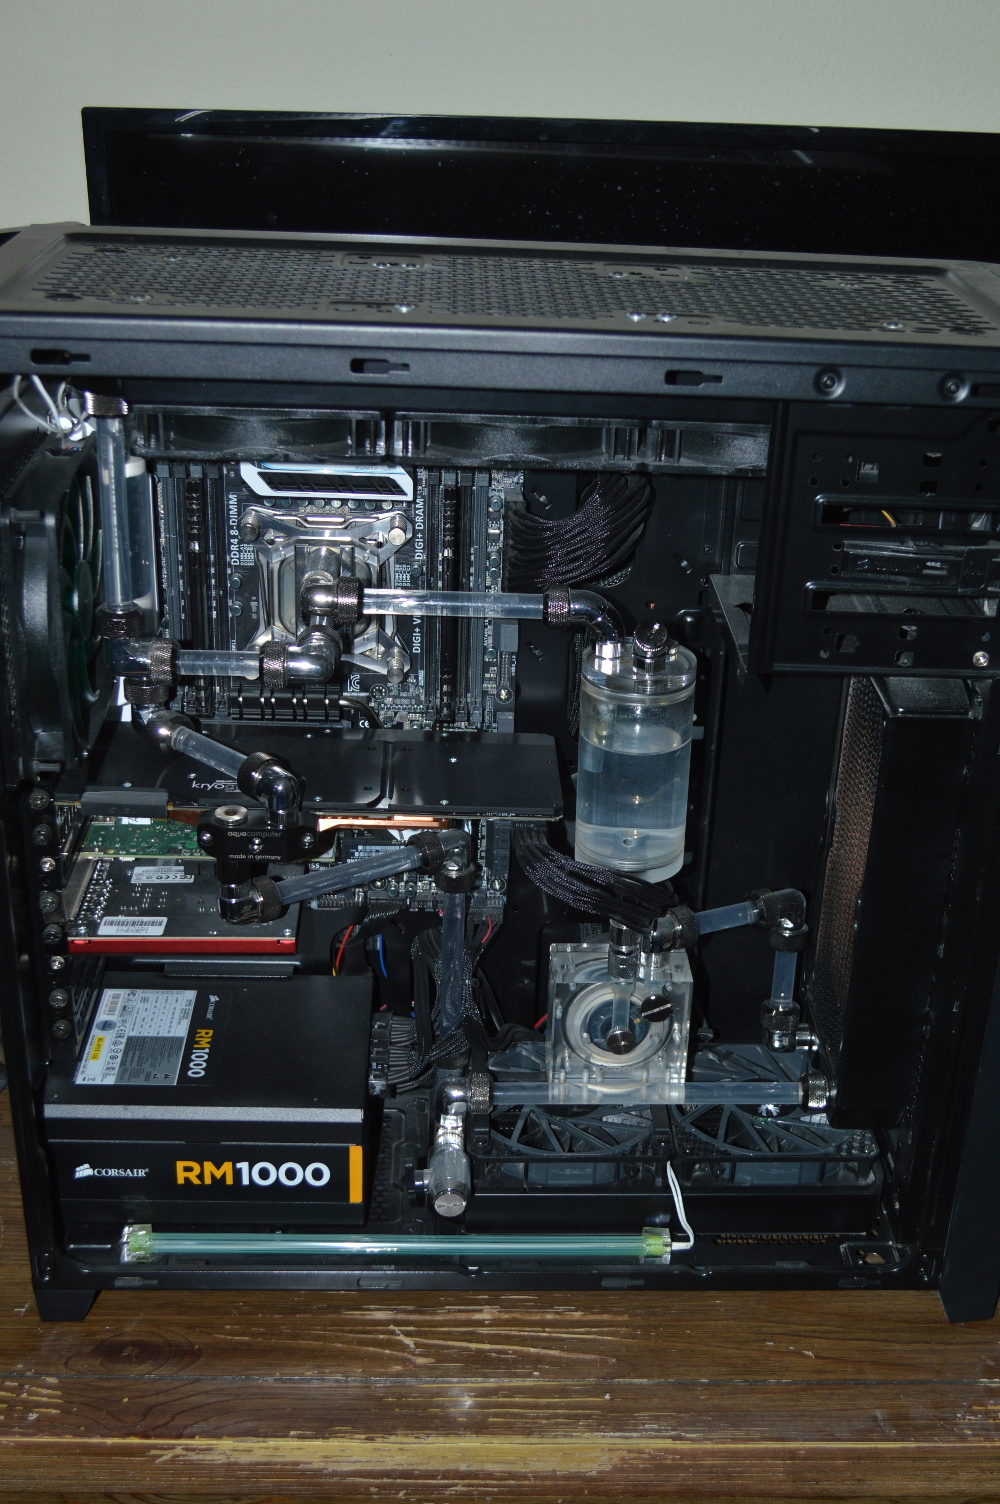
System specifications:
- CPU: Intel i7-5820k
- RAM: 16GB DDR4-2800
- Mainboard: ASUS X99-A/USB3.1
- Graphics: EVGA GTX 1080 SC
- SSD: Samsung 950 PRO NVME
- Power: Corsair RM1000
- Chassis: Corsair 750D
Water cooling specifications:
- Radiators:
- Top: AlphaCool XT45 360mm
- Bottom: AlphaCool ST30 240mm
- Front: AlphaCool XT45 240mm
- Radiator fans:
- Top: Nanoxia Deep Silence 120mm 1300 RPM
- Bottom: Bitfenix Spectre Pro 120mm
- Front: Nanoxia Deep Silence 140mm
- Pump: AlphaCool D5 with HF D5 acrylic mod top
- Reservoir: Bitspower 100mm with Z-Cap I and II clear
- CPU block: Watercool Heatkiller IV
- GPU block: Aquacomputer kryographics with clear window
- Tubing: 3/8″x1/2″ PETG
- Coolant: Mayhem’s X1 Clear
* * * * *
Final specifications
None of the main system specifications changed. Only the specifications for the water cooling loop.
- Radiators:
- Top: AlphaCool XT45 360mm
- Bottom: AlphaCool ST30 240mm
- Radiator fans:
- Top 360mm: Cougar CF-D12HB-W
- Bottom 240mm: Bitfenix Spectre Pro 120mm
- Pump: AlphaCool D5 with HF D5 acrylic mod top
- Reservoir: Bitspower 200mm with Z-Cap I and II clear
- CPU block: Watercool Heatkiller IV
- GPU block: Aquacomputer kryographics with clear window
- Tubing: 3/8″x1/2″ and 1/2″x5/8″ PETG
- Coolant: PrimoChill Liquid Utopia
Specifically there are now only two radiators where there were three, and the fans on the top radiator have also changed.
* * * * *
New parts
So no system parts upgrades this time around. There is no new generation to the GTX 10xx series, as of when I write this, and there’s no need to upgrade her to the GTX 1080Ti (and desire given current pricing). And I’m not planning on a platform upgrade for the next several years.
I removed the front 240mm radiator to make room for hard drive bays. My wife has this uncanny ability to fill up a 500GB solid-state drive, so a bank of four (4) 1TB HDDs should provide some storage longevity.
This won’t affect temperatures to any significant degree. I probably could’ve taken her system down to just the 360mm radiator and been mostly fine. It’ll also make for a simpler loop that will be easier to fill and drain.
And while I love the Nanoxia fans for being very quiet, they’re green. This worked well for Absinthe. Not so much for Amethyst. It was not easy finding similarly quiet fans that would not clash with the system theme – Noctua was NOT an option here.
I turned to the Cougar CFD series, specifically the white LED model. These are comparatively rated to the CF-V12H fans I use in Mira (ratings are for 12V operation):
- Air flow: 64 cfm (109.2 cmh) at 1200RPM
- Static pressure: 1.74 mmH2O static pressure
- Noise pressure: 16.6dB/A noise pressure
Three of these went to the top radiator, and a 140mm version is the rear exhaust fan. These provide white lighting in the upper area of the mainboard. The rest of the fans are not being changed, including leaving the front Nanoxia fans since those… aren’t all that important to the internal look of the system.
* * * * *
New color, new coolant
In the lead-up article to this, I mentioned wanting to use purple coolant, similar to what I saw in a system called Chimaera. Primarily to take advantage of the clear tubing and clear-top water blocks, clear reservoir, clear pump housing… I think you get the drift.
I also wanted to flood the system with bright white light. For that I bought a spool of pure-white LEDs, but never actually did anything with them. My wife, however, wanted to flood the system with purple light, similar to how Absinthe was flooded with green light.
Since I mentioned the white LED fans above, you can kind of guess how that turned out. No I didn’t win. Instead we compromised.
I still wanted the purple coolant, but I managed to bring my wife on-board, and get her off the idea of using purple light, by recommending UV coolant. Initially looking to the PrimoChill Vue UV Violet.
Except unbeknownst at the time I bought it – and I don’t think this provision was added until after I bought it – you can’t run the Vue coolant in a system for more than 8 hours at a time or it will break down in a matter of weeks. And the sediment additive that gives the coolant its pronounced effect will start clogging blocks and such.
But even at 8 hours per day, the coolant should be flushed and changed in 4 to 6 months.
So no thanks.
But having sold my wife on the UV Purple, I needed a new option. Initially I looked at UV Purple transparent coolants, for which there seemed to be only two options: Koolance (hopefully the color for the bulk option is more accurate) or PrimoChill. But to better control the final color – again trying for Siberian amethyst – I opted for clear coolant and dye.
And from what I could find, only one company sells a UV Purple dye: PrimoChill. Thankfully my local MicroCenter had it in stock so I was able to buy it locally. And for clear coolant, I opted for PrimoChill’s Liquid Utopia, which is a concentrated additive you mix with a gallon of distilled water. And it is also included with PrimoChill’s LRT Tubing retail packaging, which is where I got mine.
* * * * *
Bigger is better
Or at least longer is better. At least when you’re talking about reservoirs. (Try to keep your mind in the PG zone…) The previous reservoir was only a 100mm. Because of where it was initially placed when Absinthe was initially built:
And when moving that reservoir forward when rebuilding her loop for 3 radiators, I didn’t replace it with a longer tube. Instead keeping the short tube since it still allowed for a direct return from the CPU block. And going with a clear coolant, there really wasn’t a need to go with a longer reservoir tube.
But since we opted to swap for colored, UV-reactive coolant, I opted to go with a longer reservoir tube as well to show it off. Namely the 200mm Bitspower reservoir tube.
* * * * *
Showing off the graphics card
Colored coolant with a clear-top GPU block means wanting to show it off. But there aren’t many options for doing this in a chassis not already built for it. In the previous blog post, I showed one possible option:

This is the Cooler Master vertical graphics card holder. Unlike other options – such as this one from MNPCTech – it is intended to replace the expansion card slots in your chassis. And it works well if you’re using a chassis with more than the standard slots – such as the 750D – or have only one graphics card and no other expansion cards, which is likely most gaming system builders.
It’s intended for Cooler Master’s chassis as well, and using it in the 750D required… some modifications.

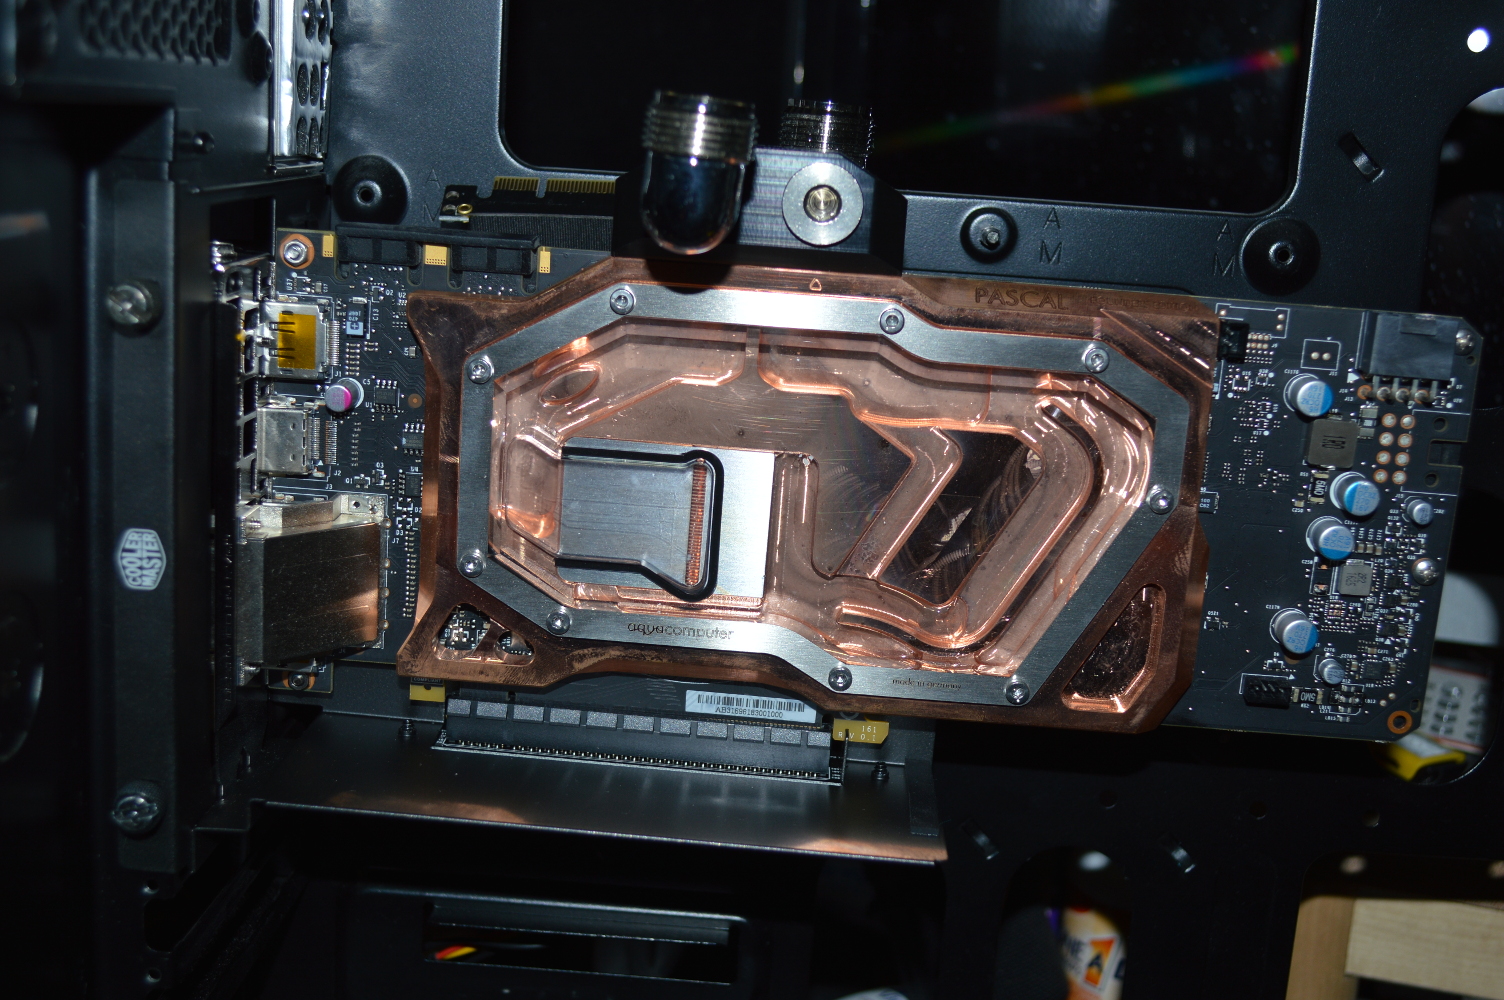
Metal sheers took care of those without much difficulty. I didn’t make it completely clean, but only clean enough.
The only complaint I have about the mount is actually with the riser cable that is included: it doesn’t clip onto the tail for 16x cards, allowing for some cable sag as you’ll see in later pictures. So if anyone from Cooler Master happens upon this article, please correct that.
* * * * *
Building the loop
Not having the front radiator simplified things in some ways. Same with the vertical GPU.
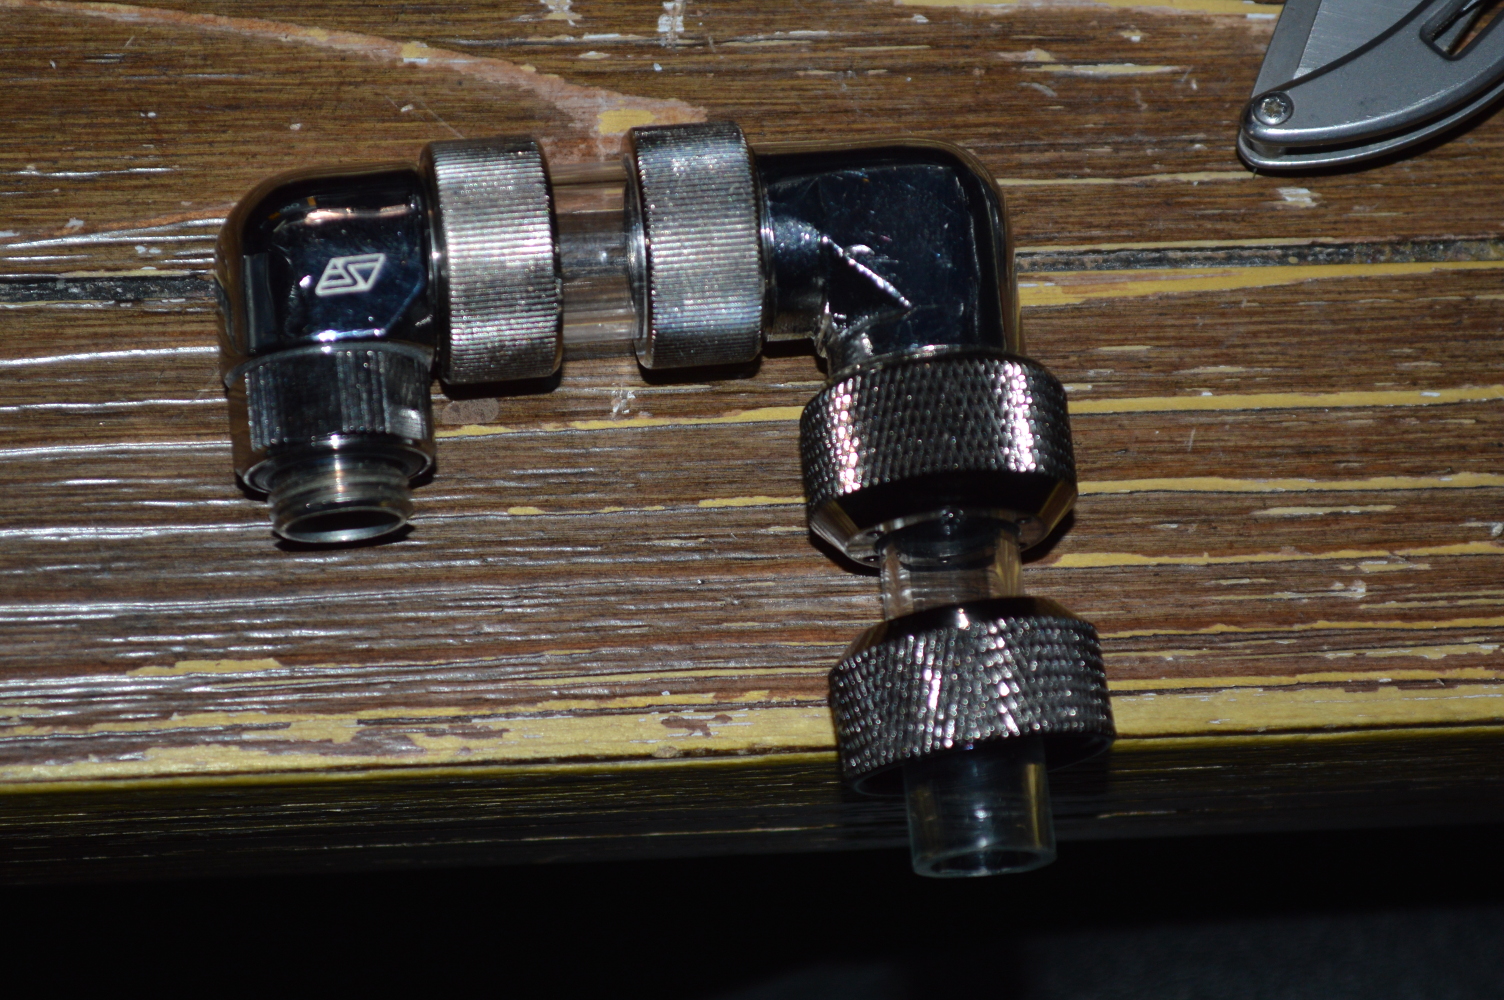
Let’s start with the lower radiator, to which the pump is also attached. I had some 5/8″ (16mm) OD tubing sitting around from when I was initially looking at using Nanoxia lighted fittings. And I also had a few EK 16mm fittings for some reason. So for the initial connection coming out of the pump and going to the bottom radiator, I opted for this.

This I felt looked a lot better than using the thinner 1/2″ OD tubing and bulkier PrimoChill Revolver fittings. The rest of the fitting assembly is…. interesting. As to get it lined up, I used a Swiftech 90° fitting, to an 8mm EK extension fitting, Swiftech dual-45° rotary fitting, and an AlphaCool 4-way fitting, with a 10mm Koolance male-to-male fitting connecting that to the radiator.
Sometimes you just need to improvise. And that wasn’t the only place. Despite having to acquire additional fittings, I’m glad I had a lot already on hand.
From the lower radiator, I needed to figure out how to get the flow running to the graphics card. Because of the jet plate, the inlet to the graphics card has to go through the specified port. So I initially tried this:

As you can see, that was complicated. The idea was to keep the coolant flow out of the way of the GPU block so you could see the entire face of it. But I quickly realized this wasn’t going to work. Again, it’s complicated, and all the 90° fittings make it restrictive as well. I needed a better solution.
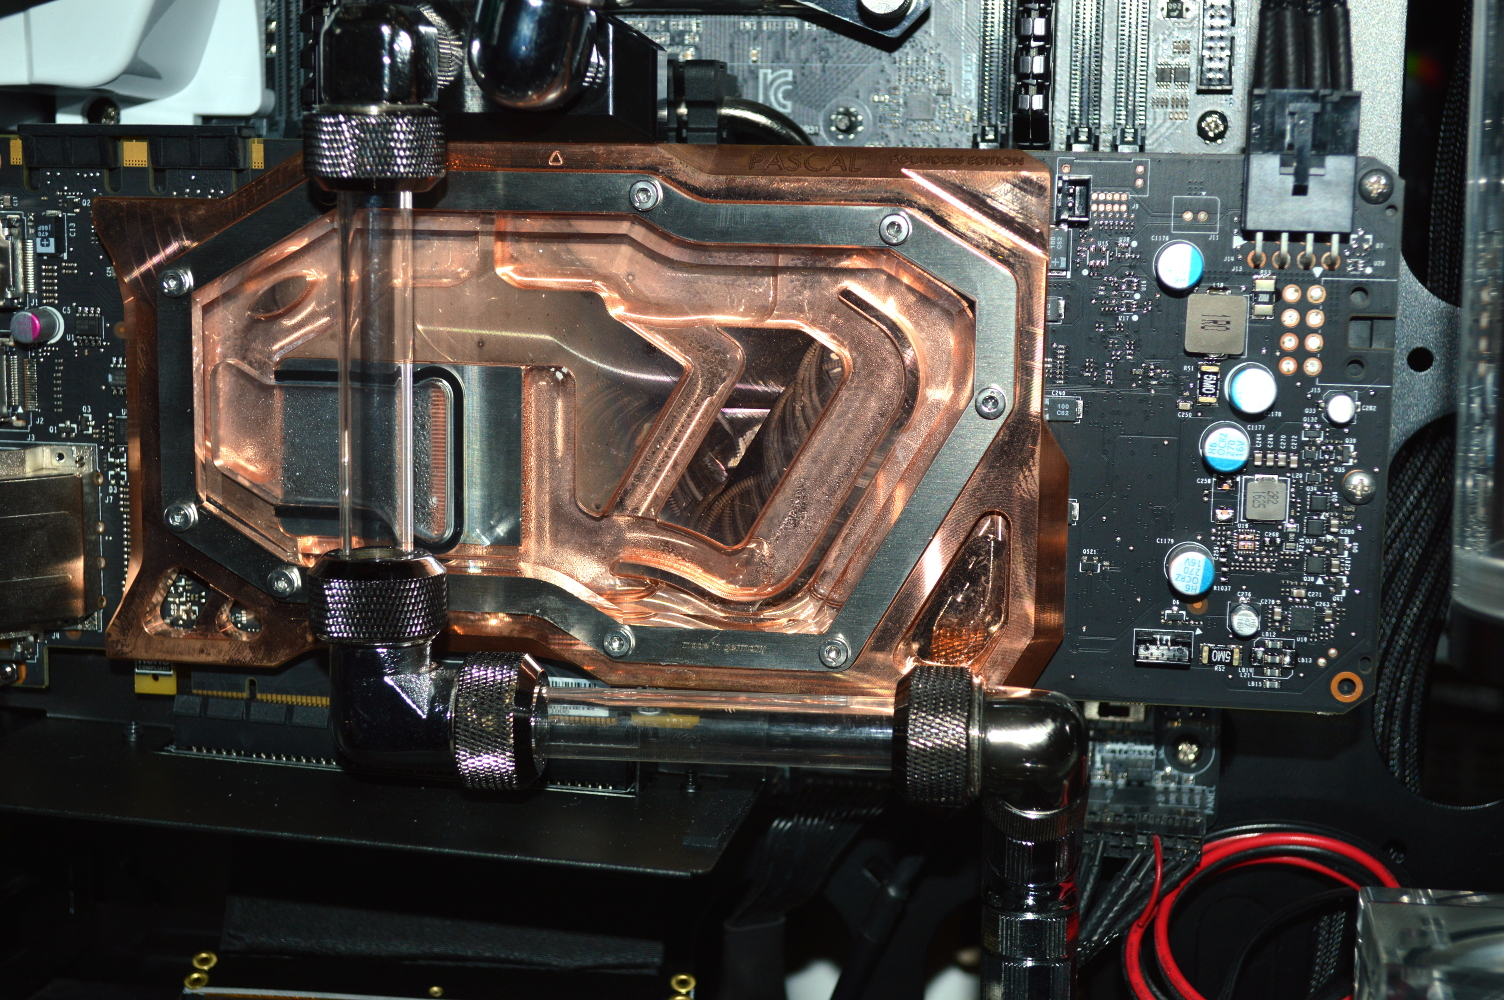
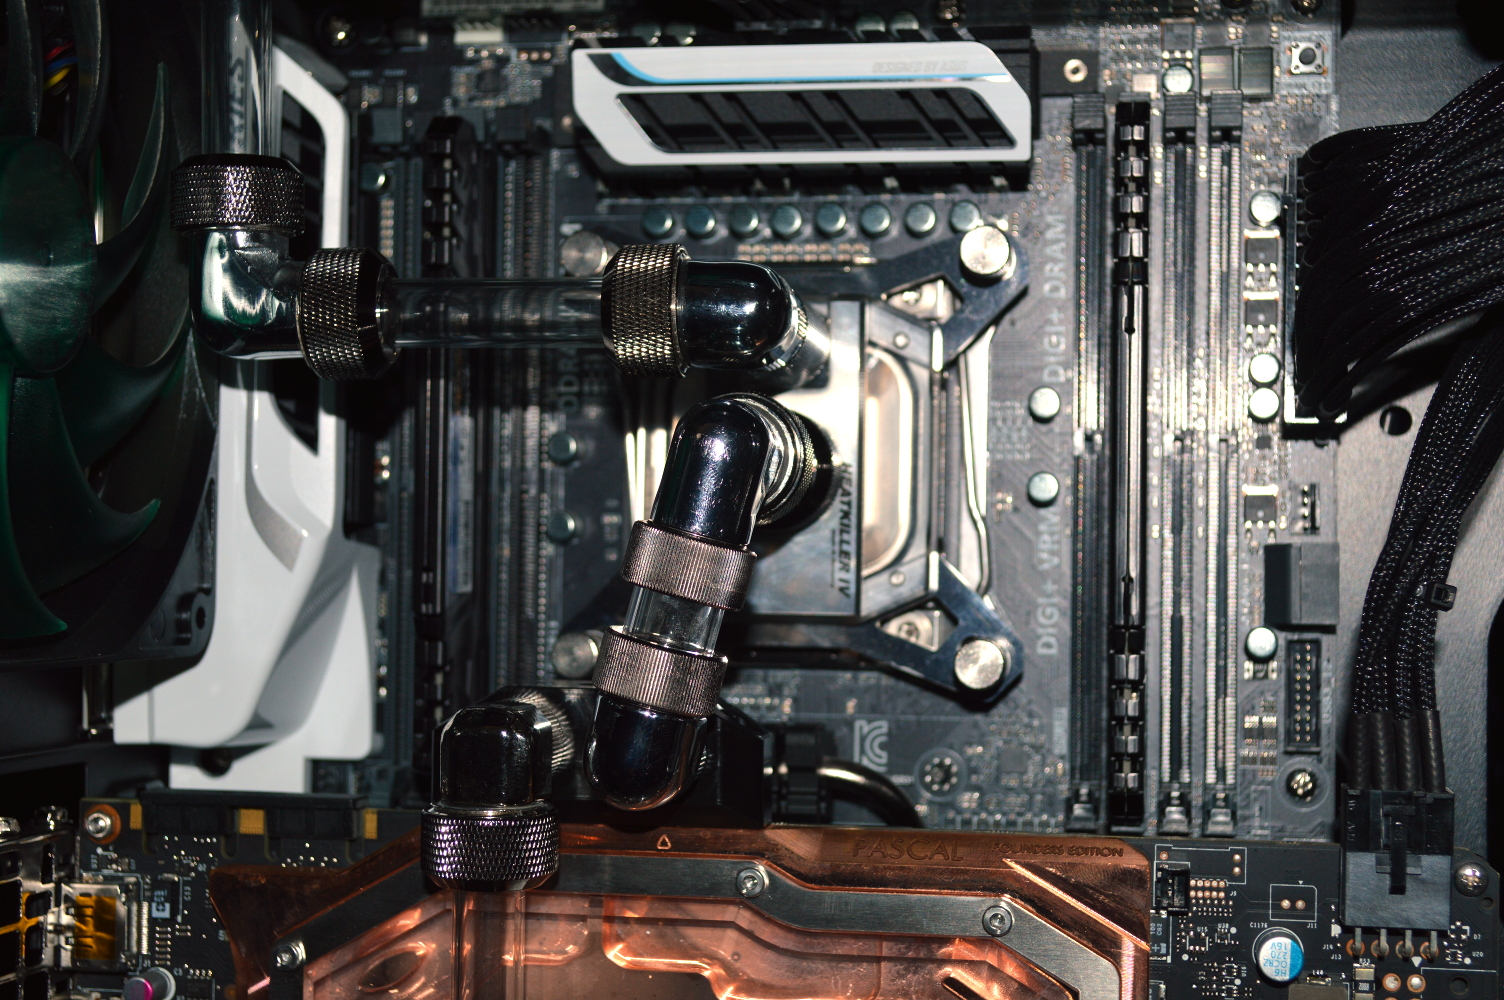
This takes the coolant flow in front of the block, but also puts it directly in front of the jet plate, helping to partially obscure it. But it’s also a lot less restrictive, and a lot less complicated. What you can’t see well is the string of fittings needed to get to this. Several extension fittings coming up from the radiator, eventually to a 45° fitting, another 15mm extension, then finally to a 90° fitting to meet the tubing.
As the above picture shows, I initially planned to take the GPU outlet to the top radiator like in the previous loop, but instead opted to have it go to the CPU using this.
From there, getting to the top radiator was a matter of using a long extension fitting coming out of the CPU (easily could’ve used clear tubing, not sure why I didn’t), to a 90° fitting. The vertical piece meets with a pair of 90-degree fittings screwed into each other. Basically a 90° fitting on the radiator into which I have another 90° fitting, giving an offset that goes to about the middle of the radiator, which comes straight down to meet up with the tubing coming from the CPU.
Then with the longer reservoir tube, getting back to the reservoir was straightforward. Literally.

That’s a black Swiftech 15mm extension fitting to an EK black-nickel dual-45° fitting coming off the radiator. An EK 90° fitting on the top of the reservoir.
* * * * *
Cleaning and preparing the loop
Again back to PrimoChill – I swear they did NOT sponsor this build (though if any PrimoChill representative is reading this, I’m open to discussions). But for cleaning out the blocks and radiators, there were really two options: Mayhem’s Blitz, or PrimoChill’s System Reboot. Since I didn’t feel like dealing with harsh chemicals, I opted for the latter.
There are two ways to use it, depending on how concentrated you want to go: either add it into a 1-gallon jug of distilled water, or fill your loop with distilled water and add the entire bottle into your loop. If you’re trying to clean out from using dyed or pastel coolant, I’d highly recommend the latter. Either way, let the cleaner circulate for at least 24 hours and up to 48 hours. And if you’re cleaning out from using dyed or pastel coolant, let it run for the full 48 hours. You may also need to repeat.
I added to the gallon distilled water and let it run for close to 36 hours. Then I used the rest of the cleaner to rinse out what was in there, and then followed with distilled water.
After that, I pulled everything apart to rinse everything individually with distilled water before piecing it all back together to add the coolant and dye.
* * * * *
Lighting
Initially I intended to use Darkside UV LEDs for the lighting, but decided ultimately it was too overpowering. They’d probably work well with opaque coolant, but not transparent. Any UV reaction was overpowered by its bright violet light. Note: this was taken with my cell phone, not my DSLR, with not the greatest white-balance settings. But it clearly shows the reservoir and pump housing are violet, and there’s virtually no UV reaction from anything else, rather than the UV glow I was going for.

So I opted for cold cathodes, which do not have nearly the overpowering violet light the Darkside LEDs had, meaning they also aren’t nearly as bright. Instead it provides a gentle violet hue while allowing the UV effect to shine through. So much so that, with an 11″ cathode behind the reservoir and the white light above and near by, it looks like a chunk of glowing amethyst. Unfortunately it isn’t something I’m currently able to properly capture on camera, so I’ll have to play around with camera settings later to see if I can properly capture it.
But one thing’s for sure: the cold cathodes give the loop a nice glow without any overpowering violet color. And the white LEDs from the fans aren’t overpowering it either. Specifically the system has an 11″ cold cathode behind the reservoir, and two 4″ cold cathodes to shine on the pump housing and GPU block. Unfortunately the acrylic on the GPU block is preventing any UV glow from coming through.

* * * * *
Update 2018-02-26: In one of the earlier pictures you can see a bank of four hard drives off to the front of the chassis. And in the immediate above picture, you can see a pink line beneath the reservoir. The HDDs were connected to the mainboard using SATA cables with a UV-reactive coating, hence the glow, that did not have latches. They were the only cables I could immediately grab that I knew were SATA III.
Well tonight, that created an issue that was resolved when I disabled the SATA ports on the mainboard – primary storage is an NVMe SSD. So a quick trip to Micro Center and 16 USD later for SATA III cables with latching connectors, and that issue was resolved. As noted when the system came up quickly and the desktop loaded nearly instantly upon login.
So let that be a lesson: don’t use SATA cables that do not have latches on them. Especially when you’re using them to connect an HDD RAID array. The latches basically all but guarantee the connectors are seated, giving you a trouble-free, fast connection.
You must be logged in to post a comment.