- Water cooling build in my wife’s computer – Part IX
- Project Absinthe
- Project Absinthe – Part II
- Project Absinthe – Part III
- Project Absinthe – Part IV
- Project Absinthe – Part V
- Project Absinthe – Part VI
- Project Absinthe – Part VII
- Project Absinthe – Part VIII
- Project Absinthe – Part IX
- Project Absinthe – Part X
- Project Absinthe – Part XI
- Project Absinthe – Part XII
- Project Absinthe – Part XIII
- Project Absinthe – Part XIV
- Project Absinthe – Part XV: It’s alive!
- Project Absinthe – Intermission and future plans
- Project Absinthe – Part XVI
- Absinthe – Part XVII
- Absinthe – Part XVIII
- Absinthe – Part XIX: Valentine’s Day
- Absinthe – Part XX
- Distilling another batch of Absinthe
- Distilling Absinthe – Part II
- Distilling Absinthe — Part III
- Another glass of absinthe
- Another glass of absinthe — II
- Adjusting the recipe
- Absinthe to Amethyst
Progress on Absinthe would have continued on Saturday had a little shipping concern not gotten in the way. Instead everything had to wait till Monday. This wasn’t a major deal as I had a parts installation for my personal computer to handle in the mean time, and I was able to figure out another little bit regarding cable management in the interim.
But come the Monday, when the power supply and the first GTX 660 card arrived, I got straight to work. My wife had a dentist appointment that day, meaning I would be home for the afternoon as I made sure to go in early for work knowing that was coming up. Here’s where I last left things off (actually this was before the fan controller installation, but close enough):
Power supply switch
Anyone who has ever changed out a power supply on a system, especially the kind with tentacles, knows how much of a pain it can be. You’re basically pulling apart everything. And given what we knew was going to be coming up, I wanted to make sure that this would be pretty much the last time I’d have to do that. Five of the fans in the system would be for radiators, so I needed to make sure I could still get them out of the way, but everything else could be “locked down”, so to speak.
But my foresight didn’t reach as far as I wanted.
As I have a CX750M in my personal computer, I had previously purchased the custom cable kit that Corsair sells. It comes with a lot of cables, and I knew I had more than enough to cover another power supply – one of the things that made me glad I went with a Corsair power supply.
But one thing that slipped my mind is that the RM power supplies are full modular, meaning the CPU and 24-pin ATX power cables are also modular. Now for the CPU, there was already a cable in the Corsair kit to handle that. But there was not one to cover the main ATX cable. Corsair sells that separately. Had I remembered that, I would’ve included it in an order from Performance-PCs that occurred around the same time. Instead I ended up overnighting it from them.
On her previous power supply, I had used extension cables for the CPU, ATX and PCI-E power cables since the tentacles on the GS800 aren’t all that attractive, nor were they long enough to adequately reach everything. But with the custom sleeved cable kit for the RM power supply, those cables were no longer necessary, allowing for much shorter cable runs and much less cable bulk to manage behind the mainboard. That is always a good thing.
Add in the attractiveness of the custom 24-pin ATX cable I had overnighted, and I didn’t need any of the extension cables I originally used, giving a significantly reduced cable bulk.
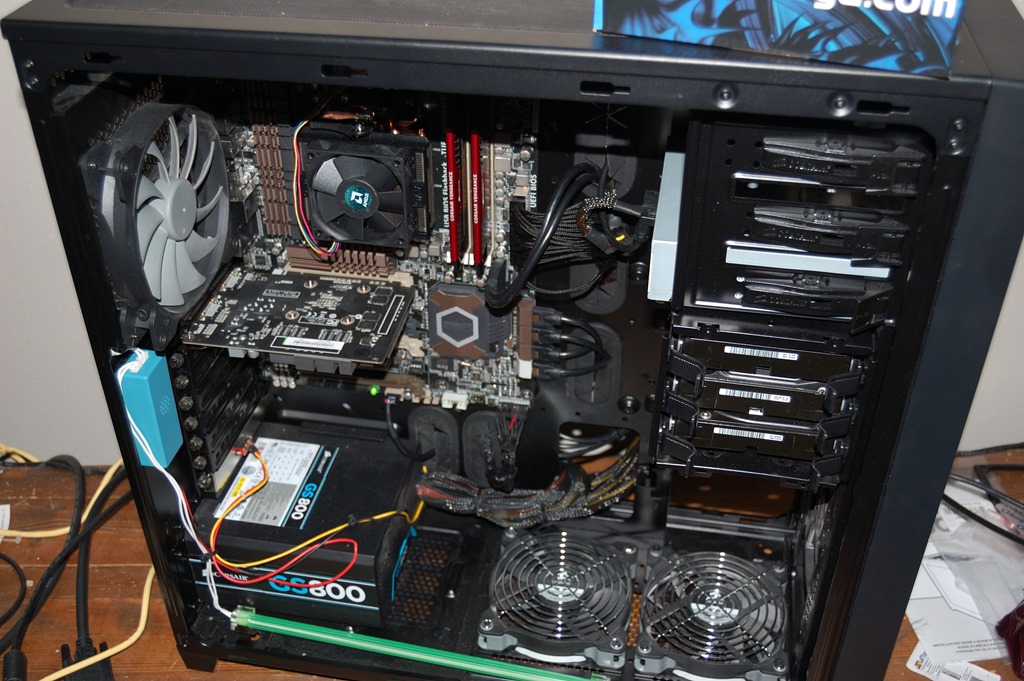
But when I first put the power supply in the case, I operated under the assumption I would still need them, so I didn’t get the cabling the way I wanted it. But I still managed to get case closed up and just left it to wait for the sleeved 24-pin ATX cable. That came on Wednesday, but as my wife had that night off, I didn’t work it until the next day in which I tore apart practically everything again. I had also made a trip to Microcenter to find a SATA to 2xMolex power adapter with the intent of using it to get rid of the Molex power cables I had also put into the build – I bought two actually so I could use one in my computer as well to get rid of the Molex power cable I have currently.
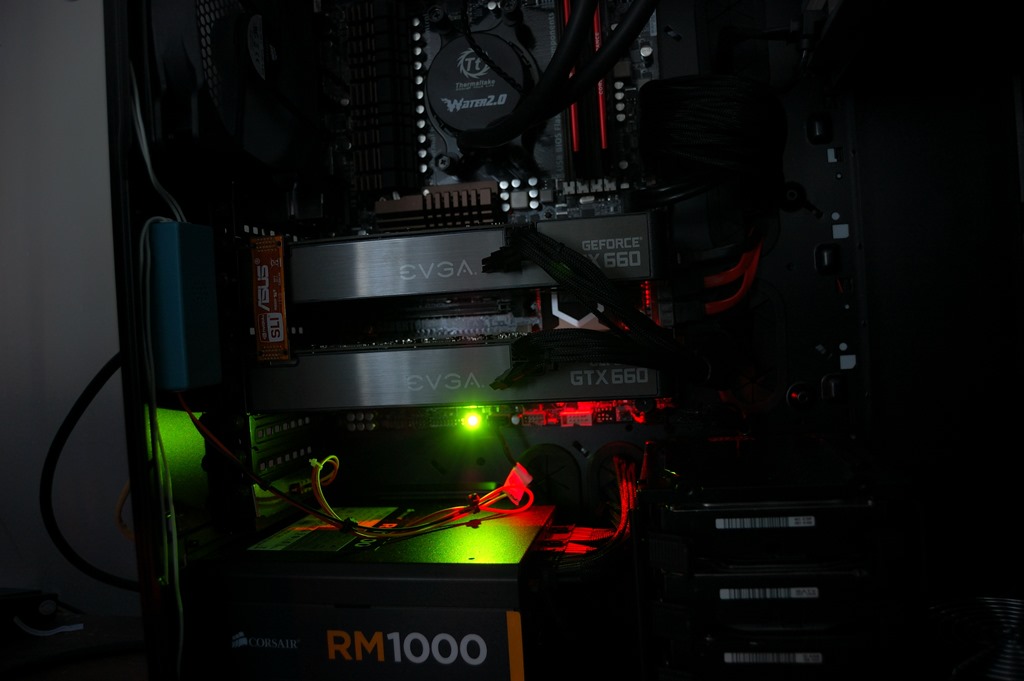
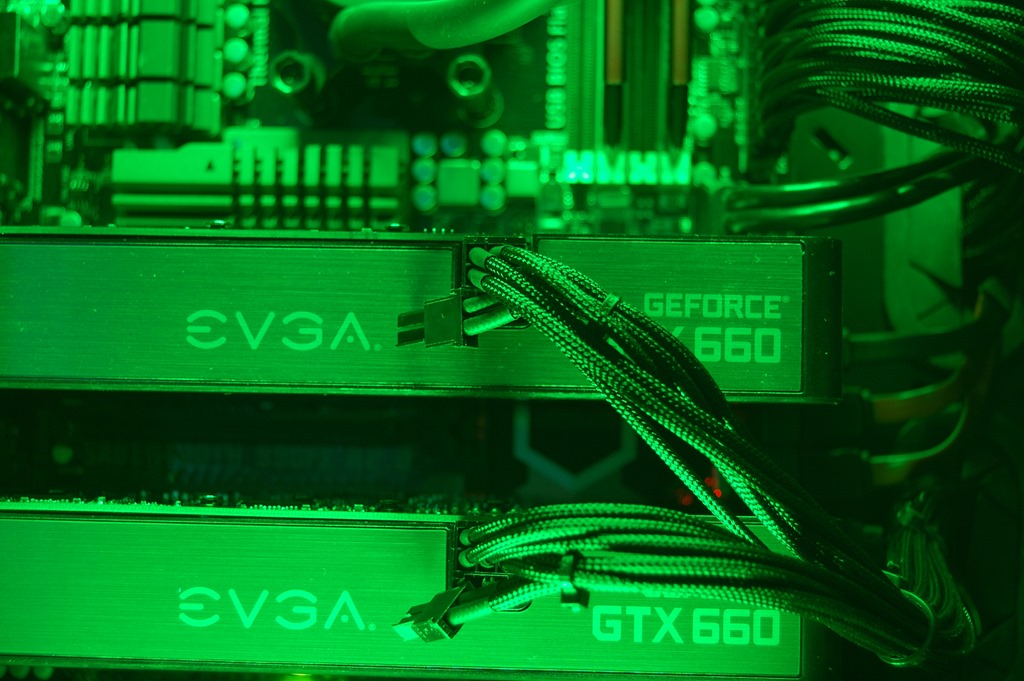
So with the redo, I was able to eliminate a lot of cable bulk – getting rid of all extension cables, plus eliminating the Molex peripheral cable. I also had a second GTX 660 on the way from NCIX, so I made sure to run two PCI-E cables, leaving one just dangling in mid-air beneath the first card. When the second card arrived on Friday, all I had to do was open the side panel and install the card and the SLI bridge without having to pull apart anything else.
Now there was one snag to my plans by going with the RM1000: the 240mm radiator won’t fit lying on the floor of the case, as the cables protrude too much from the power supply, and there’s no way around that. So instead, the 240mm radiator will be attached to the front with the front 140mm fans blowing into it. This means the hard drive cage had to be moved back to the floor of the case, immediately adjacent to the power supply.
But I was aware this might be a concern and had already planned for it, already had an alternate idea in mind.
Release the Kraken!
Both of us kind of got sick of the “jet engine” noise the AMD stock cooler provides, so I decided that I’d take the ThermalTake cooler off my graphics card and put it back on her processor. By the way, a Corsair SP120 did wonders for noise, though not much for cooling on that. I also took the opportunity to connect up the various temperature sensors as well to her fan controller. I only connected three, though, as the last temperature sensor spot would be for the coolant temperature sensor.
The locations of the sensors are the front of the case before the front fans (as in between the fans and the fan filter), near the rear intake fan, and between the ThermalTake radiator and top dust filter.
Changing out the fans
The 140mm fans that come with the 750D don’t really do all that well with the fan controller, so it seems. So I decided to look around, especially since all these Corsair fans currently in her system cause it to sound like a beehive when they’re all cranked up. I’m considering switching to NoiseBlocker fans, the PL-2 and PK-3, as I’ve heard a lot of good about them. But I’m also looking at the BitFenix Spectre Pro fans as well.
Here’s the comparison with her current fans according to their respective manufacturers (best ratings in bold):
| PK-3 | AF140 | Spectre Pro 140mm | |
| Operating voltage | 3.5-13.8V | 7-12V | 5-12V |
| RPM | 1700 | 1150 | 1200 |
| Airflow | 90 CFM | 62.74 CFM | 86.73 |
| Static pressure | 1.65 mm/H2O | .84 mm/H2O | 1.38 mm/H2O |
| Noise pressure | 32.5 dB/A | 24 dB/A | 22.8 dB/A |
So on operating voltage and RPM, the PK-3 wins out clearly. But on airflow, the Spectre Pro has only 3.6% less CFM than the PK-3. Static pressure is a bit less at 16% less static pressure. But the Spectre Pro beats everyone on noise pressure, only slightly better than the AF140 but significantly better over the PK-3.
Now let’s look at the 120mm fans (best ratings in bold):
| PL-2 | SP120 HP | Spectre Pro 120mm | |
| Operating voltage | 3.5-13.8V | 7-12V | 5-12V |
| RPM | 1400 | 2350 | 1200 |
| Airflow | 56.5 CFM | 62.74 CFM | 56.22 |
| Static pressure | 1.24 mm/H2O | 3.1 mm/H2O | 1.24 mm/H2O |
| Noise pressure | 22.5 dB/A | 35 dB/A | 18.9 dB/A |
On the 120mm front, the PL-2 wins on operating voltage, but the SP120 wins on everything else except noise, where the Spectre Pro again beats everything else. And again we see the BitFenix Spectre Pro comparing quite well to the NoiseBlocker fan, with a negligible difference in airflow and about the same static pressure while being noticeably quieter. Given that the radiators I’ll be using are low FPI radiators of moderate thickness, I don’t think having the SP120s will really improve cooling much compared to the PL-2 and the Spectre Pro, so static pressure isn’t going to be of huge importance on this one.
And on price, BitFenix wins hands down. On Performance-PCs, it’s half the price of the NoiseBlocker fans for very comparable performance, and on the 120mm front it’s still less expensive than the Corsair fans, providing a good price to performance ratio and being significantly quieter.
So I think that settles it: I’ll be going with the BitFenix Spectre Pro fans for the case and radiators.
Now I don’t think I’d dream of trying to use the BitFenix or NoiseBlocker fans on the radiator for either the Corsair H60 or the ThermalTake Water 2.0 Performer, as both radiators are very high FPI. But for the AlphaCool XT45s I will be using for the full loop, it shouldn’t be a problem.
Back up to speed
The EVGA RMA came through with a refurbished card, and I ordered a second GTX 660 from NCIX as well. The first card arrived on Monday, the second on Friday. The first card went in with the power supply change, and I ran Unigine Valley against it to stress it a little. After the second card came, I did the same. In Thursday’s adjustment to the cable management, I made sure to leave a PCI-E power cable ready for the card so I didn’t have to redo everything again to install the second card.
By the way, Unigine Valley benchmarked at 2337 on the GTX 660 pair, compared to 2140 for my single GTX 770. This was run on the ExtremeHD preset with her resolution being 1920×1080 and mine being 1680×1050 (I’m running on 7 year-old Acer 20″ monitors, but I’ll be changing them out later this year). If I follow the settings listed in a TechPowerUp thread, which calls for 4xAA, then the scores become 2779 (hers) and 2655 (mine).
Both GTX 660s were also getting around 80C when running the benchmark, and given the hot air that’s being belched out the back of the case, I think a desk fan could be in order to help keep that cleared away, especially since I have the rear 140mm fan on the case as an intake fan.
One thing to also note: during the course of the benchmarking and burning in the cards with Unigine Valley, the fan on the RM1000 barely ever came on according to the Corsair Link, despite it pulling at times over 26A across the 12V rail – i.e. over 300 W of power draw. On the GS800, the fan would’ve been running nearly continuously under that load, or would’ve been off and on a lot more frequently, which would’ve reduced the lifespan of that fan.
So that definitely shows that with my wife’s setup, you don’t need a super high-end power supply covering all of it – a 500W 80+ certified power supply should do the trick, with a 600W being a little safer bet. The benefit of the high-rated high-wattage power supply, though, is that the supply is so efficient at providing power with so little of it lost to heat, the fan is much less likely to come on even under the heaviest load you can put on your system. Combine that with quiet fans – such as the BitFenix Spectre Pros I’ll be buying later, or something similar – and you’re going to be rigged for a fairly silent running, even before a fan controller comes into the mix.
And given that the RM1000 is currently going for only $160 on Amazon (normally goes for close to $200 elsewhere), and that’s a lot of power efficiency for the price.
Here’s the parts list for how things stand: PcPartPicker. Enjoy a couple shots of the current state of things.