An NVMe solid-state drive in a dual-Opteron server… Just ponder that for a moment. Why in the world would anyone do that?
The big reason: storage is cheap. And for 80 USD, a 2TB NVMe solid-state drive is really cheap. And given this is a much older virtualization server, there is no need to go with anything high end.
Specs:
- CPU: 2x AMD Opteron 6278
- RAM: 64GB Registered DDR-3 1600Mhz
- Storage: Samsung 850 EVO M.2 500GB
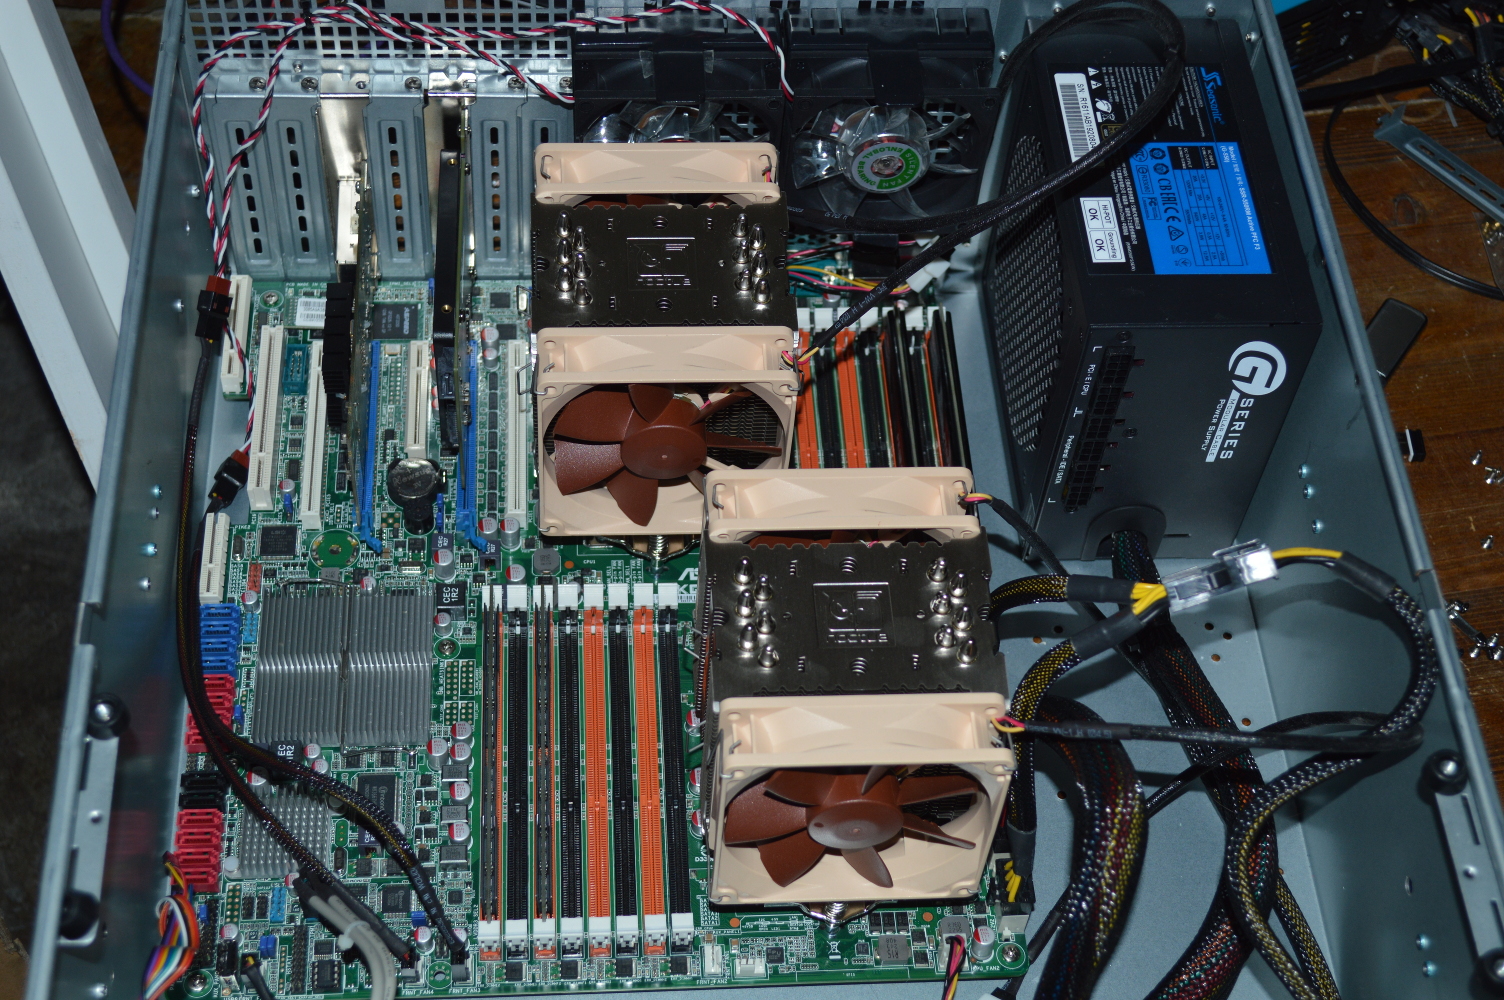
Recall that back in March 2018, I replaced an older dual-Xeon HP workstation with a dual-Opteron server setup for virtualization. Going away from a system made in the late 2000s to one with hardware from the early 2010s. But in doing that I was doubling the available core count. From a dual quad-core with HyperThreading, so 8 logical cores per processor, to two processors with 16 cores each. Later I upgraded the RAM to 64GB Registered ECC – after I accidentally bought registered sticks for Nasira and couldn’t sell them off.
And in building the system, I wanted to eliminate cables as best as possible. The CPU and ATX power connectors to the mainboard were unavoidable. But if a power or data cable could be avoided, I wanted to avoid it. The fans are powered off the mainboard, the GPU is onboard, so that leaves the storage.
And here, an SSD was the obvious choice. I had a 500GB Samsung 850 EVO I mistakenly bought for my wife’s upgrade to an i7-5820k for a mainboard that wouldn’t support it, and a StarTech M.2 to 2.5″ enclosure to use it in something else. But the enclosure still requires a power and data cable. So how to get around that? Thankfully I was able to buy a PCI-E adapter board that handled the power and data, so no additional cables.
Storage requirements
For most virtualization setups, 500GB is more than enough. My Plex VM sits on 32GB storage and uses about… half of it. (It runs off Fedora Server.) I have an OpenVPN instance on another VM that’s also 32GB and also running off about half of the space. And my only other virtual machine (at this moment, at least) is a mail server sitting on 64GB, but using 1/4th of that.
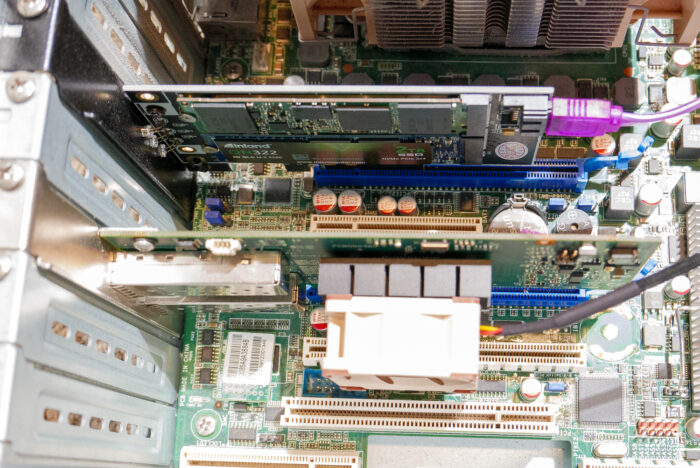
I’d been planning to upgrade the storage for a while as there are other projects I want to get into. And when I saw Micro Center having a sale on their Inland NVMe SSDs, and saw a 2TB NVMe SSD for only 80 USD, there was no way I could say No.
Alongside that I found an adapter board that could take one each of SATA M.2 and NVMe M.2 on the same board. It does require a SATA cable for the SATA M.2, unlike the previous adapter board, but nothing more. Both drives are powered by the PCI-E slot.
Wait, it works? But… bottleneck!
So did the system even recognize the drive? Well of course it did. And I had no reason to think it wouldn’t.
NVMe SSDs are PCI-Express devices after all, and the PCI-Express specification means that a PCI-Express 3.0 device can be used in a PCI-Express 2.0 slot. I already have that in Nasira, actually, where I’m using an NVMe drive as an SLOG.
But how well does it perform? Better than the SATA drive, I’ve definitely noticed. Plex is a lot snappier and the VMs load much faster. System updates on each VM are faster, too. And that along with the much better capacity was the point of that exercise.
It’s also a QLC drive with a rated top synchronous read speed only just a little higher than what PCI-E 2.0×4 can provide, so it was never going to saturate a PCI-E 3.0×4 connection anyway. And under this use case will never saturate a 2.0×4 connection. But it’s still be far better than a SATA SSD and doesn’t need any cables.
I was after the storage real estate, primarily. That it came in an NVMe SSD that I could install with an interface board and not have to worry about additional cables is the major bonus.
Cooling everything down
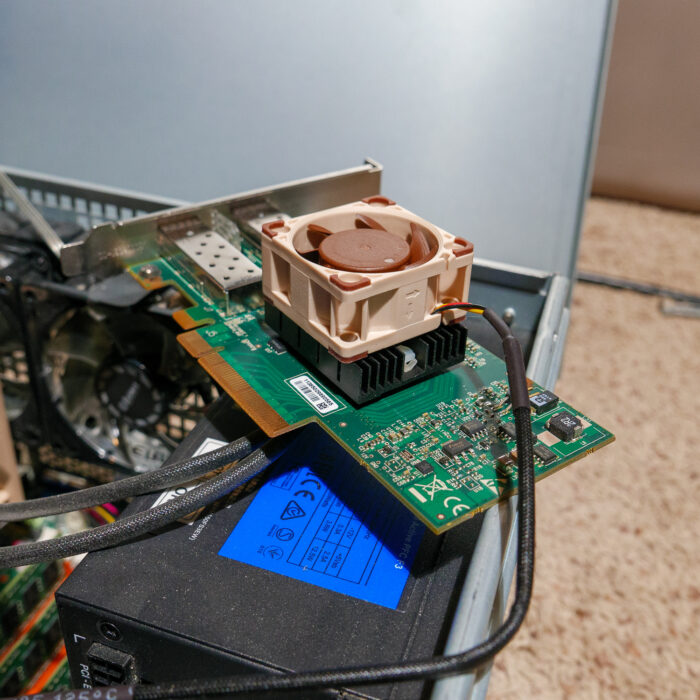
10GbE cards can run hot. Very hot, actually. So much so that I’ve actually considered watercooling the one in Mira. But as I discovered building my OPNsense router, the solution is simple: quiet 40mm fan and VHB tape to stick it to the heatsink. Problem solved. You don’t need to use a Noctua fan specifically, as there are plenty of quiet 40mm fans on the market. I just happened to have a Noctua 40mm fan that I wasn’t using for anything.
Goodbye, Proxmox!
As of the time I installed the new NVMe SSD, the server was still running Proxmox 5. And not even the latest minor version of that. Merely upgrading it to the latest 5.x version, let alone installing Proxmox 7 – the latest version as of this article – would require… a lot of work.
The easiest route would be to jettison the VMs and install Proxmox 7 clean. Trying to upgrade in-place would’ve been… “time consuming” wouldn’t adequately explain it. But that would only get me up to the latest version. Keeping it up to date is the greater chore.
Without a support subscription – €190 (€95 per CPU socket) per year for this box for the lowest tier – the only way to get minor version updates to keep Proxmox updated is through the DVD image. Then there’s the continual nagging whenever I log in that I don’t have a subscription:

So… I’m done with it. Just completely done with it.
So back to VMware, then, or what?
Hello, VirtualBox!
I was jettisoning the existing VMs regardless. Plex is easy to migrate, I no longer use the OpenVPN VM since building an OPNsense router, and the mail server was migrated to a physical box.
But for a much smoother and flexible upgrade path going forward, I moved to VirtualBox and Docker. And I went the full headless route, meaning creating and controlling the VMs through the command line. Sure it means creating VMs is a little more of a chore without a script to automate the process. Which is something that’ll be relatively easy to set up since my VMs will usually have pretty similar settings – core count, storage space, or memory will vary as needed. But the upgrade path is a LOT more flexible.
How so?
Ubuntu and Fedora (among others) allow for in-place upgrade to the next major version. My Plex VM, for example, had been getting upgraded in-place (using the dnf-plugin-system-upgrade package) since I first built this virtualization server with a fresh VM for Plex. That was Fedora 27. Didn’t need to touch it till now when I created the new VM with VirtualBox.
And VirtualBox can be upgraded via the official repository or – as is the case already with Plex, unless you enable the repository – manually on my own watch. Docker containers allow similar flexibility. Being able to use Windows Remote Desktop instead of the browser to interact with the VM’s terminal is also a bonus.
Now sure, updates on the bare metal system does mean shutting down all the VMs. But I’d have to do that with Proxmox or any virtualization system anyway.
You must be logged in to post a comment.