Back in January last year, I wrote an article clarifying one detail about the Dot Tune method for calibrating a Sigma lens. Sigma and Tamron lenses both can be individually calibrated at several different points. The prior article merely pointed out that “critical focus” for a Sigma and Tamron lens means the individual points noted in the Sigma and Tamron software.
But there was something else I came to realize with calibrating the Sigma and Tamron lenses.
Note: I’ve since migrated to the Nikon Z5 with the FTZ adapter, where the need to calibrate these lenses is basically nonexistent. And so I’ve cleared the calibrations from all my Sigma and Tamron lenses. So I’m putting this out for those who are still using DSLRs.
First, let’s revisit the original DotTune method as outlined in this video:
So here are the steps:
- Set up your target and camera – Nikon: set up for back-button AF (which you should be using anyway)
- Establish critical focus in Live View
- Switch to manual focus, if using a lens that doesn’t have MF override for AF – Nikon users: don’t do this
- Evaluate viewfinder focus confirmation
- Cycle AF tune values to find confirmed range
- Set final AF tune to the midpoint of that range
A couple other things to note:
- Turn off the image stabilization (VC for Tamron, OS for Sigma, etc.) if you can on the lens. This will make your life a LOT easier since the lens won’t try to compensate for anything. I discovered this in trying to tune my Tamron 24-70mm f/2.8 G2.
- Since all of your tuning will involve the center focus point, get your Live View and viewfinder focus point to the middle and lock it.
* * * * *
I pointed out in my prior article that “critical focus” for a Sigma or Tamron lens relies on the focus distance indicator on the lens when establishing focus in Live View. But I was wrong in how to actually calibrate the lens. It isn’t about finding one particular point that lands the solid dot, but moving the “confirmed range” up or down till its median value is as close to 0 as you can get.
The below steps will obviously apply to cameras with AF fine tuning. Prior to starting this, reset the lens to factory for its AF adjustments. Also bear in mind that you’re calibrating the lens to the camera, so once you calibrate the lens you’re likely not going to be able to move the lens to a different camera body and get similar results.
1. Set up your target and camera
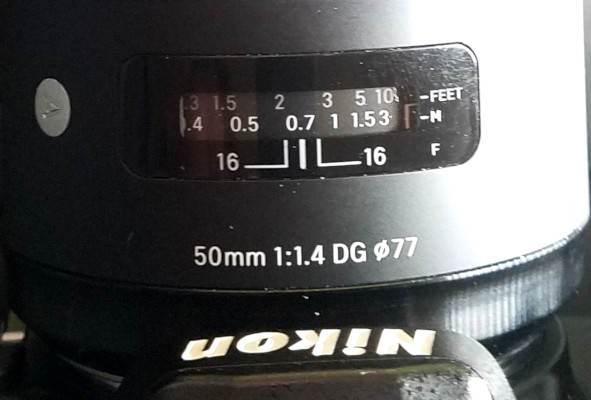
Set up your target and camera with your camera (and lens) perpendicular to the target. Set the target to the distance you will be calibrating as shown in the focus distance scale on the lens.
2. Establish critical focus in Live View
Keep adjusting the target’s distance to the camera forward or backward based on where the focus lands. You want to make sure the focus distance indicator lines up where the Sigma/Tamron software determines it needs to be.
3. Switch off Live View. Set AF fine tune value to 0 for the lens.
4. Half-press the shutter button to evaluate the viewfinder focus confirmation
5. Cycle AF tune values to find the confirmed range.
This range and its median value will determine whether to adjust the value higher or lower. You want to aim for a fine tune range with a median at -1 to +1, 0 obviously being ideal. Median values below -1 mean you need to give it a lower number, while above +1 mean you need to go higher. If you have a range with a median at -1 to +1, you likely can’t dial it in any better than that.
Repeat this evaluation for all focal lengths at this focus distance. Primes having only one will obviously be much easier. For example, on my Tamron 24-70mm f/2.8 G2, I’d need to evaluate at 24mm, 35mm, 50mm, and 70mm. Re-establish focus in Live View for each focal length. Bear in mind as well that focus breathing on your zoom lens may require you to adjust your distance to target.
6. Adjust the AF value up or down based on the confirmed range
This is definitely where you’ll need to keep track of your adjustments. A spreadsheet can help you here as well since you can use the built-in formulas to do your math: specifically the median function for evaluating the middle point between the low and high AF tune values.
Again in the end you’re looking for an AF tune value that produces a range with a median of -1 to +1 as best you can dial in.
7. Repeat steps 5 and 6 until the AF tune values for all focal lengths produce the desired median
8. Set the target to the next focus distance and repeat from step 2.
* * * * *
Bear in mind…
1. The target is important.
If you have a laser printer at home – yes, it needs to be a laser printer, not an inkjet – let me recommend using Lorem ipsum. You can find generators for it online quite easily. Take a page of it printed at various font sizes, with the larger font sizes for the longer focal distances. Times New Roman or Courier (looks like a typewriter) will probably be the best fonts for this as they should produce sharp results on your printer, but Arial should work as well.
Alternatively you can use one of the many focus testing images online. I cross-confirmed the calibration using the GhettoCAL template. I used only the square/circle pattern, not the distance scale. Printed out full size, it should produce about a 4″x4″ square, which I was able to use for my Tamron 24-70mm f/2.8 and Sigma 50mm f/1.4 lenses. Haven’t tried yet on my Tamron 70-200mm f/2.8, but I suspect it likely won’t work nearly as well and I’ll need a larger target. And more room.
Exponentially so if I were to try it with my Sigma 150-600mm…
2. Values you set at shorter focal lengths will affect longer focal lengths
And on some lenses, each value may actually affect each other, so make sure to reconfirm all values – though this doesn’t appear to be the case on any lens I’ve calibrated thus far. So if you’re tuning a zoom lens, such as my aforementioned Tamron 24-70mm f/2.8 G2, make sure you have a comfortable setup for testing and programming the lens as you’re gonna be at it for a while.
3. Adjusting by just ±1 could have significant effect
The tune values for your lens compared to the fine tune values in camera are obviously not the same. And adjusting by +1 on the lens could adjust your median by -2 or even -3. So if you have a median of -4, for example, adjusting just -1 could bring your median to -2 or even -1.
4. Don’t be afraid to set a baseline offset
If your AF fine tune is similar to the Nikon D7200, you have the option to set a “Default” AF fine tune value that applies to all lenses. Any additional per-lens fine tuning then adjusts relative to that. This can allow you to test a baseline offset for a lens when fine-tuning.
If you find your Sigma or Tamron lens is very heavily front focusing or back focusing, setting the “Default” to +10 or -10, respectively, (or another value depending on where things lie) before dialing in the lens further in the Sigma or Tamron software could allow you to bring things under control better.
Adjusting the baseline offset may also make the difference between a calibration that you can’t quite get zeroed in, dancing between -2 (or -3) and +2 (or +3) with a ±1 adjustment in the software and one that lands on a median of ±1 or 0.
Then once you have the lens dialed in, whatever you set as the “Default” will be the baseline offset for the lens set in the AF Fine Tune, with the default reset to 0.
You must be logged in to post a comment.