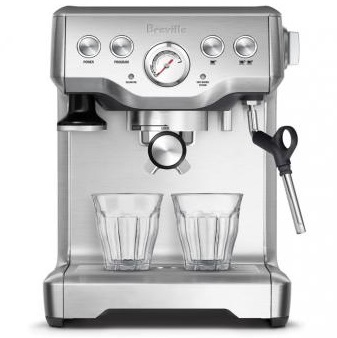
It’s been about 18 months that I’ve owned my Breville Infuser espresso maker. At $500, it’s a great mid-range option for home espresso. It is more capable than the lower-tier options from DeLonghi and Saeco, but not quite up there with options from companies like Rancilio, Nuovo Simonelli, and Rocket — oh how I wish I could own a Rocket espresso maker…
But similar to my review on the DeLonghi EC-155 (a great low-budget option, especially when you pair it with the steam wand and basket mods), I’m going to go over some of the things to keep in mind, some points that are good to know if you decide to go with this espresso maker. One thing to note up front is that the user manual is available from Breville’s website, so if you’re considering this machine, definitely give it a read.
1. No warm-up time.
That’s right, there is no warm-up time with this espresso maker. Okay, not 100% true as there is an initialization cycle that runs when you turn the machine, but it’s brief.
This is due in part to the Infuser’s thermocoil — the initialization cycle is for an initial warm-up on this. For those not in the know, a thermocoil is where water is passed through a coil (duh!) which has a heating element running alongside it to heat it. The cold water going into the coil should be the desired temperature coming out. A thermocoil can also be used to chill liquids, as Adam Savage demonstrated on an episode of Mythbusters. Thermocoils and thermoblocks are typically used in full-automatic espresso machines, and the Infuser is one of only a handful of semi-automatic espresso machines using one.
Contrast this with the many boiler espresso makers out there. The larger the boiler, the longer the warm-up time. A machine as small as the DeLonghi EC-155 has a 10 to 15 minute warm-up, while a machine like the Rancilio Silvia is looking at 30 to 45 minutes. Yikes! At least the EC-155 could warm up while you’re in the shower. If there’s a lot of metal in the machine — i.e. Rancilio Silvia and virtually everything in the prosumer lines — then the warm-up time is increased as well so all of that metal can come up to temperature. While there are “short cuts” you might be able to take to get the machine warmed up faster, there are trade-offs to doing this.
But again, the Infuser’s thermocoil means there is virtually no warm-up time. This is significant if you typically make espresso or a latte/cappuccino in the morning before work. For me it was the main selling point that pulled me away from the Rancilio Silvia and toward the Breville Infuser.
2. Automatic clean cycle
There is a nagging light that comes on to remind you to run the clean cycle on the machine. This is actually a good thing, as regular cleaning (and the reminder to regularly clean it) helps keep the brewhead clean and free of crap that an accumulate over time.
The machine comes with a couple Breville cleaning tablets and a special insert for using them. The insert creates back pressure simulating a loose espresso puck, which helps the cleaning tablets do their job. The Breville tablets are expensive though, and the more coffee you make, the more often you’ll need them. But you can save a little money and go with the Cafiza cleaning tablets instead. I typically use three tablets for a cleaning cycle — even with using that many you’re still coming out ahead.
The cleaning cycle typically uses about 16 fl.oz. (~473 mL) of water, so it’s not necessary to have the tank completely full, but make sure it’s at least half full when doing the clean cycle and you’ll be fine.
3. Portafilter and baskets
The double basket is tapered. For most machines this isn’t the case and I’m actually looking around to see if there’s a basket from another machine I can substitute into this. I also wish there was a bottomless portafilter available like the one for the Breville Double Boiler.
This machine comes with two sets of baskets: pressurized and non-pressurized. This is great for beginners as you can go from the pressurized baskets to the non-pressurized baskets as you progress. The single-cup pressurized basket is used for the cleaning cycle.
You do need a separate grinder for the non-pressurized baskets, and you need to grind for each shot. The Breville Smart Grinder is about perfect for this machine, but go higher-end if you can afford it. The grinder actually matters more than the machine. I currently use the Breville Smart Grinder, but I’m looking at upgrading to something better later this year.
4. Descaling and water quality
The cleaning cycle is relatively automatic. Descaling the machine, on the other hand, is far from. Like with all coffee makers, espresso included, you will need to descale this machine on regular intervals. The manual recommends once per month. This will vary based on water quality — harder water = more frequent descaling.
Now in my setup I have been using a Brita pitcher to filter water. The water tank in the machine is filtered as well. So I’m basically using dual-filtered water. This can cut down on how often you need to descale the machine, but not by much.
The manual recommends vinegar, and I’ve been using that to descale the machine while looking at other options. Descaling does include the steam wand as well, but hot water does not come out the steam wand like it would on the Rancilio Silvia. This makes de-scaling a little more time consuming, not to mention it makes the rinse cycle a little more involved. Basically prepare for your home to smell like vinegar when you descale it — on the plus side, if you’re having sinus problems, this could help alleviate congestion.
I typically buy coffee in 2lb bags, and that lasts about 5 or 6 weeks with how often I typically make espresso. So I time the descaling with each new bag. It’s just easier to remember.
5. Included milk pitcher
The included pitcher is about 16 oz, which is perfect for a larger latte with a double-shot of espresso. If you typically make single-shot lattes or cappuccinos, I’d recommend picking up a 12oz pitcher. If you’re upgrading from another espresso machine and already have a 16oz or 20oz pitcher, the extra can be helpful if you typically make lattes or cappuccinos for multiple people — a little more to clean, but less preparation time.
6. Programmability and dialing in the machine
Espresso machines, of course, need to be dialed in with your grinder. It’s just the nature of the beast. The beauty of this machine is the fact you can program it, but it’s both a blessing and a curse. You program the machine by starting and stopping a shot, but it records water volume, not timing. Water volume is only one variable in the entire espresso shot. The coffee mass and grind plus the tamp make the other parts. So while the machine is handling one variable, consistency still falls entirely on your shoulders.
Again, a blessing and a curse.
Variances in your grind or tamp could alter the fluid volume of the shot and/or the timing of it. The coffee in the puck will absorb some of the water. A looser grind or lighter tamp will allow more water through faster. Tighter grind or harder tamp will cause the puck to retain more water and travel through slower.
So this can be great for learning how to be consistent with each shot, but can be a pain if you’re not experienced with making espresso. Weighing your beans with each shot will help you keep things consistent.
To get the best result dialing in your machine, you need to brew espresso the way you intend to do so regularly. This means that if you typically have a hot basket when brewing espresso, you need to have a hot basket dialing it in. You basically need to maintain as much consistency on all applicable variables while dialing in to avoid variances during routine use after you program it.
7. Steam wand
The Infuser has a traditional steam wand, but you can buy a “froth enhancer” to turn it into a panarello-type wand.
When you first turn the machine to steam, there will probably be water squirting through the steam wand, so make sure it’s pointed toward the drip tray to avoid having a little clean up. As the light is blinking it’s going to be coming up to steam temperature, and you’ll start hearing steam coming out of the steam wand. When it reaches temperature, you’ll hear the tell-tale marching steps as water is pushed through the thermocoil — this is so it can maintain a level of pressure through the steam wand. When you turn the machine back off of steam, it will auto-fill the thermocoil with water as the temperature on it is brought back down — meaning you don’t need to go through any kind of “temperature surfing” like on other single-boiler espresso makers.
As water can come out of the steam wand before steam, you don’t want the steam wand in your milk from the outset. Now some would suggest letting it come up to steam, turning off the steam, letting the auto-fill happen, then turning the steam right back on. That’s not necessary.
Here’s what to do instead. Let the water push through the steam wand and come up to temperature. When the steps start, count about 10 of them and turn off the steam. The machine should not go through it’s auto-fill at this point, allowing you to put the wand into the milk, turn the steam back on and steam the milk. If you let the stepping go for too long, the machine will do it’s auto-fill, which means you’ll need to wait longer to steam your milk.
Can you get latte art from this machine? I don’t really try for it, but I think you should still be able to do so.
Now one thing to bear in mind is that this machine is slower than other mid-range machines for steaming milk. But this also allows you to gain a bit of control over it as well, making it a lot easier to learn — and if you want to practice steaming milk without going through a ton of milk, use soapy water.